• Home
  • About
  • Contact
  • ado.net
  • angular
  • c#.net
  • design patterns
  • linq
  • mvc
  • .net core
    • .Net Core MVC
    • Blazor Tutorials
  • sql
  • web api
  • dotnet
    • SOLID Principles
    • Entity Framework
    • C#.NET Programs and Algorithms
  • Others
    • C# Interview Questions
    • SQL Server Questions
    • ASP.NET Questions
    • MVC Questions
    • Web API Questions
    • .Net Core Questions
    • Data Structures and Algorithms

Saturday, July 18, 2020

Web API Versioning Using Custom Header

 Admin     July 18, 2020     .Net, Asp.Net, C#, Web API     No comments   

In this article, I am going to discuss Web API Versioning Using Custom Header with an example. This is a continuation part of our previous article, so please read our previous article before proceeding to this article where we discussed Web API Versioning using Query String Parameter.

In our previous article, we implemented a CustomControllerSelector which will retrieve the version number from a query string parameter, and then based on the version number it will select the appropriate controller.

To implement the Web API Versioning using custom header, all we need to do is to change the logic of the CustomControllerSelector class to read the version number from the custom header instead of the query string parameter.

Modify the CustomControllerSelector class as shown below. The code is self-explained, so please go through the comments.
using System.Linq;
using System.Net.Http;
using System.Web.Http;
using System.Web.Http.Controllers;
using System.Web.Http.Dispatcher;
namespace WebAPIVersioning.Custom
{
    // Derive the CustomControllerSelector from the DefaultHttpControllerSelector class
    public class CustomControllerSelector : DefaultHttpControllerSelector
    {
        private HttpConfiguration _config;
        public CustomControllerSelector(HttpConfiguration config) : base(config)
        {
            _config = config;
        }
        public override HttpControllerDescriptor SelectController(HttpRequestMessage request)
        {
            // First fetch all the available Web API controllers
            var controllers = GetControllerMapping();
            // Get the controller name and the parameter values from the request URI
            var routeData = request.GetRouteData();
            // Get the controller name from route data.
            // The name of the controller in our case is "Employees"
            var controllerName = routeData.Values["controller"].ToString();
            // Set the Default version number to 1
            string versionNumber = "1";
            // Get the version number from Custom header
            // You can give any name to this custom header. You have to use this
            // same header to specify the version number when issuing a request
            string customHeader = "X-EmployeesService-Version";
            if (request.Headers.Contains(customHeader))
            {
                versionNumber = request.Headers.GetValues(customHeader).FirstOrDefault();
            }
            if (versionNumber == "1")
            {
                // if the version number is 1, then append V1 to the controller name.
                // So at this point the, controller name will become EmployeesV1
                controllerName = controllerName + "V1";
            }
            else
            {
                // if version number is 2, then append V2 to the controller name.
                // So at this point the controller name will become EmployeesV2
                controllerName = controllerName + "V2";
            }
            HttpControllerDescriptor controllerDescriptor;
            if (controllers.TryGetValue(controllerName, out controllerDescriptor))
            {
                return controllerDescriptor;
            }
            return null;
        }
    }
}
That’s it; we have done with our implementation. Run the application and issue a request to /api/employees using either Fiddler or Postman. If you are new to Fiddler or Postman, then please read the following two articles where we discussed how to download, install, and use Fiddler and Postman to test Web API Services.

Using Fiddler to Test Web API Services

Using Postman to Test Web API Services

Here we are going to use the Postman to test the service
Test1:
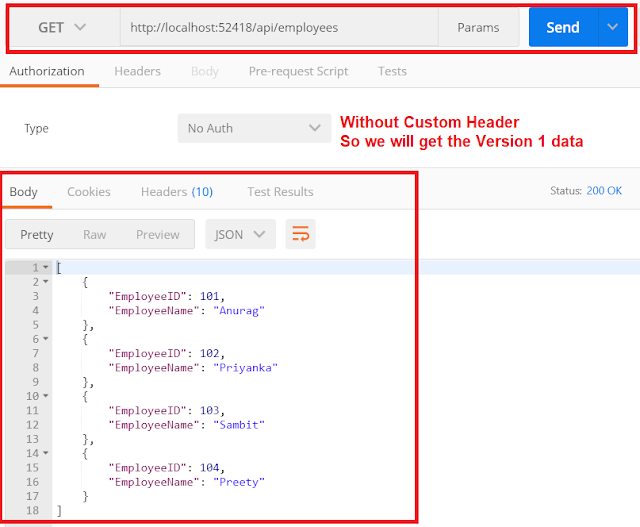
In the below request, we have not specified the custom header. So we issue the request, we get back EmployeeV1 objects as the response the reason is we have set version 1 as the default in our code.
Web API Versioning Using Custom Header

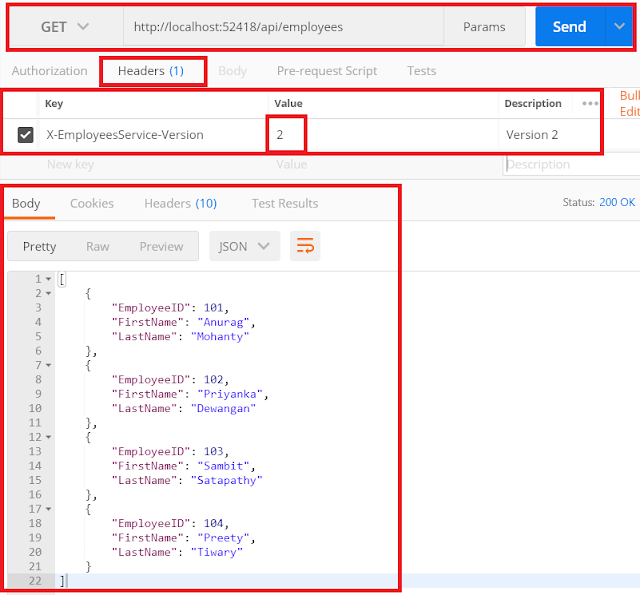
Test2: Let’s issue another request using the custom header “X-EmployeesService-Version” as shown below.
Web API Versioning Using Custom Header

As shown in the above image, we got the version 2 response as expected this is because in the header we pass the value 2 for the custom header X-EmployeesService-Version.

In the next article, I am going to discuss how to implement the Web API versioning using the Accept Header with an example. Here, In this article, I try to explain how to implement Web API Versioning Using Custom Header step by step with an example. I hope this article will help you with your needs. I would like to have your feedback. Please post your feedback, question, or comments about this article.

Summary:
I hope this post will be helpful to understand the concept of how to set Web API Versioning Using Custom Header
Please share this post with your friends and colleagues.
For any queries please post a comment below.
Happy Coding 😉
Read More
  • Share This:  
  •  Facebook
  •  Twitter
  •  Google+
  •  Stumble
  •  Digg

Friday, July 17, 2020

Web API Versioning using Query String Parameter

 Admin     July 17, 2020     .Net, Asp.Net, C#, Web API     No comments   

In this article, I am going to discuss Web API Versioning using the Query String Parameter with an example. Please read our previous article before proceeding to this article as we are going to work with the same example. In our previous article, we discussed the following things in detail.
  1. Why Web API versioning is required?
  2. Different options are available in Web API to maintain the versioning.
  3. How to version a Web API using URI’s?
In this article, we want to implement versioning a Web API service using Query String Parameter. Let’s have a look at the following table
Web API Versioning using Query String Parameter

So when we pass the query string v=1 then we want to return Version 1 of the Web API service and similarly when we pass v=2 then we need to return version 2 of the Web API service. If we don’t specify the query string then by default it will return the version 1 of the Web API Service.

How the Web API Framework select a Controller?
Before we start implementing the Web API versioning using a query string parameter, let first understand how the Web API Framework selects a controller when a request is issued to a Web API service. For example, let us understand how the Web API framework selects the controller when a request is issued to the following URI

/api/employees/1

In ASP.NET Web API, there is a class called DefaultHttpControllerSelector. This class has a method called SelectController() which will select the controller based on the information it has in the URI.

The above class uses the below algorithm to find the controller:
  1. First, it will look at the route dictionary collection for the key “controller”.
  2. Secondly, it takes the value for the “controller” key and appends the string “Controller” to get the controller type name.
  3. Finally, it looks for a Web API controller with this type name.
For example, if the route dictionary contains the key-value pair “controller” = “Employees”, then the controller type is “EmployeesController”. If there is no matching type found, or it found multiple matches, then the ASP.NET WEB API Framework simply returns an error to the client.

In our example, in the URI we have
  1. The name of the controller, in this case, Employees
  2. The id parameter value, in this case, 1
So from the URI, the SelectController() method takes the name of the controller in this case “Employees” and try to find the “EmployeesController” in the route dictionary and if it founds then returns it. This is the default implementation to select the Web API Controller. If you want to learn more about the controller and action selector in Web API, then please refer to the following article.

The Controller and Action Selector in Web API

The above default implementation of Controller Selection will not work for us because in our Web API Service we do not have any controller with the name EmployeesController. Instead, we have the following two controllers
  1. EmployeesV1Controller and
  2. EmployeesV2Controller
So, when a request is issued to the following URI, depending on the query string parameter “v” value we want to select the appropriate controller. If the value is 1, then we need to select the EmployeesV1Controller, and if the value is 2, then we need to select the EmployeesV2Controller.

/api/employees?v=1

How to Maintain Web API service versioning using a query string parameter?
Step1: As we already discussed, the default implementation of controller selection provided by Web API Framework will not work for us, so we need to provide our own custom controller selector implementation.

To do this, add a new folder to your project with the name “Custom” and then add a class file within the Custom Folder and name it as “CustomControllerSelector“. Once you add the class file, then copy and paste the following code. The code is self-explained so please go through the comments.
using System.Net.Http;
using System.Web;
using System.Web.Http;
using System.Web.Http.Controllers;
using System.Web.Http.Dispatcher;
namespace WebAPIVersioning.Custom
{
    // Derive the CustomControllerSelector from the DefaultHttpControllerSelector class
    public class CustomControllerSelector : DefaultHttpControllerSelector
    {
        private HttpConfiguration _config;
        public CustomControllerSelector(HttpConfiguration config) : base(config)
        {
            _config = config;
        }
        public override HttpControllerDescriptor SelectController(HttpRequestMessage request)
        {
            // First fetch all the available Web API controllers
            var controllers = GetControllerMapping();
            // Get the controller name and the parameter values from the request URI
            var routeData = request.GetRouteData();
            // Get the controller name from route data.
            // The name of the controller in our case is "Employees"
            var controllerName = routeData.Values["controller"].ToString();
            // Set the Default version number to 1
            string versionNumber = "1";
            var versionQueryString = HttpUtility.ParseQueryString(request.RequestUri.Query);
            if (versionQueryString["v"] != null)
            {
                versionNumber = versionQueryString["v"];
            }
            if (versionNumber == "1")
            {
                // if the version number is 1, then append V1 to the controller name.
                // So at this point the, controller name will become EmployeesV1
                controllerName = controllerName + "V1";
            }
            else
            {
                // if version number is 2, then append V2 to the controller name.
                // So at this point the controller name will become EmployeesV2
                controllerName = controllerName + "V2";
            }
            HttpControllerDescriptor controllerDescriptor;
            if (controllers.TryGetValue(controllerName, out controllerDescriptor))
            {
                return controllerDescriptor;
            }
            return null;
        }
    }
}
Step2:
Now we need to replace the default controller selector with our custom controller selector and we need to do this within the WebApiConfig.cs file. Notice, here we are replacing the IHttpControllerSelector, with our CustomControllerSelector. The DefaultHttpControllerSelector implements IHttpControllerSelector, so that is the reason we are replacing IHttpControllerSelector.
Web API Versioning using Query String Parameter

Step3: Include the following default route in WebApiConfig.cs
Web API Versioning using Query String Parameter

After the above two changes in the WebApiConfig.cs file, your WebApiConfig.csfile should looks as shown below.
using System.Web.Http;
using System.Web.Http.Dispatcher;
using WebAPIVersioning.Custom;
namespace WebAPIVersioning
{
    public static class WebApiConfig
    {
        public static void Register(HttpConfiguration config)
        {
            config.MapHttpAttributeRoutes();
            
            config.Services.Replace(typeof(IHttpControllerSelector),
                               new CustomControllerSelector(config));
            
            config.Routes.MapHttpRoute(
                name: "DefaultRoute",
                routeTemplate: "api/{controller}/{id}",
                defaults: new { id = RouteParameter.Optional }
            );
        }
    }
}
Step4:
Finally remove the [Route] attribute, from all the action methods of both EmployeesV1Controller and EmployeesV2Controller as shown below.
Web API Versioning using Query String Parameter

EmployeesV2Controller
Web API Versioning using Query String Parameter

That’s it; we have done with our implementation. Now run the application and navigates the following URI and you will see the output as expected.

/api/employees
/api/employees?v=1
/api/employees?v=2

In the next article, I am going to discuss how to implement the Web API Versioning using Custom Header with an example. Here, In this article, I try to explain how to implement Web API Versioning Using Query String parameter step by step with an example. I hope this article will help you with your needs. I would like to have your feedback. Please post your feedback, question, or comments about this article.

Summary:
I hope this post will be helpful to understand how to maintain Web API Versioning using Query String Parameter
Please share this post with your friends and colleagues.
For any queries please post a comment below.
Happy Coding 😉
Read More
  • Share This:  
  •  Facebook
  •  Twitter
  •  Google+
  •  Stumble
  •  Digg

ASP.NET Web API Versioning Using URI

 Admin     July 17, 2020     .Net, Asp.Net, C#, Web API     No comments   

In this article, I am going to discuss the Web API Versioning Using URI with an example. Please read our previous article where we discussed the HMAC Authentication in ASP.NET Web API application with example. As part of this article, we are going to discuss the following pointers in detail.
  1. Why Web API versioning is required?
  2. Different options are available in Web API to maintain the versioning.
  3. How to version a Web API using URI’s?
Why Web API versioning is required?
Once you develop and deploy a Web API service then different clients start consuming your Web API services.

As you know, day by day the business grows and once the business grows then the requirement may change, and once the requirement change then you may need to change the services as well, but the important thing you need to keep in mind is that you need to do the changes to the services in such a way that it should not break any existing client applications who already consuming your services.

This is the ideal scenario when the Web API versioning plays an important role. You need to keep the existing services as it is so that the existing client applications will not break, they worked as it is, and you need to develop a new version of the Web API service which will start consuming by the new client applications.

What are the Different options available in Web API to maintain the versioning?
The different options that are available to maintain versioning are as follows
  1. URI’s
  2. Query String
  3. Version Header
  4. Accept Header
  5. Media Type
How to version a Web API using URI’s?
In this article, I am going to discuss how to maintain versioning using URIs. In our upcoming articles, I will discuss the rest of the versioning options one by one. So let us understand Web API Versioning using URI’s with an example.

Create one empty ASP.NET Web API application with the name WebAPIVersioning. Once you create the application, let’s create the following EmployeeV1 model within the Models folder.

EmployeeV1.cs
namespace WebAPIVersioning.Models
{
    public class EmployeeV1
    {
        public int EmployeeID { get; set; }
        public string EmployeeName { get; set; }
    }
}
Version 1 of the above Employee class (EmployeeV1) has just 2 properties (EmployeeID & EmployeeName).

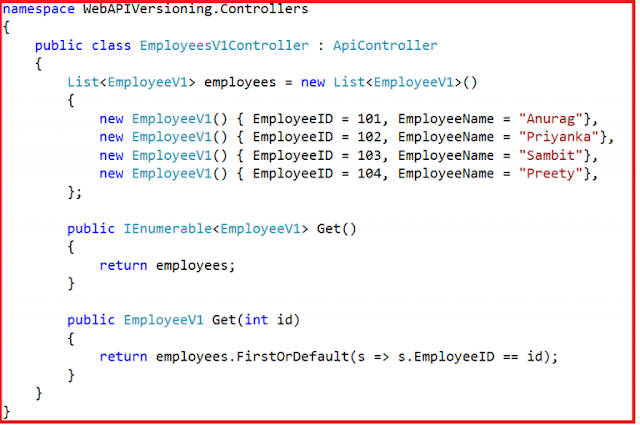
Let’s create an empty Web API controller with the name EmployeesV1Controller within the Controllers folder which will act as our version 1 controller. Once you create the controller, then please copy and paste the following code in it.
using System.Web.Http;
using WebAPIVersioning.Models;
using System.Collections.Generic;
using System.Linq;
namespace WebAPIVersioning.Controllers
{
    public class EmployeesV1Controller : ApiController
    {
        List<EmployeeV1> employees = new List<EmployeeV1>()
        {
            new EmployeeV1() { EmployeeID = 101, EmployeeName = "Anurag"},
            new EmployeeV1() { EmployeeID = 102, EmployeeName = "Priyanka"},
            new EmployeeV1() { EmployeeID = 103, EmployeeName = "Sambit"},
            new EmployeeV1() { EmployeeID = 104, EmployeeName = "Preety"},
        };
        public IEnumerable<EmployeeV1> Get()
        {
            return employees;
        }
        public EmployeeV1 Get(int id)
        {
            return employees.FirstOrDefault(s => s.EmployeeID == id);
        }
    }
}
Finally, modify the WebApiConfig.cs file as shown below.
using System.Web.Http;
namespace WebAPIVersioning
{
    public static class WebApiConfig
    {
        public static void Register(HttpConfiguration config)
        {
            config.MapHttpAttributeRoutes();
            config.Routes.MapHttpRoute(
                name: "Version1",
                routeTemplate: "api/v1/employees/{id}",
                defaults: new { id = RouteParameter.Optional, controller = "EmployeesV1" }
            );
        }
    }
}
The clients of our Version1 Web API service can use the following URLs to get either the list of all employees or a specific employee by using the EmployeeID. At the moment, as part of the employee objects, the service returns the Employee Id and Name properties.
Web API Versioning Using URI

Implementing Web API Versioning using URI
Let’s say the business grows and as a result, the requirements have changed and now some of the new clients want the FirstName and LastName properties instead of the Name property. If we change the Version 1 Web API service, then it will break all the existing client applications. So there is a need to create Version 2 of the Web SPI service which will be consumed by the new clients who want the FirstName and LastName properties instead of the Name property.

If we do so, I mean if we create Version 2 of the Web API Service, then all the existing client applications will not break, they work as it is as before and now they have 2 options. If they want they can make use of the version 2 Web API service by making changes to their application or else they still continue their work as it is without changing their application.

So, the important point to keep in mind is that with Web API Versioning we are not breaking any existing client application and at the same time we are also satisfying the new client requirements.

Following are the steps to create Version 2 of the Web API Service
Step1: Add a class file within the Models folder with the name it EmployeeV2 and then copy and paste the following code.
namespace WebAPIVersioning.Models
{
    public class EmployeeV2
    {
        public int EmployeeID { get; set; }
        public string FirstName { get; set; }
        public string LastName { get; set; }
    }
}
Notice in EmployeeV2 class, instead of the Name property, we have the FirstName and LastName properties.

Step2: Add a new Web API 2 empty controller within the Controllers folder with the name “EmployeesV2Controller” and then copy and paste the following code.
using System.Collections.Generic;
using System.Linq;
using System.Web.Http;
using WebAPIVersioning.Models;
namespace WebAPIVersioning.Controllers
{
    public class EmployeesV2Controller : ApiController
    {
        List<EmployeeV2> employees = new List<EmployeeV2>()
        {
            new EmployeeV2() { EmployeeID = 101, FirstName = "Anurag", LastName = "Mohanty"},
            new EmployeeV2() { EmployeeID = 102, FirstName = "Priyanka", LastName = "Dewangan"},
            new EmployeeV2() { EmployeeID = 103, FirstName = "Sambit", LastName = "Satapathy"},
            new EmployeeV2() { EmployeeID = 104, FirstName = "Preety", LastName = "Tiwary"},
        };
        public IEnumerable<EmployeeV2> Get()
        {
            return employees;
        }
        public EmployeeV2 Get(int id)
        {
            return employees.FirstOrDefault(s => s.EmployeeID == id);
        }
    }
}
Now, the “EmployeesV2Controller” returns the “EmployV2” object that has the FirstName and LastName properties instead of the Name property.

Step3: Modify the WebApiConfig.cs file as shown below.
using System.Web.Http;
namespace WebAPIVersioning
{
    public static class WebApiConfig
    {
        public static void Register(HttpConfiguration config)
        {
            config.MapHttpAttributeRoutes();
            config.Routes.MapHttpRoute(
                name: "Version1",
                routeTemplate: "api/v1/employees/{id}",
                defaults: new { id = RouteParameter.Optional, controller = "EmployeesV1" }
            );
            config.Routes.MapHttpRoute(
                name: "Version2",
                routeTemplate: "api/v2/employees/{id}",
                defaults: new { id = RouteParameter.Optional, controller = "EmployeesV2" }
            );
        }
    }
}
As shown in the above WebApiConfig.cs file, now we have 2 routes. Notice the route template, for each of the routes. The Version 1 clients use “/api/v1/employees/{id}” route while the Version 2 clients use “/api/v2/employees/{id}” route

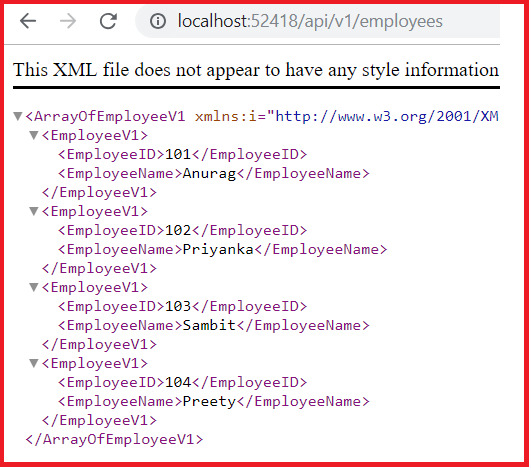
That’s it. We have implemented the versioning in our Web API service. So, if we navigate to /api/v1/employees – We get the employee with Employee Id and Name properties as shown below
Web API Versioning Using URI

/api/v2/employees – We get employees with Employee Id, FirstName and LastName properties as shown below.
Web API Versioning Using URI

At the moment we are using the convention-based routing to implement the Web API versioning. We can also use the Attribute Routing instead of convention-based routing to implement the Web API versioning. What we need to do is, we need to use the [Route] attribute on methods in EmployeesV1Controller and EmployeesV2Controller as shown below.

EmployeesV1Controller
namespace WebAPIVersioning.Controllers
{
    public class EmployeesV1Controller : ApiController
    {
        List<EmployeeV1> employees = new List<EmployeeV1>()
        {
            new EmployeeV1() { EmployeeID = 101, EmployeeName = "Anurag"},
            new EmployeeV1() { EmployeeID = 102, EmployeeName = "Priyanka"},
            new EmployeeV1() { EmployeeID = 103, EmployeeName = "Sambit"},
            new EmployeeV1() { EmployeeID = 104, EmployeeName = "Preety"},
        };
        [Route("api/v1/employees")]
        public IEnumerable<EmployeeV1> Get()
        {
            return employees;
        }
        [Route("api/v1/employees/{id}")]
        public EmployeeV1 Get(int id)
        {
            return employees.FirstOrDefault(s => s.EmployeeID == id);
        }
    }
}
EmployeesV2Controller
namespace WebAPIVersioning.Controllers
{
    public class EmployeesV2Controller : ApiController
    {
        List<EmployeeV2> employees = new List<EmployeeV2>()
        {
            new EmployeeV2() { EmployeeID = 101, FirstName = "Anurag", LastName = "Mohanty"},
            new EmployeeV2() { EmployeeID = 102, FirstName = "Priyanka", LastName = "Dewangan"},
            new EmployeeV2() { EmployeeID = 103, FirstName = "Sambit", LastName = "Satapathy"},
            new EmployeeV2() { EmployeeID = 104, FirstName = "Preety", LastName = "Tiwary"},
        };
        [Route("api/v2/employees")]
        public IEnumerable<EmployeeV2> Get()
        {
            return employees;
        }
        [Route("api/v2/employees/{id}")]
        public EmployeeV2 Get(int id)
        {
            return employees.FirstOrDefault(s => s.EmployeeID == id);
        }
    }
}
As we are using the Attribute Routing, so we can safely comment following 2 route templates in WebApiConfig.cs file
namespace WebAPIVersioning
{
    public static class WebApiConfig
    {
        public static void Register(HttpConfiguration config)
        {
            config.MapHttpAttributeRoutes();
            //config.Routes.MapHttpRoute(
            //    name: "Version1",
            //    routeTemplate: "api/v1/employees/{id}",
            //    defaults: new { id = RouteParameter.Optional, controller = "EmployeesV1" }
            //);
            //config.Routes.MapHttpRoute(
            //    name: "Version2",
            //    routeTemplate: "api/v2/employees/{id}",
            //    defaults: new { id = RouteParameter.Optional, controller = "EmployeesV2" }
            //);
        }
    }
}
At this point, build the solution and test the application and it should work exactly the same way as before.

In the next article, I am going to discuss Web API Versioning using Query String Parameter with an example. Here, in this article, I try to explain how to implement Web API Versioning Using URI step by step with an example. I hope this article will help you with your needs. I would like to have your feedback. Please post your feedback, question, or comments about this article.

Summary:
I hope this post will be helpful to understand the concept of versioning in Web API
Please share this post with your friends and colleagues.
For any queries please post a comment below.
Happy Coding 😉
Read More
  • Share This:  
  •  Facebook
  •  Twitter
  •  Google+
  •  Stumble
  •  Digg

Thursday, July 16, 2020

Enable HTTPS in Web API Service

 Admin     July 16, 2020     .Net, Asp.Net, C#, Web API     No comments   

In this article, I am going to discuss How to enable HTTPS in Web API Service with an example. In our previous article, we discussed how to enable SSL in the Visual Studio Development Server. Please read our previous article before proceeding to this article as we are going to work with the same example that we worked in our previous article.

At the moment, we can use both the HTTP and HTTPS to invoke the Web API resources as shown below and both the URI will give you the same result.

http://localhost:55486/api/employees

https://localhost:44300/api/employees

In this article, we are going to discuss how to enable HTTPS in Web API Service means once we enabled the HTTPS, if a request is issued using the HTTP then we want that request to be automatically redirected to HTTPS.

Point to Remember: If you are coming from the ASP.NET MVC background, then you may be tempted to use the built-in RequireHttpsAttribute but the sad thing is that this attribute is not supported in Web API.

How to enable HTTPS in Web API Service?
You need to follow the below two steps to enable HTTPS in Web API.

Step1:
Right-click on the Models folder and add a class file with the name CustomRequireHttpsAttribute and then copy and paste the following code.
using System;
using System.Net;
using System.Net.Http;
using System.Text;
using System.Web.Http.Controllers;
using System.Web.Http.Filters;
namespace WebAPIEnableHTTPS.Models
{
    public class CustomRequireHttpsAttribute : AuthorizationFilterAttribute
    {
        public override void OnAuthorization(HttpActionContext actionContext)
        {
            //both the request is not https
            if (actionContext.Request.RequestUri.Scheme != Uri.UriSchemeHttps)
            {
                actionContext.Response = actionContext.Request.CreateResponse(HttpStatusCode.Found);
                actionContext.Response.Content = new StringContent
                    ("<p>Use https instead of http</p>", Encoding.UTF8, "text/html");
                //Create the request URI
                UriBuilder uriBuilder = new UriBuilder(actionContext.Request.RequestUri);
                //Set the Request scheme as HTTPS
                uriBuilder.Scheme = Uri.UriSchemeHttps;
                //Set the HTTPS Port number as 44300
                //In the project properties window you can find the port number
                //for SSL URL
                uriBuilder.Port = 44300;
                actionContext.Response.Headers.Location = uriBuilder.Uri;
            }
            else
            {
                base.OnAuthorization(actionContext);
            }
        }
    }
}
Step2:
You need to register the CustomRequireHttpsAttribute in the Register() method of the WebApiConfig class in WebApiConfig.cs file which is present in the App_Start folder as shown below.
How to enable HTTPS in Web API

The above line of code will add the CustomRequireHttpsAttribute as a global filter to the filters collection as a result for every incoming request the code which is present in this filter is going to be executed. So, if the request is issued using HTTP, then it will be automatically redirected to HTTPS.

The complete code of the WebApiConfig.cs file is given below.
using System.Web.Http;
using WebAPIEnableHTTPS.Models;
namespace WebAPIEnableHTTPS
{
    public static class WebApiConfig
    {
        public static void Register(HttpConfiguration config)
        {
            config.Filters.Add(new CustomRequireHttpsAttribute());
            
            config.MapHttpAttributeRoutes();
            config.Routes.MapHttpRoute(
                name: "DefaultApi",
                routeTemplate: "api/{controller}/{id}",
                defaults: new { id = RouteParameter.Optional }
            );
        }
    }
}
Now, build the solution and navigate to the following URL.

http://localhost:55486/api/employees

Once you hit the browser you will see that the above URL is transmitted to the below URL

https://localhost:44300/api/employees

Note: If you don’t want to enable the HTTPS for the entire application, then don’t add the CustomRequireHttpsAttribute to the filters collection on the config object in the register method of the WebApiConfig class.

What you need to do is, decorate the controller class or the action method with CustomRequireHttpsAttribute for which you want the HTTPS to be enabled. For the rest of the controllers and action methods, HTTPS will not be enabled.

In this article, I try to explain How to enable HTTPS in Web API with an example. I hope this article will help you with your need. I would like to have your feedback. Please post your feedback, question, or comments about this article.

Summary:
I hope this post will be helpful to enable HTTPS in Web API
Please share this post with your friends and colleagues.
For any queries please post a comment below.
Happy Coding 😉
Read More
  • Share This:  
  •  Facebook
  •  Twitter
  •  Google+
  •  Stumble
  •  Digg

Enable SSL in Visual Studio Development Server

 Admin     July 16, 2020     .Net, Asp.Net, C#, Web API     No comments   

How to Enable SSL in Visual Studio Development Server?
In this article, I am going to discuss How to Enable SSL in the Visual Studio Development Server with an example. While developing any application if you want to test the service using https protocol then you need to enable SSL in visual studio. Let us understand how to enable SSL in Visual Studio with an example.

Creating an Empty Application:
First, create an empty Web API application with the name WebAPIEnableHTTP. Once you create the project then add the following model class (Employee.cs) with the Models folder.
namespace WebAPIEnableHTTPS.Models
{
    public class Employee
    {
        public int EmployeeID { get; set; }
        public string EmployeeName { get; set; }
    }
}
Once you add the Model then you need to add a Web API 2 Controller – Empty within the Controllers folder and name it as EmployeesController and then copy and paste the following code in it.
using System.Collections.Generic;
using System.Linq;
using System.Web.Http;
using WebAPIEnableHTTPS.Models;
namespace WebAPIEnableHTTPS.Controllers
{
    public class EmployeesController : ApiController
    {
        List<Employee> employees = new List<Employee>()
        {
            new Employee() { EmployeeID = 101, EmployeeName = "Anurag"},
            new Employee() { EmployeeID = 102, EmployeeName = "Priyanka"},
            new Employee() { EmployeeID = 103, EmployeeName = "Sambit"},
            new Employee() { EmployeeID = 104, EmployeeName = "Preety"},
        };
        public IEnumerable<Employee> Get()
        {
            return employees;
        }
        public Employee Get(int id)
        {
            return employees.FirstOrDefault(s => s.EmployeeID == id);
        }
    }
}
At the moment when we navigate to the following URL, we get the output as expected.

http://localhost:55486/api/employees (please change the port number where your application is running),

Let’s change the protocol to https instead of HTTP and see what happened.

https://localhost:55486/api/employees


We get the error page as This site can’t provide a secure connection. This is because we have not enabled SSL for our Web API Service.

How to Enable SSL in Visual Studio Development Server?
To enable SSL in the Visual Studio development server, you need to follow the below steps

In the Solution Explorer click on the WebAPIEnableHTTP Web API project and press F4 key on the keyboard which will open the Project Properties window. From the Project Properties window, we need to set the SSL Enabled property to true. As soon as you do this Visual Studio sets the SSL URL as shown in the image below.
Enabling SSL in Visual Studio Development Server

As shown in the above image, once you set the SSL Enabled property to True, now you have two URLs one is SSL URL and the other one is the only URL. The SSL URL is https://localhost:44300/ and the URL is http://localhost:55486/

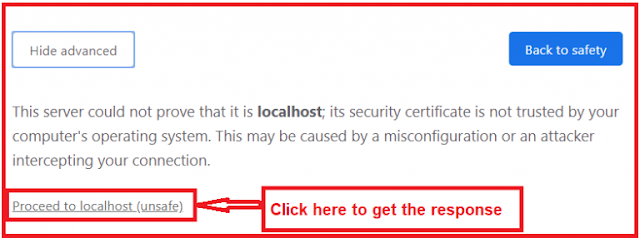
At this point, build the solution and then navigate to https://localhost:44300/api/employees URL in the browser and you will see the following browser security page. Make sure you click on the “Advanced” link to see the “Proceed to localhost” link.
How to Enable SSL in Visual Studio Development Server

Once you click on the above Advanced tab it opens the following section on the same page.
Enable SSL in Visual Studio Development Server

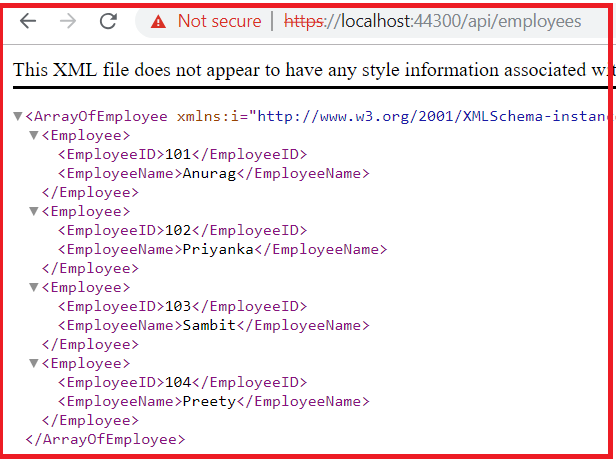
Once you click on the Proceed to localhost (unsafe) tab, it will give you the response as shown in the image below.
Enable SSL in Visual Studio Development Server

As shown in the above image, once you click on the Not Secure link, you will see that the certificate is invalid as shown below.
Enable SSL in Visual Studio Development Server

The reason is that the certificate that Visual Studio installed automatically is not trusted. To solve the above problem, what we need to do is, we need to place the certificate that visual studio has issued in the Trusted Root Certificates folder

Generating a Trusted Certificate:
In order to use a trusted certificate, please follow the below steps
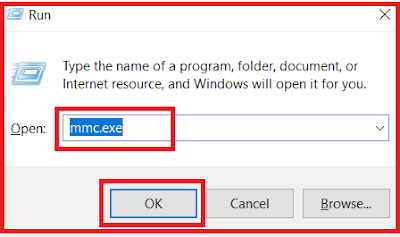
Open the RUN window, then type mmc.exe and click on the OK button as shown below
Enable SSL in Visual Studio Development Server

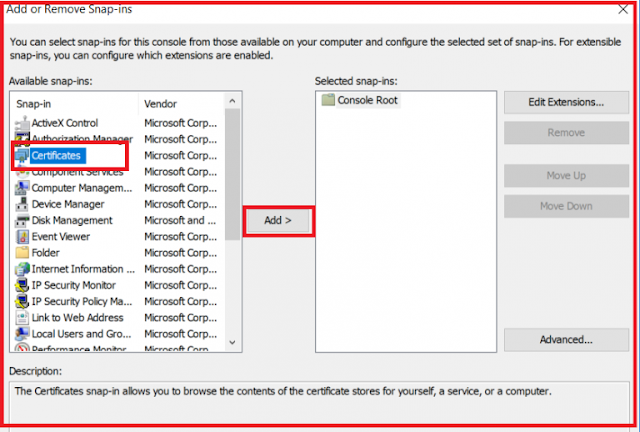
When you click on the OK button, one window will open, click “File” => “Add/Remove Snap-in” from that window and then from the “Available snap-ins” list select the “Certificates” and click on the “Add” button as shown in the below image
Enable SSL in Visual Studio Development Server

Once you click on the Add button it will open another screen from where select the “Computer account” radio button and then click on the Next button as shown below
Enable SSL in Visual Studio Development Server

When you click on the Next button, it will open another screen and from that screen select the “Local computer” radio button and click on the “Finish” button as shown below.
Enable SSL in Visual Studio Development Server

Once you click on the Finish button, it will take you back to the Add or Remove Snap-ins screen and from there click on the OK button as shown in the below image.
Enable SSL in Visual Studio Development Server

Expand the Console Root => Certificates (Local Computer) => Personal => Certificates folder and you will find a certificate that is Issued To localhost and Issued By localhost as shown in the image below.
Enable SSL in Visual Studio Development Server

Right-click on the localhost certificate, and then select “All Tasks” and then click on the “Export” option as shown in the image below.
Enable SSL in Visual Studio Development Server

Once you click on the Export option, it will open the welcome to Welcome to Certificate Export Wizard screen and from there just click on the “Next” button. From the next screen select the No, do not export the private key radio button, and click on the Next radio button as shown below.
Enable SSL in Visual Studio Development Server

Once you click on the Next button, it will open the select File Format wizard and from that wizard select the “DER encoded binary X.509 (.CER)” radio button, and click on the Next button as shown in the below image.
Enable SSL in Visual Studio Development Server

From the next screen, provide a meaningful name (in my case I have given MyLocalhostCertificate) for the certificate that you are exporting and then click on the “Next” button. Once you click on the Next button, it will open the following window from there just click on the Finish button. Please remember the path where your certificate is stored. In my case, it is C:\Windows\System32\MyLocalhostCertificate
Enable SSL in Visual Studio Development Server

Once you click on the Finish button, if everything is ok, then you will get the message Export Successful.

How to Import the newly Generated Certificate in the Trusted Root Certification Folder?
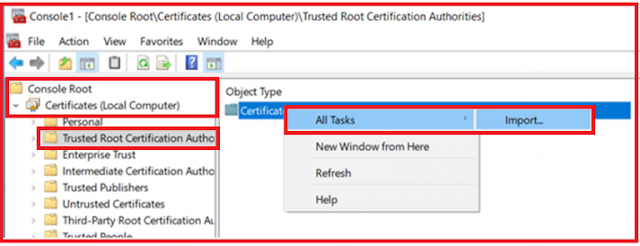
Expand the Console Root – Certificates (Local Computer) – Trusted Root Certification Authorities – Certificates. And then right-click on the “Certificates“, and select “All Tasks” and then select the “Import” option as shown below.
Enable SSL in Visual Studio Development Server

Click on the “Next” button on the subsequent screen. In the next screen, you have to enter the complete path where you have exported the certificate and then click on the click “Next” as shown below. In my case, the certificate is at C:\Windows\System32\MyLocalhostCertificate.cer
Enable SSL in Visual Studio Development Server

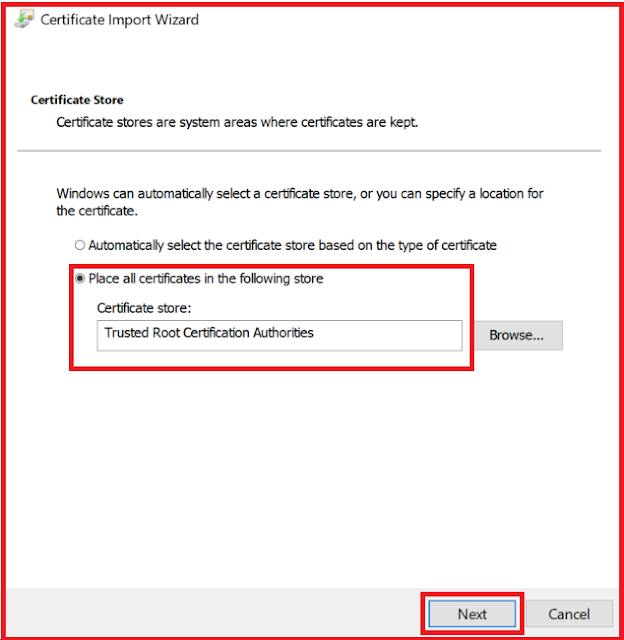
Once you click on the Next button, it will open another screen and from that screen select “Place all certificates in the following store” radio button and click on the “Next” button as shown below
Enable SSL in Visual Studio Development Server

Finally, click on the “Finish” button which will give you one message that import was successful. So that’s it. We have created and import the certificate for the localhost in the trusted certificate location.

Now first close all the instances of the browser. Open a new browser instance and navigate to https://localhost:44300/api/employees and you will not get any certificate error. At the moment we can access the web API service using both HTTP and https.

In the next article, I am going to discuss how to automatically redirect an HTTP request to HTTPS, when the request is made using HTTP to our Web API service. Here, in this article, I try to explain how to enable SSL in the Visual Studio Development Server step by step with an example. I hope this article will help you with your need.

Summary:
I hope this post will be helpful to understand how to enable SSL in visual studio
Please share this post with your friends and colleagues.
For any queries please post a comment below.
Happy Coding 😉
Read More
  • Share This:  
  •  Facebook
  •  Twitter
  •  Google+
  •  Stumble
  •  Digg

Sunday, July 5, 2020

Route Names and Route Orders in Attribute Routing

 Admin     July 05, 2020     .Net, Asp.Net, C#, Web API     No comments   

In this article, I will discuss the Route Names and Route Orders in Attribute Routing with examples. We are going to work with the same example that we worked in our previous articles. So if you have not read those articles then I strongly recommend you to read the following articles before proceeding to this article.

Attribute Routing in Web API

Optional URI Parameters and Default values in Attribute Routing

Attribute Routing Route Prefix in WEB API

Route Constraints in Attribute Routing

Route Names
In ASP.NET Web API, each and every route has a name. The Route names are useful for generating links so that you can include a link in an HTTP response.

To specify the route name, we need to set the Name property on the attribute. Let us see an example to understand how to set the route name, and also how to use the route name when generating a link.
namespace AttributeRoutingInWEBAPI.Controllers
{
    public class StudentsController : ApiController
    {
        static List<Student> students = new List<Student>()
        {
            new Student() { Id = 1, Name = "Pranaya" },
            new Student() { Id = 2, Name = "Priyanka" },
            new Student() { Id = 3, Name = "Anurag" },
            new Student() { Id = 4, Name = "Sambit" }
        };
        [HttpGet]
        [Route("{studentID:nonzero}", Name = "GetStudentById")]
        public Student GetStudentDetails(int studentID)
        {
            Student studentDetails = students.FirstOrDefault(s => s.Id == studentID);
            return studentDetails;
        }
        [Route("api/students")]
        public HttpResponseMessage Post(Student student)
        {
            students.Add(student);
            var response = Request.CreateResponse(HttpStatusCode.Created);
            // Generate a link for the new student and set the Location header in the response.
            string uri = Url.Link("GetStudentById", new { studentID = student.Id });
            response.Headers.Location = new Uri(uri);
            return response;
        }
    }
}
Let’s test this using Fiddler.
Route Names and Route Orders in Attribute Routing

Then click on the execute button. It will give us the below result.
Route Names and Route Orders in Attribute Routing

Route Order
When the WEB API Framework tries to match a URI with a route, it evaluates the routes in a particular order. To specify the order, set the Order property on the route attribute. Lower values are evaluated first. The default order value is zero.

Here is how the total ordering is determined:
  1. Compare the Order property of the route attribute.
  2. Look at each URI segment in the route template. For each segment, order as follows:
  3. Literal segments.
  4. Route parameters with constraints.
  5. Route parameters without constraints.
  6. Wildcard parameter segments with constraints.
  7. Wildcard parameter segments without constraints.
  8. In the case of a tie, routes are ordered by a case-insensitive ordinal string comparison (OrdinalIgnoreCase) of the route template.
Here is an example. Suppose you define the following controller:
Route Names and Route Orders in Attribute Routing

These routes are ordered as follows.
  1. orders/details
  2. orders/{id}
  3. orders/{customerName}
  4. orders/{*date}
  5. orders/pending
Notice that “details” is a literal segment and appears before “{id}”, but “pending” appears last because the Order property is 1. (This example assumes there are no customers named “details” or “pending”. In general, try to avoid ambiguous routes. In this example, a better route template for GetByCustomer is “customers/{customerName}” )

In this article, I try to explain the Route Names and Route Orders in Attribute Routing with examples. I hope this article will help you with your needs. I would like to have your feedback. Please post your feedback, question, or comments about this article.

Summary:
I Hope this post will be helpful to understand the concept of Web API Route Names and Route Orders in Attribute Routing
Please share this post with your friends and colleagues.
For any queries please post a comment below.
Happy Coding 😉
Read More
  • Share This:  
  •  Facebook
  •  Twitter
  •  Google+
  •  Stumble
  •  Digg

Saturday, July 4, 2020

Web API Attribute Routing Route Constraints

 Admin     July 04, 2020     .Net, Asp.Net, C#, Web API     No comments   

In this article, I will discuss the Web API Attribute Routing Route Constraints with examples. We are going to work with the same example that we worked in our previous articles. So, please read the following articles before proceeding to this article.
  1. Attribute Routing in Web API
  2. Optional URI Parameters and Default values in Attribute Routing
  3. Attribute Routing Route Prefix in WEB API
Web API Attribute Routing Route Constraints
The Web API Attribute Routing Route Constraints are nothing but a set of rules that we can apply on our routing parameters to restrict how the parameters in the route template are matched. The general syntax is

{parameter:constraint}

Let us understand ASP.NET Web API Attribute Routing Route Constraints with one example.
Let’s modify the Students Controller as shown below.
namespace AttributeRoutingInWEBAPI.Controllers
{
    [RoutePrefix("students")]
    public class StudentsController : ApiController
    {
        static List<Student> students = new List<Student>()
        {
            new Student() { Id = 1, Name = "Pranaya" },
            new Student() { Id = 2, Name = "Priyanka" },
            new Student() { Id = 3, Name = "Anurag" },
            new Student() { Id = 4, Name = "Sambit" }
        };
        [HttpGet]
        [Route("{studentID}")]
        public Student GetStudentDetails(int studentID)
        {
            Student studentDetails = students.FirstOrDefault(s => s.Id == studentID);
            return studentDetails;
        }
    }
}
Now, if we navigate to /students/1 URI, then the GetStudentDetails(int studentID) action is executed and we get the details of the student whose id is 1 as expected.

Let’s change our business requirement, in addition to retrieving the student details by “student Id”, we also want to retrieve the student details by “student Name“. So let’s add another GetStudentDetails() action method with a string parameter as shown below.
namespace AttributeRoutingInWEBAPI.Controllers
{
    [RoutePrefix("students")]
    public class StudentsController : ApiController
    {
        static List<Student> students = new List<Student>()
        {
            new Student() { Id = 1, Name = "Pranaya" },
            new Student() { Id = 2, Name = "Priyanka" },
            new Student() { Id = 3, Name = "Anurag" },
            new Student() { Id = 4, Name = "Sambit" }
        };
        [HttpGet]
        [Route("{studentID}")]
        public Student GetStudentDetails(int studentID)
        {
            Student studentDetails = students.FirstOrDefault(s => s.Id == studentID);
            return studentDetails;
        }
        [HttpGet]
        [Route("{studentName}")]
        public Student GetStudentDetails(string studentName)
        {
            Student studentDetails = students.FirstOrDefault(s => s.Name == studentName);
            return studentDetails;
        }
    }
}
At this point build the solution, and navigate to the following URI’s

/students/1

/students/Pranaya

In both the cases we will get the below error:
Multiple actions were found that match the request: GetStudentDetails on type AttributeRoutingInWEBAPI.Controllers.StudentsController GetStudentDetails on type AttributeRoutingInWEBAPI.Controllers.StudentsController

This is because the WEB API Framework does not know or does not identify which version of the GetStudentDetails() action method to use. This is the situation where the route constraints play a very important role.

If an integer is specified in the URI like /students/1, then we need to execute the GetStudentDetails(int studentId) action method which takes an integer parameter whereas if a string is specified in the URI like /students/Pranaya, then we need to execute the GetStudentDetails(string studentName) action method which takes the parameter of type string.

This can be very easily achieved using Attribute Route Constraints in the WEB API application. To specify the attribute route constraint, the syntax is “{parameter:constraint}“. With these constraints in place, if the parameter segment in the URI is an integer, then the GetStudentDetails(int studentId) action method with integer parameter is invoked and if it is a string value then the GetStudentDetails(string studentName) action method with string parameter is invoked.

Let’s modify the Student Controller to use the Attribute Route Constraints as shown below to achieve the above requirements.
namespace AttributeRoutingInWEBAPI.Controllers
{
    [RoutePrefix("students")]
    public class StudentsController : ApiController
    {
        static List<Student> students = new List<Student>()
        {
            new Student() { Id = 1, Name = "Pranaya" },
            new Student() { Id = 2, Name = "Priyanka" },
            new Student() { Id = 3, Name = "Anurag" },
            new Student() { Id = 4, Name = "Sambit" }
        };
        [HttpGet]
        [Route("{studentID:int}")]
        public Student GetStudentDetails(int studentID)
        {
            Student studentDetails = students.FirstOrDefault(s => s.Id == studentID);
            return studentDetails;
        }
        [HttpGet]
        [Route("{studentName:alpha}")]
        public Student GetStudentDetails(string studentName)
        {
            Student studentDetails = students.FirstOrDefault(s => s.Name == studentName);
            return studentDetails;
        }
    }
}
Now build the solution, and navigate to the following two URIs and see everything is working as expected.

/students/1

/students/Pranaya

Please note that “alpha” stands for uppercase or lowercase alphabet characters. Along with alpha and int, you can also use constraints such as decimal, float, long, double, bool, etc. Please check the following MSDN link for the full list of available constraints in web API.
https://docs.microsoft.com/en-us/aspnet/web-api/overview/web-api-routing-and-actions/attribute-routing-in-web-api-2#route-constraints
Example:
If you want GetStudentDetails(int studentId) action method to be mapped to URI /students/{studentId}, only if the studentId is a number greater than ZERO, then use the “min” constraint as shown below.
WEB API Route Constraints in Attribute Routing

With the above change, if we specify a positive number like 1 in the URI, then it will be mapped to the GetStudentDetails(int studentID) action method as expected

/students/1

However, if we specify 0 or a negative number less than ZERO, then we will get an error. For example, if we specify 0 as the value for studentID in the URI,

/students/0

We will get the below error
WEB API Route Constraints in Attribute Routing

Along with the “min” constraint, you can also specify the “max” constraint as shown below. For example, if you want the studentID value in the URI to be between 1 and 3 inclusive, then you can specify both “min” and “max” constraints as shown below.
WEB API Route Constraints in Attribute Routing

The above example can also be achieved using the “range” attribute as shown below
WEB API Route Constraints in Attribute Routing

Custom Web API Route Constraints in Attribute Routing
You can also create custom route constraints in Web API and to do so you need to implement the IHttpRouteConstraint interface. For example, the below constraint will restrict a parameter value to a non-zero integer value.
using System;
using System.Collections.Generic;
using System.Globalization;
using System.Net.Http;
using System.Web.Http.Routing;
namespace AttributeRoutingInWEBAPI.Models
{
    public class NonZeroConstraint : IHttpRouteConstraint
    {
        public bool Match(HttpRequestMessage request, IHttpRoute route, string parameterName,
            IDictionary<string, object> values, HttpRouteDirection routeDirection)
        {
            object value;
            if (values.TryGetValue(parameterName, out value) && value != null)
            {
                long longValue;
                if (value is long)
                {
                    longValue = (long)value;
                    return longValue != 0;
                }
                string valueString = Convert.ToString(value, CultureInfo.InvariantCulture);
                if (Int64.TryParse(valueString, NumberStyles.Integer,
                    CultureInfo.InvariantCulture, out longValue))
                {
                    return longValue != 0;
                }
            }
            return false;
        }
    }
}
The following code shows how to register the custom constraint:
namespace AttributeRoutingInWEBAPI
{
    public static class WebApiConfig
    {
        public static void Register(HttpConfiguration config)
        {
            var constraintResolver = new DefaultInlineConstraintResolver();
            constraintResolver.ConstraintMap.Add("nonzero", typeof(NonZeroConstraint));
            // Attribute routing.
            config.MapHttpAttributeRoutes(constraintResolver);
            // Convention-based routing.
            config.Routes.MapHttpRoute(
                name: "DefaultApi",
                routeTemplate: "api/{controller}/{id}",
                defaults: new { id = RouteParameter.Optional }
            );
        }
    }
}
Now you can apply the custom constraint in your routes as shown below.
[HttpGet]
[Route("{studentName:alpha}")]
public Student GetStudentDetails(string studentName)
{
    Student studentDetails = students.FirstOrDefault(s => s.Name == studentName);
    return studentDetails;
}
In the next article, I am going to discuss Route Names and Route Orders in WEB API. Here, in this article, I try to explain the Web API Attribute Routing Route Constraints with examples. I hope this Web API Attribute Routing Route Constraints article will help you with your needs. I would like to have your feedback. Please post your feedback, question, or comments about this article.

Summary:
I Hope this post will be helpful to understand the concept of Web API Attribute Routing Route Constraints
Please share this post with your friends and colleagues.
For any queries please post a comment below.
Happy Coding 😉
Read More
  • Share This:  
  •  Facebook
  •  Twitter
  •  Google+
  •  Stumble
  •  Digg
Newer Posts Older Posts

Join us on Telegram

Loved Our Blog Posts? Subscribe To Get Updates Directly To Your Inbox

Like us on Facebook

Popular Posts

  • What is Dependency Injection(DI)
    Hi friends! Today we are going to learn about Dependency Injection and in our last session we have come across Static classes and where it s...
  • ASP.NET State Management
    State management is a technique or way to maintain / store the state of an Asp.Net controls, web page information, object/data, and user in ...
  • What is Abstract Class and When we should use Abstract Class
    Hi friends! In our previous sessions we have seen  Difference Between Class and Struct . And in our last session  we learnt Usability of Sec...
  • HTTP Client Message Handler in Web API
    In this article, I am going to discuss HTTP Client Message Handler in Web API with real-time examples. As we already discussed in HTTP Mes...
  • ASP.NET Web API Basic Authentication
    In this article, I am going to discuss how to implement the ASP.NET Web API Basic Authentication step by step with an example. Please read...
  • Views in ASP.NET Core MVC
    In this article, I am going to discuss Views in the ASP.NET Core MVC application. Please read our previous article before proceeding to th...
  • How to find the angle between hour and minute hands of a clock at any given time in C#
    In this article, I am going to discuss how to find the angle between the hour and minute hands of a clock at any given time in C# with an ...

Blog Archive

Contact Form

Name

Email *

Message *

Tags

.Net .Net Core .Net Core MVC Algorithm Angular Anonymous Types Asp.Net Asp.Net MVC Blazor C# Data Structure Database Design Patterns Entity Framework Entity Framework Core Filters Interview Question Management Studio Programming Programs SQL Server SSMS Web API

Copyright © C# Techtics | All Right Reserved.

Protected by Copyscape