In this article, I am going to discuss Web API Versioning Using Custom Header with an example. This is a continuation part of our previous article, so please read our previous article before proceeding to this article where we discussed Web API Versioning using Query String Parameter.
In our previous article, we implemented a CustomControllerSelector which will retrieve the version number from a query string parameter, and then based on the version number it will select the appropriate controller.
To implement the Web API Versioning using custom header, all we need to do is to change the logic of the CustomControllerSelector class to read the version number from the custom header instead of the query string parameter.
Modify the CustomControllerSelector class as shown below. The code is self-explained, so please go through the comments.
Using Fiddler to Test Web API Services
Using Postman to Test Web API Services
Here we are going to use the Postman to test the service
Test1:
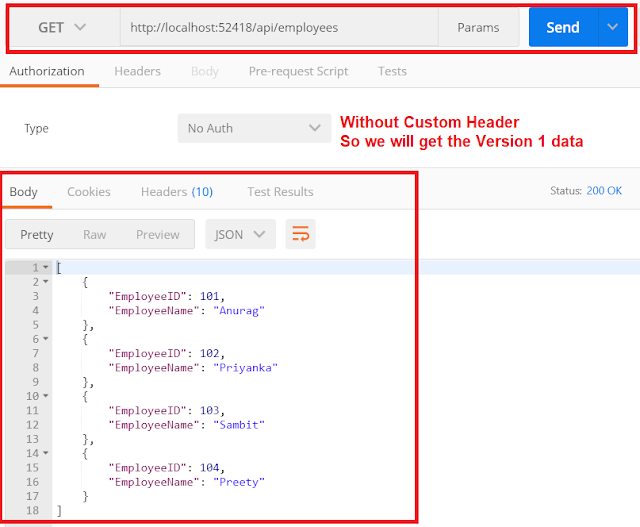
In the below request, we have not specified the custom header. So we issue the request, we get back EmployeeV1 objects as the response the reason is we have set version 1 as the default in our code.
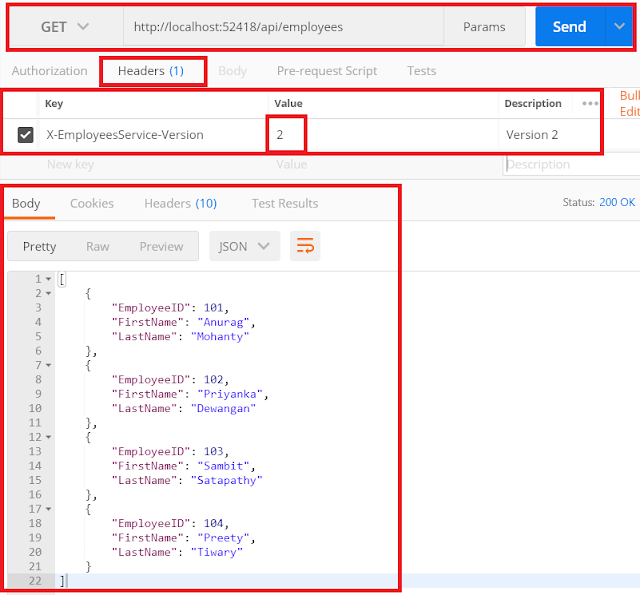
Test2: Let’s issue another request using the custom header “X-EmployeesService-Version” as shown below.
As shown in the above image, we got the version 2 response as expected this is because in the header we pass the value 2 for the custom header X-EmployeesService-Version.
In the next article, I am going to discuss how to implement the Web API versioning using the Accept Header with an example. Here, In this article, I try to explain how to implement Web API Versioning Using Custom Header step by step with an example. I hope this article will help you with your needs. I would like to have your feedback. Please post your feedback, question, or comments about this article.
Summary:
I hope this post will be helpful to understand the concept of how to set Web API Versioning Using Custom Header
Please share this post with your friends and colleagues.
For any queries please post a comment below.
Happy Coding 😉
In our previous article, we implemented a CustomControllerSelector which will retrieve the version number from a query string parameter, and then based on the version number it will select the appropriate controller.
To implement the Web API Versioning using custom header, all we need to do is to change the logic of the CustomControllerSelector class to read the version number from the custom header instead of the query string parameter.
Modify the CustomControllerSelector class as shown below. The code is self-explained, so please go through the comments.
using System.Linq;
using System.Net.Http;
using System.Web.Http;
using System.Web.Http.Controllers;
using System.Web.Http.Dispatcher;
namespace WebAPIVersioning.Custom
{
    // Derive the CustomControllerSelector from the DefaultHttpControllerSelector class
    public class CustomControllerSelector : DefaultHttpControllerSelector
    {
        private HttpConfiguration _config;
        public CustomControllerSelector(HttpConfiguration config) : base(config)
        {
            _config = config;
        }
        public override HttpControllerDescriptor SelectController(HttpRequestMessage request)
        {
            // First fetch all the available Web API controllers
            var controllers = GetControllerMapping();
            // Get the controller name and the parameter values from the request URI
            var routeData = request.GetRouteData();
            // Get the controller name from route data.
            // The name of the controller in our case is "Employees"
            var controllerName = routeData.Values["controller"].ToString();
            // Set the Default version number to 1
            string versionNumber = "1";
            // Get the version number from Custom header
            // You can give any name to this custom header. You have to use this
            // same header to specify the version number when issuing a request
            string customHeader = "X-EmployeesService-Version";
            if (request.Headers.Contains(customHeader))
            {
                versionNumber = request.Headers.GetValues(customHeader).FirstOrDefault();
            }
            if (versionNumber == "1")
            {
                // if the version number is 1, then append V1 to the controller name.
                // So at this point the, controller name will become EmployeesV1
                controllerName = controllerName + "V1";
            }
            else
            {
                // if version number is 2, then append V2 to the controller name.
                // So at this point the controller name will become EmployeesV2
                controllerName = controllerName + "V2";
            }
            HttpControllerDescriptor controllerDescriptor;
            if (controllers.TryGetValue(controllerName, out controllerDescriptor))
            {
                return controllerDescriptor;
            }
            return null;
        }
    }
}
That’s it; we have done with our implementation. Run the application and issue a request to /api/employees using either Fiddler or Postman. If you are new to Fiddler or Postman, then please read the following two articles where we discussed how to download, install, and use Fiddler and Postman to test Web API Services.
Using Fiddler to Test Web API Services
Using Postman to Test Web API Services
Here we are going to use the Postman to test the service
Test1:
In the below request, we have not specified the custom header. So we issue the request, we get back EmployeeV1 objects as the response the reason is we have set version 1 as the default in our code.
Test2: Let’s issue another request using the custom header “X-EmployeesService-Version” as shown below.
As shown in the above image, we got the version 2 response as expected this is because in the header we pass the value 2 for the custom header X-EmployeesService-Version.
In the next article, I am going to discuss how to implement the Web API versioning using the Accept Header with an example. Here, In this article, I try to explain how to implement Web API Versioning Using Custom Header step by step with an example. I hope this article will help you with your needs. I would like to have your feedback. Please post your feedback, question, or comments about this article.
Summary:
I hope this post will be helpful to understand the concept of how to set Web API Versioning Using Custom Header
Please share this post with your friends and colleagues.
For any queries please post a comment below.
Happy Coding 😉


0 comments:
Post a Comment
If you like this website, please share with your friends on Facebook, Twitter, LinkedIn.