• Home
  • About
  • Contact
  • ado.net
  • angular
  • c#.net
  • design patterns
  • linq
  • mvc
  • .net core
    • .Net Core MVC
    • Blazor Tutorials
  • sql
  • web api
  • dotnet
    • SOLID Principles
    • Entity Framework
    • C#.NET Programs and Algorithms
  • Others
    • C# Interview Questions
    • SQL Server Questions
    • ASP.NET Questions
    • MVC Questions
    • Web API Questions
    • .Net Core Questions
    • Data Structures and Algorithms
Showing posts with label Database. Show all posts

Friday, April 17, 2020

ASP.NET Web API using SQL Server

 Admin     April 17, 2020     .Net, Database, Web API     No comments   

In this article, I am going to discuss ASP.NET Web API using SQL Server database. So here we will create the Web API Service which will perform the CRUD operation on the SQL Server database. We are going to use this service as the base for understanding many of the ASP.NET Web API concepts that we are going to discuss in our upcoming articles.

The Web API EmployeeService that we are going to build will retrieve the data from the Employees database table. We will be using Entity Framework to retrieve data from the SQL server database. You can use any technology of your choice to retrieve data from the database. For example, you can even use raw ADO.NET.

Creating the Required Database:
We are going to use the following Employees table in this demo to understand how to create Web API service using SQL Server database.

WEB API with SQL Server

Please use the following SQL Script to create and populate the Employees table with some test data. The below SQL script
  • Create a database called WEBAPI_DB
  • Then creates the Employees table and populate it with some test data
CREATE DATABASE WEBAPI_DB
GO
USE WEBAPI_DB
GO
CREATE TABLE Employees
(
     ID int primary key identity,
     FirstName nvarchar(50),
     LastName nvarchar(50),
     Gender nvarchar(50),
     Salary int
)
GO
INSERT INTO Employees VALUES ('Pranaya', 'Rout', 'Male', 60000)
INSERT INTO Employees VALUES ('Anurag', 'Mohanty', 'Male', 45000)
INSERT INTO Employees VALUES ('Preety', 'Tiwari', 'Female', 45000)
INSERT INTO Employees VALUES ('Sambit', 'Mohanty', 'Male', 70000)
INSERT INTO Employees VALUES ('Shushanta', 'Jena', 'Male', 45000)
INSERT INTO Employees VALUES ('Priyanka', 'Dewangan', 'Female', 30000)
INSERT INTO Employees VALUES ('Sandeep', 'Kiran', 'Male', 45000)
INSERT INTO Employees VALUES('Shudhansshu', 'Nayak', 'Male', 30000)
INSERT INTO Employees VALUES ('Hina', 'Sharma', 'Female', 35000)
INSERT INTO Employees VALUES ('Preetiranjan', 'Sahoo', 'Male', 80000)
GO
Creating a new ASP.NET Web API Project
Open Visual Studio and select File – New – Project as shown below
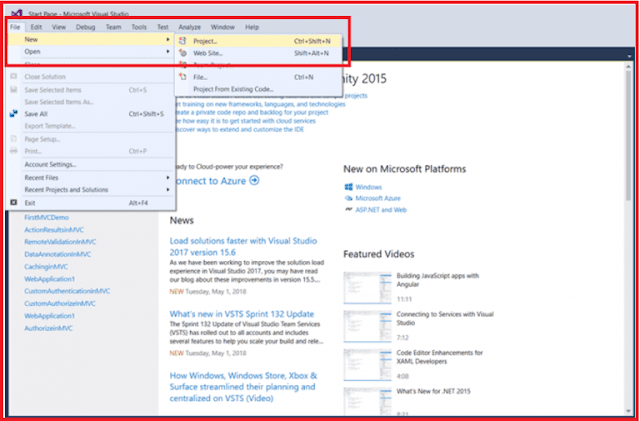
ASP.NET Web API using SQL Server - Creating a new asp.net web api project
Creating a new asp.net web api project

From the “New Project” window, Select “Visual C#” under the “Installed – Templates” section. Again from the middle pane, you need to select the “ASP.NET Web Application” and name the project as “EmployeeService“. Finally, click on the “OK” button as shown in the below image.

ASP.NET Web API using SQL Server - Selecting Project
Selecting Template

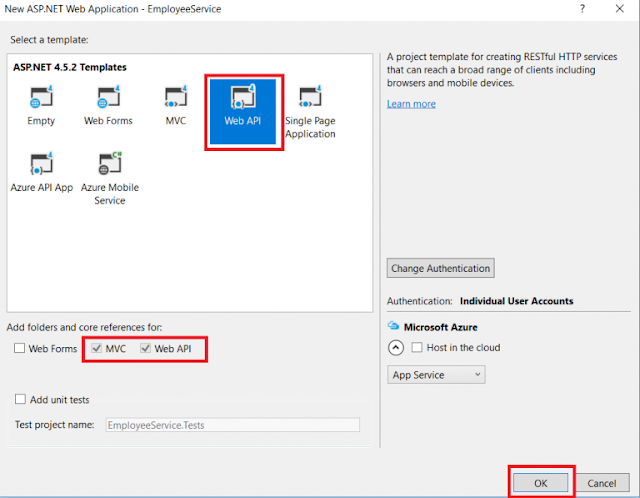
Once you click on the OK button. A new dialog window will open with Name “New ASP.NET Project” for selecting project Templates as per your requirement.

ASP.NET Web API using SQL Server


In this dialog, we are going to choose WEB API project template and click on the OK Button. At this point, you should have the Web API project created with the following structure.

ASP.NET Web API using SQL Server

Adding ADO.NET Entity Data Model to retrieve data from the database
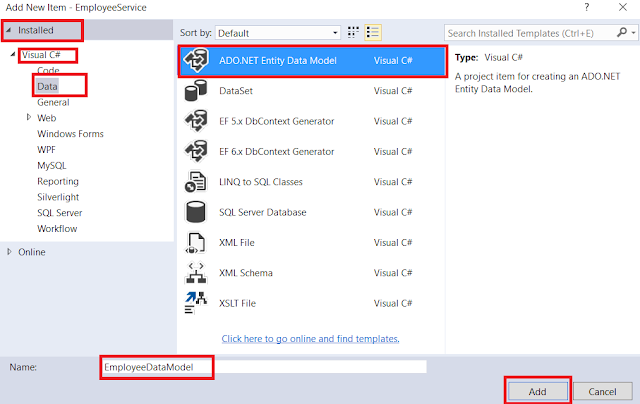
Right-click on the Models folder and then select Add – New Item and from the “Add New Item” window select “Data” from the left pane and then select ADO.NET Entity Data Model from the middle pane

In the Name text box, type EmployeeDataModel and click on the Add button as shown in the below image.

WEB API with SQL Server

On the Entity Data Model Wizard, select “EF Designer from database” option and click next

WEB API with SQL Server

On the next screen, click on the “New Connection” button as shown in the image below

ASP.NET Web API using SQL Server - Creating new connection
Creating new connection

Once you click on the New Connection Button it will open the Connection Properties window.

On “Connection Properties” window, set
  • Server Name = provide the server
  • Authentication = Select the authentication type
  • Select or enter a database name = WEBAPI_DB
Finally, click on the OK button as shown below.

WEB API with SQL Server

Once you click on the OK button it will navigate back to the Choose Your Data Connection wizard. Here Modify the Connection String as EmployeeDBContext and click on the Next Button as shown in the below image.

WEB API with SQL Server

On the next screen, select Entity Framework 6.x as shown in the below image. This step may be optional if you are using a higher version of visual studio.

WEB API with SQL Server

On Choose Your Database Objects and Settings screen, select the “Employees” table, provide the model namespace name and click on the Finish button as shown below.

WEB API with SQL Server

Once you click on the Finish Button the following edmx file will generate.

WEB API with SQL Server

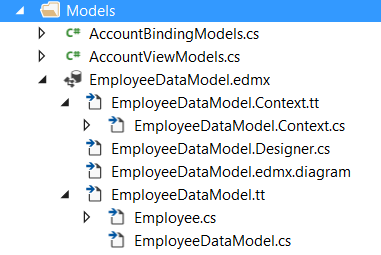
The edmx file is generated within the Models folder as shown below.

WEB API with SQL Server

Adding Web API Controller
  • Right click on the Controllers folder in EmployeeService project and select Add – Controller
  • Then you need to select the “Web API 2 Controller – Empty” and then click on the “Add” button as shown in the below image.
selecting web api controller

On the next screen set, the Controller Name as EmployeesController and click on the Add button as shown in the below image.

Naming Web API Controller

Copy and paste the following code in EmployeesController.cs
namespace EmployeeService.Controllers
{
    public class EmployeesController : ApiController
    {
        public IEnumerable<Employee> Get()
        {
            using (EmployeeDBContext dbContext = new EmployeeDBContext())
            {
                return dbContext.Employees.ToList();
            }
        }
        public Employee Get(int id)
        {
            using (EmployeeDBContext dbContext = new EmployeeDBContext())
            {
                return dbContext.Employees.FirstOrDefault(e => e.ID == id);
            }
        }
    }
}
Please import the below namespace.
using EmployeeService.Models;
At this point when we navigate to /api/employees we should see all employees and when we navigate to /api/employees/1 we should see all the details of the employee whose Id=1

Summary:
I Hope this post will be helpful to understand the concept of connecting your Web API project with SQL Server.
Please share this post with your friends and colleagues.
For any queries please post a comment below.
Happy Coding 😉
Read More
  • Share This:  
  •  Facebook
  •  Twitter
  •  Google+
  •  Stumble
  •  Digg

Thursday, October 5, 2017

Cascading referential integrity constraint in Sql Server

 Abhishek Tomer     October 05, 2017     Database, Management Studio, SQL Server, SSMS     No comments   

Hi friends! In our previous sessions we have seen how to create tables and enforce primary and foreign key constraints between them. And in our last session we learnt adding a default constraint in SQL Server.

Now, Today we are going to learn Cascading referential integrity constraint in SQL Server

SQL Server defines many cascading referential integrity constraints to choose from. Cascading referential integrity constraints allow you to define the actions SQL Server should take when a user tries to delete or update a key for which foreign keys exist in the database.

Cascading is used with the drop command. Suppose, we want to drop a record from the parent table, even when we have the corresponding records in the child table or we want to drop a parent table, even when a child table exists, then we use Cascading referential integrity constraints.
If you execute a delete command without a cascading constraint, then it will throw an error.
So let's take a look at a practical example of how to use a SQL Cascading Constraint in SQL Server. The example is developed in SQL Server 2016 using the SQL Server Management Studio.

Firstly, we will create two tables named Category and SubCategory.

Category Table:
Here, I have created a Table named as Category which has three columns named Id, Name, Description. Set the identity and Primary Key properties of the Id as follows:

CREATE TABLE [dbo].[Category](
           [Id] [int] IDENTITY(1,1) NOT NULL,
           [Name] [varchar](200) NULL,
           [Description] [nvarchar](200) NOT NULL,
CONSTRAINT [PK_Category] PRIMARY KEY CLUSTERED
(
           [Id] ASC
)WITH (PAD_INDEX = OFF, STATISTICS_NORECOMPUTE = OFF, IGNORE_DUP_KEY = OFF, ALLOW_ROW_LOCKS = ON,ALLOW_PAGE_LOCKS = ON) ON [PRIMARY]
) ON [PRIMARY]

The Category table looks as in the following:
Category Table Structure in Sql Server
Category Table Structure
SubCategory Table:
Here, I have created a Table named SubCategory which has four columns named Id, CategoryId, Name and Description. Set the identity and Referential Integrity properties of the Id as follows.

CREATE TABLE [dbo].[SubCategory](
           [Id] [int] IDENTITY(1,1) NOT NULL,
           [CategoryId] [int] NOT NULL,
           [Name] [varchar](200) NULL,
           [Description] [nvarchar](200) NOT NULL,
CONSTRAINT [PK_SubCategory] PRIMARY KEY CLUSTERED
(
           [Id] ASC
)WITH (PAD_INDEX = OFF, STATISTICS_NORECOMPUTE = OFF, IGNORE_DUP_KEY = OFF, ALLOW_ROW_LOCKS = ON,ALLOW_PAGE_LOCKS = ON) ON [PRIMARY]
) ON [PRIMARY]
GO
SET ANSI_PADDING OFF
GO
ALTER TABLE [dbo].[SubCategory]  WITH CHECK ADD  CONSTRAINT [FK_SubCategory_Category] FOREIGN KEY([CategoryId])
REFERENCES [dbo].[ Category] ([Id])
ON DELETE CASCADE
GO
ALTER TABLE [dbo].[SubCategory] CHECK CONSTRAINT [FK_SubCategory_Category]
GO

Table SubCategory looks as in the following:

Now, let’s try to delete our Category which defines the Foreign Key Constraints.
We could see that, it displays the following error:
Delete from Category where Id='21'
Error while deleting a Primary Key which is used as a Foreign Key in another table.
Error while deleting a Primary Key which is used as a Foreign Key in another table
Cascading Referential Integrity Constraints
Now use the ON DELETE CASCADE option to specify whether you want rows deleted in a child table when corresponding rows are deleted in the parent table:

CREATE TABLE [dbo].[SubCategory](
           [Id] [int] IDENTITY(1,1) NOT NULL,
           [CategoryId] [int] NOT NULL,
           [Name] [varchar](200) NULL,
           [Description] [nvarchar](200) NOT NULL,
CONSTRAINT [PK_SubCategory] PRIMARY KEY CLUSTERED
(
           [Id] ASC
)WITH (PAD_INDEX = OFF, STATISTICS_NORECOMPUTE = OFF, IGNORE_DUP_KEY = OFF, ALLOW_ROW_LOCKS = ON,ALLOW_PAGE_LOCKS = ON) ON [PRIMARY]
) ON [PRIMARY]
GO
SET ANSI_PADDING OFF
GO
ALTER TABLE [dbo].[SubCategory]  WITH CHECK ADD  CONSTRAINT [FK_SubCategory_Category] FOREIGNKEY([CategoryId])
REFERENCES [dbo].[Category] ([Id])
ON DELETE CASCADE
GO
ALTER TABLE [dbo].[SubCategory] CHECK CONSTRAINT [FK_SubCategory_Category]
GO

Now we delete a row from the major table:
delete from Category where Id='21'
This statement will successfully delete your Category with Id=21

However, you have the following options when setting up Cascading referential integrity constraint

1. No Action: This is the default behaviour of SQL Server. No Action specifies that you try to DELETE or UPDATE a row with a key that is referenced by the foreign keys in other tables, then an error is raised by  SQL Server and the DELETE or UPDATE query is rolled back.

2. Cascade: It specifies that if an attempt is made to DELETE or UPDATE a row with a key referenced by foreign keys in existing rows in other tables, all rows containing those foreign keys are also DELETED or UPDATED in both the tables.

3. Set NULL: It specifies that if an attempt is made to DELETE or UPDATE a row with a key referenced by foreign keys in existing rows in other tables, then all rows containing those foreign keys are set to NULL.

4. Set Default: It specifies that if an attempt is made to DELETE or UPDATE a row with a key referenced by foreign keys in existing rows in other tables, all rows containing those foreign keys are set to default values(if a default constraint is defined in that table).
If you need help in how to create a default constraint in SQL Server table then please refer this link, click here.

Summary:
So, Guys this is all about Cascading referential integrity constraint in SQL Server.
I Hope in this post covered all the points about Cascading referential integrity which will be helpful to understand the concept how useful Foreign keys are.

Please share this post with your friends and colleagues.
For any queries please post a comment below.

Happy Coding 😉
Read More
  • Share This:  
  •  Facebook
  •  Twitter
  •  Google+
  •  Stumble
  •  Digg

Sunday, September 17, 2017

Default constraint in Sql Server

 Abhishek Tomer     September 17, 2017     Database, Management Studio, SQL Server, SSMS     2 comments   

Hi friends! In our last session we learned how to create tables (tblPerson and tblGender) and we made a relation between them using foreign key constraints.

This is the structure of the previous tables that we have worked on.
Default constraint in Sql Server

In this post, we will be learning how to add a Default Constraint into a table in SQL Server.

A column default value can be specified using Default constraint. The Default Constraint is used to insert a default value into a column. The default value will be added to all new records, if no other value is specified, including NULL, i.e if we explicitly provide NULL for any column then Default Constraint will not work.

Here is the General Syntax for Altering an existing column to add a default constraint:
ALTER TABLE { TABLE_NAME }
ADD CONSTRAINT { CONSTRAINT_NAME }
DEFAULT { DEFAULT_VALUE } FOR { EXISTING_COLUMN_NAME }

Here is the Syntax for Adding a new column, with default value, to an existing table:
ALTER TABLE { TABLE_NAME } 
ADD { COLUMN_NAME } { DATA_TYPE } { NULL | NOT NULL } 
CONSTRAINT { CONSTRAINT_NAME } DEFAULT { DEFAULT_VALUE }

This command will add a default constraint, DF_tblPerson_GenderId.
ALTER TABLE tblPerson
ADD CONSTRAINT DF_tblPerson_GenderId
DEFAULT 1 FOR GenderId

Now, let’s test our query.
This insert statement below does not provide a value for GenderId column, so the Default Constraint should work and set its default value of 1 will be inserted in this record.
Insert into tblPerson(ID,Name,Email) values(4,'XYZ','x@x.com')

Now Select your rows from the table using this statement
Select * from tblPerson

Now, you could see that the Default Constraint has inserted a default value of in the table.
Let’s try by passing NULL value. The following Insert Statement will insert NULL, instead of using the default.
Insert into tblPerson(ID,Name,Email,GenderId) values (5,'ABC','a@a.com',NULL)

Finally, If you want to drop any constraint from your table, use this statement.
ALTER TABLE { TABLE_NAME } 
DROP CONSTRAINT { CONSTRAINT_NAME }

Summary:
So, Guys this is all about Default constraint in Sql Server
I Hope in this post covered all the points about how to pass a default value into the table if any value is not specified for that, which will be helpful to understand the concept Default constraint

Please share this post with your friends and colleagues.
For any queries please post a comment below.

Happy Coding 😉
Read More
  • Share This:  
  •  Facebook
  •  Twitter
  •  Google+
  •  Stumble
  •  Digg

Thursday, September 7, 2017

Creating and Working with tables in Sql Server

 Abhishek Tomer     September 07, 2017     Database, SQL Server, SSMS     No comments   

Hi friends! In our last post we have seen How to create Database and perform Alter, Delete/ Drop operation on databases in SQL Server.

Today, We are going to learn how to create a Tables in SQL Server and implementing Foreign Key Constraint in our table, also the benefits of Foreign key in our Database.

The main aim of this post is to teach how to make Tables in SQL Server and establish a relationships between 2 tables using Primary Key and Foreign Key Relation.
Table Structure in SQL Server
Table Structure
There are 2 ways to make Tables as similar to Databases in SQL Server.
To know how to make Databases in SQL Server please go through my previous post
  • Creating and Working with Database.
There are 2 ways to make Tables in SQL Server.
  1. Graphically
  2. using a Query
First Let's discuss how to make Table in SQL Server Graphically.
We need to follow some steps to make a Table.
  1. Firstly connect to the SQL Server Management Studio(SSMS). Need help? click here
  2. Expand Databases folder by clicking on "+" icon on the left side.
  3. Now, Right click on Tables folder in Object explorer window and
  4. Click on New Table option.
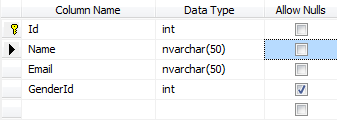
  5. Fill Column Name, Data Type and Allow Nulls(if you want to pass NULL value as default), as shown below and save the table as tblPerson. 
Table Design of tblPerson in SQL Server
Table Design of tblPerson
Following steps creates a table with the name tblPerson with 4 columns.
Now, Let’s make another table using a Query in SQL Server.
The general syntax to create a table in SQL Server is
Create Table TableName (Column1Name Datatype(size) Contraint if any, Column2Name Datatype(size), so on..)
So, Let’s make a table with the name tblGender, with 2 Columns ID and Gender respectively.
ID column is Primary Key Column.
The primary key is used to uniquely identify each row in a table.Primary key does not allow nulls.
Create Table tblGender(ID int Not Null Primary Key,Gender nvarchar(50))
Now, Let's add the reference between both the tables using Foreign Key relation.
In tblPerson table, GenderID is the foreign key referencing ID column in tblGenderTable.
Foreign key references also can be added in two ways i.e. graphically using SSMS and using a query as well.
To graphically add a foreign key reference in SQL Server we need to follow some steps as follows:
  1. Right click on tblPerson table in Tables Folder and select Design option.
  2. In the table design window, right click on GenderId column and select Relationships option.
    Selecting Relationship Option from Context Menu in SQL Server
    Selecting Relationship Option from Context Menu
  3. In the Foreign Key Relationships window, click on Add button as shown in picture.
    Adding a New Relation in SQL Server
    Adding a New Relation
  4. Now expand, in Tables and Column Specification row, by clicking the, ">" sign
  5. Click on the elipses ("...") button, that is present in Tables and Column Specification row
  6. From the Primary Key Table dropdown, select tblGender
  7. Click on the row below, and select ID column
  8. From the column on the right hand side, select GenderId
  9. Click OK and then click close.
  10. Finally save the table.
  11. You will get a Confirmation Message if you create a Relationship after Table Creation, then click on Ok.
Here, is the another way to reference Foreign key Relation using a query.
Alter table tblPerson 
add constraint tblPerson_GenderId_FK FOREIGN KEY (GenderId) references tblGender(ID)
General Syntax of Foreign Key Constraint is
Alter table ForeignKeyTable add constraintForeignKeyTable_ForiegnKeyColumn_FK 
FOREIGN KEY (ForiegnKeyColumn) references PrimaryKeyTable (PrimaryKeyColumn)
Foreign keys are used to enforce database integrity. In layman's terms, A foreign key in one table references to a primary key in another table.

At last I need to discuss why is it so important to use Foreign Key in our Database? 

The foreign key constraint prevents invalid data form being inserted into the foreign key column. The values that you enter into the foreign key column, has to be one of the values contained in the table it points to.
Summary:
So, Guys this is all about Creating ad working with Tables in SQL Server.
I Hope in this post covered all the points about Table Creation and Foreign Key Reference which will be helpful to understand the clear concept of Foreign Key, Why do we use it?

Please share this post with your friends and colleagues.
For any queries please post a comment below.

Happy Coding 😉
Read More
  • Share This:  
  •  Facebook
  •  Twitter
  •  Google+
  •  Stumble
  •  Digg
Older Posts

Join us on Telegram

Loved Our Blog Posts? Subscribe To Get Updates Directly To Your Inbox

Like us on Facebook

Popular Posts

  • What is Dependency Injection(DI)
    Hi friends! Today we are going to learn about Dependency Injection and in our last session we have come across Static classes and where it s...
  • C# Programming Examples on Sorting
    Today i am going to tell you some of the Sorting programming questions in C#. Q1- Write a C# program to perform Selection sort. Ans:  Sel...
  • Calling Web API Service in a Cross-Domain Using jQuery AJAX
    In this article, I am going to discuss Calling Web API Service in a Cross-Domain Using jQuery AJAX . Please read our previous article befor...
  • ViewBag in ASP.NET Core MVC
    In this article, I am going to discuss the use of ViewBag in ASP.NET Core MVC application with examples. Please read our previous article ...
  • Recursion And Back Tracking
    In this article, I am going to discuss Recursion And BackTracking in detail. Please read our previous article where we discussed Master Th...
  • What is Abstract Class and When we should use Abstract Class
    Hi friends! In our previous sessions we have seen  Difference Between Class and Struct . And in our last session  we learnt Usability of Sec...
  • Binary to Decimal Conversion in C# with Examples
    In this article, I am going to discuss the Binary to Decimal Conversion in C# with some examples. Please read our previous article where w...

Blog Archive

Contact Form

Name

Email *

Message *

Tags

.Net .Net Core .Net Core MVC Algorithm Angular Anonymous Types Asp.Net Asp.Net MVC Blazor C# Data Structure Database Design Patterns Entity Framework Entity Framework Core Filters Interview Question Management Studio Programming Programs SQL Server SSMS Web API

Copyright © C# Techtics | All Right Reserved.

Protected by Copyscape