In this article, I am going to discuss how to use POSTMAN to test Web API Services with examples. We are going to work with the same example that we created in our Creating first web API application article, so please read that article before proceeding with this article.
What is POSTMAN?
The Postman is the most popular and the most powerful HTTP client for testing the restful web services. Postman makes it easy to test the Restful Web APIs, as well as it develops and documents Restful APIs by allowing the users to quickly put together both simple and complex HTTP requests. The Postman is available as both a Google Chrome in-browser app and Google Chrome Packaged App.
The packaged app version of Postman provides many advanced features that include OAuth 2.0 support and bulk uploading/importing that are not available with the Google Chrome in-browser app version. The in-browser version includes a few features, such as session cookies support, that are not yet available in the packaged app version.
Let’s see how to use POSTMAN to send an HTTP request to our local ASP.NET Web API Services and check the response.
Step 1: Download and install POSTMAN from Postman
Step 2: Once the Postman is successfully installed, open the Postman. It will look like the image shown below.
GET Request using Postman:
Select the HTTP Method as “GET” and enter the URL of your Web API as shown in the below image.
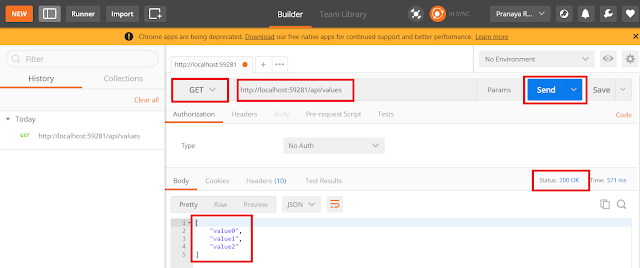
Once you click on the Send button, an HTTP request is sent to the provided URL. The response coming from the Web API Server is displayed in the below image.
As you can see in the above image, the HTTP response shows data and response status. Thus, you can also use Postman to test your Web API.
POST Request using Postman:
Next, we need to provide the string value that we want to add to the string array. We need to provide string value in the request body. To do so click on the body tab and provide the string value as shown below.
Once you provided the string value in the request body, click on the send button which will issue a post request to the web API. In the same way, you can test the PUT and DELETE Requests. In this article series, we are going to use the tool Fiddler and Postman to test the services.
Summary:
I Hope this post will be helpful to understand how to test your Web APIs using Postman.
Please share this post with your friends and colleagues.
For any queries please post a comment below.
Happy Coding 😉
What is POSTMAN?
The Postman is the most popular and the most powerful HTTP client for testing the restful web services. Postman makes it easy to test the Restful Web APIs, as well as it develops and documents Restful APIs by allowing the users to quickly put together both simple and complex HTTP requests. The Postman is available as both a Google Chrome in-browser app and Google Chrome Packaged App.
The packaged app version of Postman provides many advanced features that include OAuth 2.0 support and bulk uploading/importing that are not available with the Google Chrome in-browser app version. The in-browser version includes a few features, such as session cookies support, that are not yet available in the packaged app version.
Let’s see how to use POSTMAN to send an HTTP request to our local ASP.NET Web API Services and check the response.
Step 1: Download and install POSTMAN from Postman
Step 2: Once the Postman is successfully installed, open the Postman. It will look like the image shown below.
 |
| Postman UI |
GET Request using Postman:
Select the HTTP Method as “GET” and enter the URL of your Web API as shown in the below image.
 |
| Preparing GET Request using Postman |
Once you click on the Send button, an HTTP request is sent to the provided URL. The response coming from the Web API Server is displayed in the below image.
 |
| Reponse of Web API |
As you can see in the above image, the HTTP response shows data and response status. Thus, you can also use Postman to test your Web API.
POST Request using Postman:
- Choose the HTTP verb as POST
- Set the URL
- Set the Content-Type as application/json. To do this click on the Header tab and provide the key value as shown in the below image
 |
| POST Request using Postman |
Next, we need to provide the string value that we want to add to the string array. We need to provide string value in the request body. To do so click on the body tab and provide the string value as shown below.
Once you provided the string value in the request body, click on the send button which will issue a post request to the web API. In the same way, you can test the PUT and DELETE Requests. In this article series, we are going to use the tool Fiddler and Postman to test the services.
Summary:
I Hope this post will be helpful to understand how to test your Web APIs using Postman.
Please share this post with your friends and colleagues.
For any queries please post a comment below.
Happy Coding 😉


0 comments:
Post a Comment
If you like this website, please share with your friends on Facebook, Twitter, LinkedIn.