• Home
  • About
  • Contact
  • ado.net
  • angular
  • c#.net
  • design patterns
  • linq
  • mvc
  • .net core
    • .Net Core MVC
    • Blazor Tutorials
  • sql
  • web api
  • dotnet
    • SOLID Principles
    • Entity Framework
    • C#.NET Programs and Algorithms
  • Others
    • C# Interview Questions
    • SQL Server Questions
    • ASP.NET Questions
    • MVC Questions
    • Web API Questions
    • .Net Core Questions
    • Data Structures and Algorithms

Monday, July 20, 2020

Web API Service with Basic Authentication

 Admin     July 20, 2020     Asp.Net, C#, Web API     No comments   

In this article, I am going to discuss how to consume Web API Service with Basic Authentication. Please read our previous article before proceeding to this article, where we discussed how to implement the Role-Based Basic Authentication in Web API with an example. We are also going to work with our previous example. As part of this article, we are going to discuss the following pointers.
  1. How to enable CORS in Web API?
  2. How to call Web API service from JQuery using Ajax?
  3. How to call Web API service from C# using a Console Application?
How to Enable CORS in Web API?
As we are going to consume the Web API Service using Jquery Ajax from another domain, we need to enable CORS in our application. Enabling CORS is a two steps process.

Step1: Install Microsoft.AspNet.WebApi.Cors package. Execute the following command using the NuGet Package Manager Console.

Step2: Include the following 2 lines of code in the Register() method of WebApiConfig class in WebApiConfig.cs file which is inside App_Start folder
EnableCorsAttribute cors = new EnableCorsAttribute(“*”, “*”, “*”);
config.EnableCors();
With the above two lines of code in place, the WebApiConfig class should look as below.
using System.Web.Http;
using System.Web.Http.Cors;
namespace RoleBasedBasicAuthenticationWEBAPI
{
    public static class WebApiConfig
    {
        public static void Register(HttpConfiguration config)
        {
            // Web API routes
            config.MapHttpAttributeRoutes();
            config.Routes.MapHttpRoute(
                name: "DefaultApi",
                routeTemplate: "api/{controller}/{id}",
                defaults: new { id = RouteParameter.Optional }
            );
            EnableCorsAttribute cors = new EnableCorsAttribute("*", "*", "*");
            config.EnableCors();
        }
    }
}
If you are new to CORS, then I strongly recommended you to read the following articles, where I discussed CORS in details.

https://csharptechtics.blogspot.com/2020/04/cross-origin-resource-sharing-web-api.html

Modifying the Controller: In the controller, we need to create one method called GetEmployees. Depending on the credentials provided the Web API service should authenticate and return the correct results as follows.

If the AdminUser username and password are provided then only the male employees are returned from the service. Similarly, if SuperadminUser username and password are provided then only the female employees are returned from the service. In the same way, if both user username and password are provided then all the employees should be returned from the service else any other case it should return BAD Request from the service

To achieve this, let’s modify the Employee Controller as shown below.
using RoleBasedBasicAuthenticationWEBAPI.Models;
using System.Linq;
using System.Net;
using System.Net.Http;
using System.Security.Claims;
using System.Threading;
using System.Web.Http;
namespace RoleBasedBasicAuthenticationWEBAPI.Controllers
{
    public class EmployeeController : ApiController
    {
        [BasicAuthentication]
        [EnableCorsAttribute("*", "*", "*")]
        [MyAuthorize(Roles = "Admin,Superadmin")]
        [Route("api/Employees")]
        public HttpResponseMessage GetEmployees()
        {
            //var identity = (ClaimsIdentity)User.Identity;
            //var username = identity.Name;
            //OR you can use the below code to get the login username
            string username = Thread.CurrentPrincipal.Identity.Name;
            var EmpList = new EmployeeBL().GetEmployees();
            switch (username.ToLower())
            {
                case "adminuser":
                    return Request.CreateResponse(HttpStatusCode.OK,
                        EmpList.Where(e => e.Gender.ToLower() == "male").ToList());
                case "superadminuser":
                    return Request.CreateResponse(HttpStatusCode.OK,
                        EmpList.Where(e => e.Gender.ToLower() == "female").ToList());
                case "bothuser":
                    return Request.CreateResponse(HttpStatusCode.OK,EmpList);
                default:
                    return Request.CreateResponse(HttpStatusCode.BadRequest);
            }
        }
    }
}
In the last article, we discussed how to consume the Web API’s using the Postman as a client. But it is also necessary to know how to consume APIs from different types of clients.

Consuming Web API Service using JQuery AJAX:
Create one empty web application and then add one HTML page with the name AJAXClient to your application. Once you add the HTML Page then copy and paste the following code.

Note: You need to be installed JQuery packages into your projects.
<!DOCTYPE html>
<html>
<head>
    <title></title>
    <meta charset="utf-8" />
    <!--First Installed Jquery into your application-->
    <script src="Scripts/jquery-3.3.1.js"></script>
    <script type="text/javascript">
        $(document).ready(function () {
            var ulEmployees = $('#ulEmployees');
            $('#btnGetData').click(function () {
                // Get the username & password from textboxes
                var username = $('#txtUsername').val();
                var password = $('#txtPassword').val();
                $.ajax({
                    type: 'GET',
                    // Make sure to change the port number to
                    // where you have the service
                    // running on your local machine
                    url: 'http://localhost:63228/api/Employees',
                    dataType: 'json',
                    // Specify the authentication header
                    // btoa() method encodes a string to Base64
                    headers: {
                        'Authorization': 'Basic ' + btoa(username + ':' + password)
                    },
                    success: function (data) {
                        ulEmployees.empty();
                        $.each(data, function (index, val) {
                            var EmployeeDetails = 'Name = '+ val.Name + ' Gender = ' + val.Gender + ' Dept = ' + val.Dept + ' Salary = ' + val.Salary;
                            ulEmployees.append('<li>' + EmployeeDetails + '</li>')
                        });
                    },
                    complete: function (jqXHR) {
                        if (jqXHR.status == '401') {
                            ulEmployees.empty();
                            ulEmployees.append('<li style="color:red">'
                                + jqXHR.status + ' : ' + jqXHR.statusText + '</li>')
                        }
                    }
                });
            });
            $('#btnClear').click(function () {
                ulEmployees.empty();
            });
        });
    </script>
</head>
<body>
    Username : <input type="text" id="txtUsername" />
    Password : <input type="password" id="txtPassword" />
    <br /><br />
    <input id="btnGetData" type="button" value="Get Employees" />
    <input id="btnClear" type="button" value="Clear" />
    <ul id="ulEmployees"></ul>
</body>
</html>
First, run the service application and then the client application. Now go to the client application and navigate to the URL /AJAXClient.html. Provide the valid username and password and click on the GetEmployees button and you should see the data as expected.
Consuming Web API Service using JQuery AJAX

Now provide the wrong username and password and see the results as 401 unauthorized as expected.
Consuming Web API Service with Basic Authentication using JQuery AJAX

Consuming Web API Service using C# Console Application:
Create a console application and then copy and paste the following code. You need to Install Newtonsoft.Json Package into your application
using System;
using System.Collections.Generic;
using System.Text;
using System.Net.Http;
using System.Net.Http.Headers;
using Newtonsoft.Json;
namespace ClientApplication
{
    class Program
    {
        static void Main(string[] args)
        {
            HttpClientHandler handler = new HttpClientHandler();
            HttpClient client = new HttpClient(handler);
            
            client.DefaultRequestHeaders.Authorization = new AuthenticationHeaderValue("Authorization", 
                        Convert.ToBase64String(Encoding.Default.GetBytes("AdminUser:123456")));
            //Need to change the PORT number where your WEB API service is running
            var result = client.GetAsync(new Uri("http://localhost:63228/api/Employees")).Result;
            
            if (result.IsSuccessStatusCode)
            {
                Console.WriteLine("Done" + result.StatusCode);
                var JsonContent = result.Content.ReadAsStringAsync().Result;
                List<Employee> empList = JsonConvert.DeserializeObject<List<Employee>>(JsonContent);
                foreach(var emp in empList)
                {
                    Console.WriteLine("Name = " + emp.Name + " Gender = " + emp.Gender + " Dept = " + emp.Dept + " Salary = " + emp.Salary);
                }
            }
            else
                Console.WriteLine("Error" + result.StatusCode);
            Console.ReadLine();
        }
    }
    public class Employee
    {
        public int ID { get; set; }
        public string Name { get; set; }
        public string Gender { get; set; }
        public string Dept { get; set; }
        public int Salary { get; set; }
    }
}
Here, we have given the AdminUser username and password, so it displays only the male employees as expected as shown in the below image.
Consuming Web API Service using C# Console Application

In the next article, I am going to discuss Message Handler in WEB API with an example. Here, in this article, I try to explain how to Consuming Web API Service with Basic Authentication from JQuery AJAX as well as from a C# client.

Summary:
I hope this post will be helpful to how to consume Web API Service with Basic Authentication
Please share this post with your friends and colleagues.
For any queries please post a comment below.
Happy Coding 😉
Read More
  • Share This:  
  •  Facebook
  •  Twitter
  •  Google+
  •  Stumble
  •  Digg

Role-Based Basic Authentication in Web API

 Admin     July 20, 2020     .Net, Asp.Net, C#, Web API     No comments   

In this article, I am going to discuss how to implement the Role-Based Basic Authentication in Web API Application. Please read our last article before proceeding to this article, where we discussed How to implement ASP.NET Web API Basic Authentication with an example. As part of this article, we are going to discuss the following pointers related to authentication and authorization.
  1. Why do we need Role-Based Authentication?
  2. How to Implement Role-Based Basic Authentication in Web API?
  3. Testing the Role-Based Basic Authentication using Postman.
  4. What are the advantages and disadvantages of using BASIC Authentication in Web API?
Why do we need Role-Based Authentication?
Let us understand this with an example. As shown in the above image, we have three resources i.e. GetAllMaleEmployees, GetAllFemaleEmployees, and GetAllEmployees in our service.
Role-Based Basic Authentication in Web API

In our application, we have two types of Roles i.e. Admin and Superadmin. As per our business requirement,
  1. Only the users who have the Role Admin can access only to the GetAllMaleEmployees resource.
  2. The users who have the Role Superadmin can access only to the GetAllFemaleEmployees resource.
  3. The GetAllEmployees resource can be accessed by both the Admin and Superadmin resource.
In order to achieve this, we need to implement Role-Based Authentication.

Implementing Role-Based Basic Authentication in Web API.
First, create an empty Web API application with the name RoleBasedBasicAuthenticationWEBAPI. The Add the following User and Employee model to the Models folder

User.cs
namespace RoleBasedBasicAuthenticationWEBAPI.Models
{
    public class User
    {
        public int ID { get; set; }
        public string UserName { get; set; }
        public string Password { get; set; }
        public string Roles { get; set; }
        public string Email { get; set; }
    }
}
Employee.cs
namespace RoleBasedBasicAuthenticationWEBAPI.Models
{
    public class Employee
    {
        public int ID { get; set; }
        public string Name { get; set; }
        public string Gender { get; set; }
        public string Dept { get; set; }
        public int Salary { get; set; }
    }
}
Now we need to add the UserBL and EmployeeBL class file within the Models folder.

UserBL.cs
namespace RoleBasedBasicAuthenticationWEBAPI.Models
{
    public class UsersBL
    {
        public List<user> GetUsers()
        {
            // In Realtime you need to get the data from any persistent storage
            // For Simplicity of this demo and to keep the focus on Basic Authentication
            // Here we are hardcoded the data
            List<User> userList = new List<User>();
            userList.Add(new User()
            {
                ID = 101,
                UserName = "AdminUser",
                Password = "123456",
                Roles = "Admin",
                Email = "Admin@a.com"
            });
            userList.Add(new User()
            {
                ID = 102,
                UserName = "BothUser",
                Password = "abcdef",
                Roles = "Admin,Superadmin",
                Email = "BothUser@a.com"
            });
            userList.Add(new User()
            {
                ID = 103,
                UserName = "SuperadminUser",
                Password = "Password@123",
                Roles = "Superadmin",
                Email = "Superadmin@a.com"
            });
            return userList;
        }
    }
}
EmployeeBL.cs
namespace RoleBasedBasicAuthenticationWEBAPI.Models
{
    public class EmployeeBL
    {
        public List<employee> GetEmployees()
        {
            // In Realtime you need to get the data from any persistent storage
            // For Simplicity of this demo and to keep the focus on Basic Authentication
            // Here we hardcoded the data
            List<Employee> empList = new List<Employee>();
            for (int i = 0; i < 10; i++)
            {
                if (i > 5)
                {
                    empList.Add(new Employee()
                    {
                        ID = i,
                        Name = "Name" + i,
                        Dept = "IT",
                        Salary = 1000 + i,
                        Gender = "Male"
                    });
                }
                else
                {
                    empList.Add(new Employee()
                    {
                        ID = i,
                        Name = "Name" + i,
                        Dept = "HR",
                        Salary = 1000 + i,
                        Gender = "Female"
                    });
                }
            }
            return empList;
        }
    }
}
Now add one more class file with the name UserValidate and copy and paste the following code.

UserValidate.cs
namespace RoleBasedBasicAuthenticationWEBAPI.Models
{
    public class UserValidate
    {
        //This method is used to check the user credentials
        public static bool Login(string username, string password)
        {
            UsersBL userBL = new UsersBL();
            var UserLists = userBL.GetUsers();
            return UserLists.Any(user =>
                user.UserName.Equals(username, StringComparison.OrdinalIgnoreCase)
                && user.Password == password);
        }
        //This method is used to return the User Details
        public static User GetUserDetails(string username, string password)
        {
            UsersBL userBL = new UsersBL();
            return userBL.GetUsers().FirstOrDefault(user =>
                user.UserName.Equals(username, StringComparison.OrdinalIgnoreCase)
                && user.Password == password);
        }
    }
}
Now create the BasicAuthenticationAttribute which will implement the AuthorizationFilterAttribute where we will put the logic for role-based basic authentication.

BasicAuthenticationAttribute.cs
namespace RoleBasedBasicAuthenticationWEBAPI.Models
{
    public class BasicAuthenticationAttribute : AuthorizationFilterAttribute
    {
        private const string Realm = "My Realm";
        public override void OnAuthorization(HttpActionContext actionContext)
        {
            if (actionContext.Request.Headers.Authorization == null)
            {
                actionContext.Response = actionContext.Request.CreateResponse(HttpStatusCode.Unauthorized);
                if (actionContext.Response.StatusCode == HttpStatusCode.Unauthorized)
                {
                    actionContext.Response.Headers.Add("WWW-Authenticate", string.Format("Basic realm=\"{0}\"", Realm));
                }
            }
            else
            {
                string authenticationToken = actionContext.Request.Headers.Authorization.Parameter;
                string decodedAuthenticationToken = Encoding.UTF8.GetString(Convert.FromBase64String(authenticationToken));               
                string[] usernamePasswordArray = decodedAuthenticationToken.Split(':');
                string username = usernamePasswordArray[0];
                string password = usernamePasswordArray[1];
                if (UserValidate.Login(username, password))
                {
                    var UserDetails = UserValidate.GetUserDetails(username, password);
                    var identity = new GenericIdentity(username);
                    identity.AddClaim(new Claim("Email", UserDetails.Email));
                    identity.AddClaim(new Claim(ClaimTypes.Name, UserDetails.UserName));
                    identity.AddClaim(new Claim("ID", Convert.ToString(UserDetails.ID)));
                    IPrincipal principal = new GenericPrincipal(identity, UserDetails.Roles.Split(','));
                    Thread.CurrentPrincipal = principal;
                    if (HttpContext.Current != null)
                    {
                        HttpContext.Current.User = principal;
                    }
                }
                else
                {
                    actionContext.Response = actionContext.Request
                        .CreateResponse(HttpStatusCode.Unauthorized);
                }
            }
        }
    }
}
Please add the following namespaces.
using System;
using System.Net;
using System.Net.Http;
using System.Security.Claims;
using System.Security.Principal;
using System.Text;
using System.Threading;
using System.Web;
using System.Web.Http.Controllers;
using System.Web.Http.Filters;
Now we will create out custom Authorize Attribute which will inherit from AuthorizeAttribute where we will implement the logic to return an appropriate response when the Authorization failed.

MyAuthorizeAttribute.cs
namespace RoleBasedBasicAuthenticationWEBAPI.Models
{
    public class MyAuthorizeAttribute : System.Web.Http.AuthorizeAttribute
    {
        // 401 (Unauthorized) - indicates that the request has not been applied because it lacks valid 
        // authentication credentials for the target resource.
        // 403 (Forbidden) - when the user is authenticated but isn’t authorized to perform the requested 
        // operation on the given resource.
        protected override void HandleUnauthorizedRequest(System.Web.Http.Controllers.HttpActionContext actionContext)
        {
            if (!HttpContext.Current.User.Identity.IsAuthenticated)
            {
                base.HandleUnauthorizedRequest(actionContext);
            }
            else
            {
                actionContext.Response = new System.Net.Http.HttpResponseMessage(System.Net.HttpStatusCode.Forbidden);
            }
        }
    }
}
Let’s create a Web API 2 Empty Controller with the name EmployeeController and copy and paste the following code.
using RoleBasedBasicAuthenticationWEBAPI.Models;
using System.Linq;
using System.Net;
using System.Net.Http;
using System.Security.Claims;
using System.Web.Http;
namespace RoleBasedBasicAuthenticationWEBAPI.Controllers
{
    public class EmployeeController : ApiController
    {
        [BasicAuthentication]
        [MyAuthorize(Roles = "Admin")]
        [Route("api/AllMaleEmployees")]
        public HttpResponseMessage GetAllMaleEmployees()
        {
            var identity = (ClaimsIdentity)User.Identity;
            //Getting the ID value
            var ID = identity.Claims
                       .FirstOrDefault(c => c.Type == "ID").Value;
            //Getting the Email value
            var Email = identity.Claims
                      .FirstOrDefault(c => c.Type == "Email").Value;
            //Getting the Username value
            var username = identity.Name;
            //Getting the Roles only if you set the roles in the claims
            //var Roles = identity.Claims
            //            .Where(c => c.Type == ClaimTypes.Role)
            //            .Select(c => c.Value).ToArray();
            var EmpList = new EmployeeBL().GetEmployees().Where(e => e.Gender.ToLower() == "male").ToList();
            return Request.CreateResponse(HttpStatusCode.OK, EmpList);
        }
        [BasicAuthentication]
        [MyAuthorize(Roles = "Superadmin")]
        [Route("api/AllFemaleEmployees")]
        public HttpResponseMessage GetAllFemaleEmployees()
        {
            var EmpList = new EmployeeBL().GetEmployees().Where(e => e.Gender.ToLower() == "female").ToList();
            return Request.CreateResponse(HttpStatusCode.OK, EmpList);
        }
        [BasicAuthentication]
        [MyAuthorize(Roles = "Admin,Superadmin")]
        [Route("api/AllEmployees")]
        public HttpResponseMessage GetAllEmployees()
        {
            var EmpList = new EmployeeBL().GetEmployees();
            return Request.CreateResponse(HttpStatusCode.OK, EmpList);
        }
    }
}
That’s it. We have done with our implementation.

Testing Role-Based Basic Authentication in Web API using Postman
If you are new to the postman, I strongly recommended you read the following article, where I discussed how to download and use postman to test rest services.

https://csharptechtics.blogspot.com/2020/04/how-to-use-postman-to-test-web-api.html

We need to pass the username and password in the Authorization header. The username and password need to be a colon (:) separated and must be in base64 encoded. To do so, just use the following website

https://www.base64encode.org/

Enter the username and password separated by a colon (:) in “Encode to Base64 format” textbox, and then click on the “Encode” button as shown in the below diagram which will generate the Base64 encoded value. Let first generate the Base64 encoded string for the user AdminUser as shown in the below image
Testing Role-Based Basic Authentication in Web API using Postman

Once you generated the Base64 encoded string, let’s see how to use basic authentication in the header to pass the Base64 encoded value. Here we need to use the Authorization header and the value will be the Base64 encoded string followed the “BASIC” as shown below.

Authorization: BASIC TWFsZVVzZXI6MTIzNDU2

The role Admin has been assigned to the AdminUser. So he can access only the following two resources

/api/AllMaleEmployees /api/AllEmployees

But he cannot access the following resource

/api/AllFemaleEmployees

Let proofs this using the Postman.

/api/AllMaleEmployees
Role-Based Web API Authentication

Here we got the response 200 OK.

/api/AllEmployees
Role-Based Web API Authentication

Here we also got the response 200 OK as expected.

/api/AllFemaleEmployees
Role-Based Basic Authentication in WEB API

As you can see, here we got the response as 403 Forbidden which means the user is authenticated but not authorized to access the above resource. Similarly, you can test the other users.

Advantages and disadvantages of Basic Authentication in Web API.
Advantages:
  1. Internet standard.
  2. Supported by all major browsers.
  3. Relatively simple protocol.
Disadvantages:
  1. User credentials are sent in the request.
  2. Credentials are sent as plaintext.
  3. Credentials are sent with every request.
  4. No way to log out, except by ending the browser session.
  5. Vulnerable to cross-site request forgery (CSRF); requires anti-CSRF measures.
In the next article, I am going to discuss how to consume the Web API from JavaScript and C# client. Here, in this article, I try to explain the Role-Based Basic Authentication in Web API Application step by step with an example. I hope now you understood the need and use Role-Based Authentication in Web API.

Summary:
I hope this post will be helpful to understand the concept of Role-Based Basic Authentication in Web API
Please share this post with your friends and colleagues.
For any queries please post a comment below.
Happy Coding 😉
Read More
  • Share This:  
  •  Facebook
  •  Twitter
  •  Google+
  •  Stumble
  •  Digg

Sunday, July 19, 2020

ASP.NET Web API Basic Authentication

 Admin     July 19, 2020     .Net, Asp.Net, C#, Web API     No comments   

In this article, I am going to discuss how to implement the ASP.NET Web API Basic Authentication step by step with an example. Please read our previous article where we discussed the basics of Authentication and Authorization in Web API. As part of this article, we are going to discuss the following pointers.
  1. Why we need Authentication in Web API?
  2. How Basic Authentication Work in Web API?
  3. How to Implement Basic Authentication in ASP.NET Web API?
  4. How to Enable Basic Authentication in Web API?
  5. Testing the ASP.NET Web API Basic Authentication using Postman
Why we need Authentication in Web API?
Let’s start the discussion with one of the Rest Constraint i.e. Stateless Constraint. The Stateless Constraint is one of the Rest Constraints which states that the communication between the client and server must be stateless between the requests. This means that we should not be storing the client information on the server which required to process the request. The request that is coming from the client should contain all the necessary information that is required by the server to process that request. This ensures that each request coming from the client can be treated independently by the server.

The above approach is fine and the advantage is that we can separate the client or server at any given point of time without affecting others. Here, the client can be any type of application including JavaScript or any other programming languages like Java or C#. The server does not remember the client once the request has been processed, so each and every request coming from the client is new to the server and the server needs to check the request (most of the time the HTTP header) to identify the user.

So, in order to process the request by the server, the client needs to pass its credentials with each and every request and then the server will check and match the credentials with any persistent storage (most of the time it may be a database). If the credentials are found in the persistent storage then the server will treat that HTTP request as a valid request and process it else it simply returns an unauthorized error to the client.

We can implement the Authentication and Authorization in many ways in an application. Here, in this article, I will discuss how to implement ASP.NET Web API Basic Authentication.

How Basic Authentication Work in Web API?
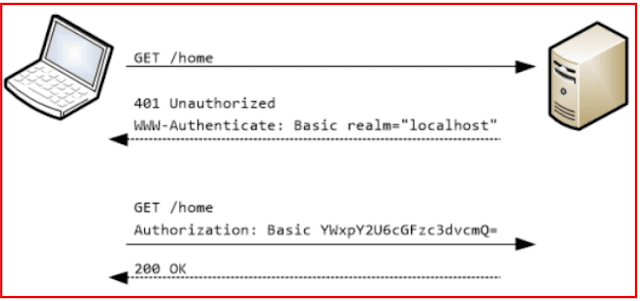
Please have a look at the following diagram.
How Basic Authentication Work in Web API

If a request requires authentication and if the client didn’t send the credentials in the header (most of the time it is Authorization header), then the server will return 401 (Unauthorized). The response will also include a WWW-Authenticate header, indicating that the server supports Basic Authentication.

The client sends another request to the server, with the client credentials in the Authorization header. Generally, the client credentials are formatted as the string “name: password“, base64-encoded format.

As we attach the sensitive data (i,e. username and password) in each and every HTTP request, it should be transferred in an encoded format and the protocol should be HTTPS, then only we can protect our data over the internet.

The ASP.NET Web API Basic Authentication is performed within the context of a “realm.” The server includes the name of the realm in the WWW-Authenticate header. The user’s credentials are valid within that realm. The exact scope of a realm is defined by the server. For example, you might define several realms in order to partition resources.

Implementing Basic Authentication in ASP.NET Web API
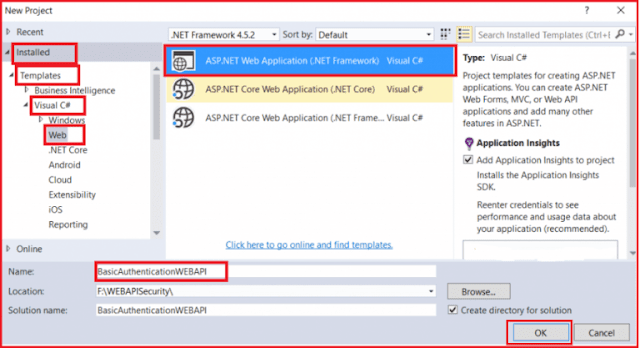
First, create an ASP.NET Web Application with the name BasicAuthenticationWEBAPI (you can give any name) as shown in the below image.
Implementing Basic Authentication in ASP.NET Web API

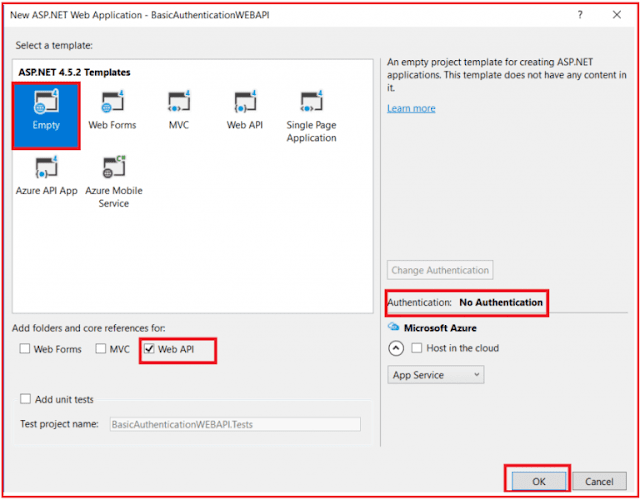
Once you click on the OK button, it will open the “Select a template” window. From the “Select a template” window choose
  1. Empty template
  2. Web API Checkbox
  3. No Authentication
And finally, click on the OK button as shown below
Selecting Project Template in Web API for Basic Authentication

Once you click on the OK Button it will take some time to create the project for us.

Creating Models
Now we need to create two models i.e. User and Employee. So Right-click on the Models folder and add a class file with the Name User and then copy and paste the below code.

User.cs
namespace BasicAuthenticationWEBAPI.Models
{
    public class User
    {
        public int ID { get; set; }
        public string UserName { get; set; }
        public string Password { get; set; }
    }
}
Similarly, right-click on the Models folder and add a class file with the Name Employee and then copy and paste the below code.

Employee.cs
namespace BasicAuthenticationWEBAPI.Models
{
    public class Employee
    {
        public int ID { get; set; }
        public string Name { get; set; }
        public string Gender { get; set; }
        public string Dept { get; set; }
        public int Salary { get; set; }
    }
}
Now we need to create two classes which will return the list of user and employees. Right-click on the Models folder and add a class file with the Name UserBL and then copy and paste the below code.

UserBL.cs
namespace BasicAuthenticationWEBAPI.Models
{
    public class UsersBL
    {
        public List<user> GetUsers()
        {
            // In Real-time you need to get the data from any persistent storage
            // For Simplicity of this demo and to keep the focus on Basic Authentication
            // Here we are hardcoded the data
            List<user> userList = new List<user>();
            userList.Add(new User()
            {
                ID = 101,
                UserName = "MaleUser",
                Password = "123456"
            });
            userList.Add(new User()
            {
                ID = 101,
                UserName = "FemaleUser",
                Password = "abcdef"
            });
            return userList;
        }
    }
}
Similarly, right-click on the Models folder and add a class file with the Name EmployeeBL and then copy and paste the below code.

EmployeeBL.cs
namespace BasicAuthenticationWEBAPI.Models
{
    public class EmployeeBL
    {
        public List<employee> GetEmployees()
        {
            // In Real-time you need to get the data from any persistent storage
            // For Simplicity of this demo and to keep the focus on Basic Authentication
            // Here we hardcoded the data
            List<employee> empList = new List<employee>();
            for (int i = 0; i < 10; i++)
            {
                if (i > 5)
                {
                    empList.Add(new Employee()
                    {
                        ID = i,
                        Name = "Name" + i,
                        Dept = "IT",
                        Salary = 1000 + i,
                        Gender = "Male"
                    });
                }
                else
                {
                    empList.Add(new Employee()
                    {
                        ID = i,
                        Name = "Name" + i,
                        Dept = "HR",
                        Salary = 1000 + i,
                        Gender = "Female"
                    });
                }
            }
            return empList;
        }
    }
}
Now, we need to create a class that will check whether the username and password are valid or not. Right-click on the Models folder and add a class file with the Name UserValidate and then copy and paste the following code.

UserValidate.cs
namespace BasicAuthenticationWEBAPI.Models
{
    public class UserValidate
    {
        //This method is used to check the user credentials
        public static bool Login(string username, string password)
        {
            UsersBL userBL = new UsersBL();
            var UserLists = userBL.GetUsers();
            return UserLists.Any(user =>
                user.UserName.Equals(username, StringComparison.OrdinalIgnoreCase)
                && user.Password == password);
        }
    }
}
Create a Basic Authentication Filter in Web API
Right Click on the Models folder and add a class file with the name BasicAuthenticationAttribute and then copy and paste the following code in it.
namespace BasicAuthenticationWEBAPI.Models
{
    public class BasicAuthenticationAttribute : AuthorizationFilterAttribute
    {
        private const string Realm = "My Realm";
        public override void OnAuthorization(HttpActionContext actionContext)
        {
            //If the Authorization header is empty or null
            //then return Unauthorized
            if (actionContext.Request.Headers.Authorization == null)
            {
                actionContext.Response = actionContext.Request
                    .CreateResponse(HttpStatusCode.Unauthorized);
                // If the request was unauthorized, add the WWW-Authenticate header 
                // to the response which indicates that it require basic authentication
                if (actionContext.Response.StatusCode == HttpStatusCode.Unauthorized)
                {
                    actionContext.Response.Headers.Add("WWW-Authenticate",
                        string.Format("Basic realm=\"{0}\"", Realm));
                }
            }
            else
            {
                //Get the authentication token from the request header
                string authenticationToken = actionContext.Request.Headers
                    .Authorization.Parameter;
                //Decode the string
                string decodedAuthenticationToken = Encoding.UTF8.GetString(
                    Convert.FromBase64String(authenticationToken));
                //Convert the string into an string array
                string[] usernamePasswordArray = decodedAuthenticationToken.Split(':');
                //First element of the array is the username
                string username = usernamePasswordArray[0];
                //Second element of the array is the password
                string password = usernamePasswordArray[1];
                //call the login method to check the username and password
                if (UserValidate.Login(username, password))
                {
                    var identity = new GenericIdentity(username);
                    IPrincipal principal = new GenericPrincipal(identity,null);
                    Thread.CurrentPrincipal = principal;
                    if (HttpContext.Current != null)
                    {
                        HttpContext.Current.User = principal;
                    }
                }
                else
                {
                    actionContext.Response = actionContext.Request
                        .CreateResponse(HttpStatusCode.Unauthorized);
                }
            }
        }
    }
}
Note: Please add the following namespaces.
using System;
using System.Net;
using System.Net.Http;
using System.Security.Principal;
using System.Text;
using System.Threading;
using System.Web;
using System.Web.Http.Controllers;
using System.Web.Http.Filters;
Adding WebAPI2 Empty Controller
Right-click on the Controllers folder and select Add => Controller which will open the window to select the controller as shown below.
Adding Web API 2 Empty Controller for Basic Authentication

From this window select Web API 2 Controller – Empty and click on the Add button, which will open another window to give a name to your controller as shown below.
Providing Controller Name in ASP.NET Web API Application

Provide the controller name as Employee and click on the Add button which will add Employee Controller within the controller folder.

Enable Web API Basic Authentication
We can enable basic authentication in many different ways by applying the BasicAuthenticationAttribute. We can apply the BasicAuthenticationAttribute attribute on a specific controller, specific action, or globally on all Web API controllers.

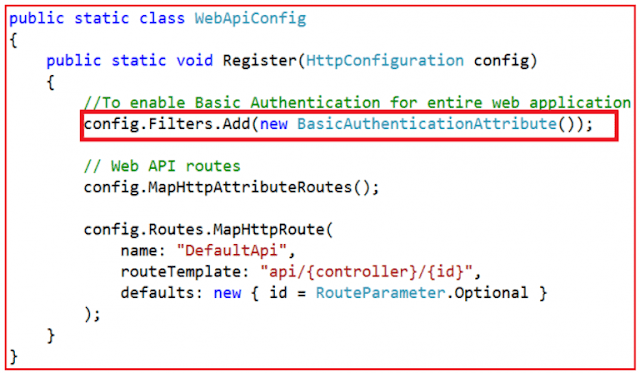
To enable the basic authentication across the entire Web API application, register the BasicAuthenticationAttribute as a filter using the Register() method in WebApiConfig class as shown in the below image.
Configuring Web API Basic Authentication

We can also apply the BasicAuthenticationAttribute attribute on a specific controller which will enable the basic authentication for all the methods that are present in that controller as shown in the below image.
Applying Web API Basic Authentication at Controller level

You can also enable the basic authentication at the action method level as shown in the below image which is only applicable to that particular action method which is decorated with the BasicAuthenticationAttribute.
Applying Web API Basic Authentication at the Action level

Let’s first add an action method to the Employee Controller with the following business requirements. As we have two users i.e. MaleUser and FemaleUser and if the user login with the MaleUser username we want to display all the “male” employees and if the user login with the FemaleUser username we want to display all the female employees.

Along with the above business requirement, we also enable basic authentication at the action method level.

Add the following action method within the Employee controller
namespace BasicAuthenticationWEBAPI.Controllers
{  
    public class EmployeeController : ApiController
    {
        [BasicAuthentication]
        public HttpResponseMessage GetEmployees()
        {
            string username = Thread.CurrentPrincipal.Identity.Name;
            var EmpList = new EmployeeBL().GetEmployees();
            switch (username.ToLower())
            {
                case "maleuser":
                    return Request.CreateResponse(HttpStatusCode.OK,
                        EmpList.Where(e => e.Gender.ToLower() == "male").ToList());
                case "femaleuser":
                    return Request.CreateResponse(HttpStatusCode.OK,
                        EmpList.Where(e => e.Gender.ToLower() == "female").ToList());
                default:
                    return Request.CreateResponse(HttpStatusCode.BadRequest);
            }
        }
    }
}
Testing the Web API Basic Authentication using Postman
If you are new to the postman, I strongly recommended you read the following article, where I discussed how to download and use postman to test rest services.

https://csharptechtics.blogspot.com/2020/04/how-to-use-postman-to-test-web-api/

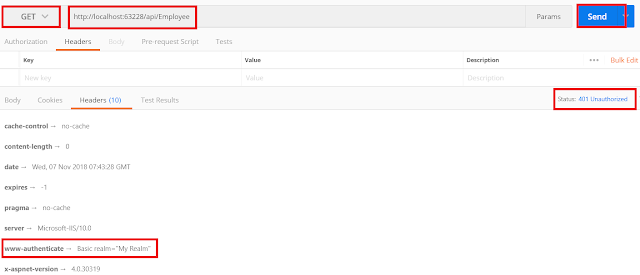
Let’s first make a request without passing the authorization header. Set the method type as GET, provide the request URI and click on the Send button as shown in the below image.
ASP.NET Web API Basic Authentication

Here you can observe that you will get a 401 status code which is Unauthorized. Let’s make the request to use the Authorization header. The username and password need to be a colon (:) separated and must be in base64 encoded. To do so, just use the following website
https://www.base64encode.org/
Enter the username and password separated by a colon (:) in “Encode to Base64 format” textbox, and then click on the “Encode” button as shown in the below diagram which will generate the Base64 encoded value.
ASP.NET Web API Basic Authentication

Once you generate the Base64 encoded string, let’s see how to use basic authentication in the header to pass the Base64 encoded value. Here we need to use the Authorization header and the value will be the Base64 encoded string followed the “BASIC” as shown below.

Authorization: BASIC TWFsZVVzZXI6MTIzNDU2
ASP.NET Web API Basic Authentication

Once you click on the Send button, you can see that the status code is 200 as expected. That’s it for today. In the next article, I am going to discuss how to implement Role-Based Web API Authentication along with I will also discuss the advantages and disadvantages of using ASP.NET Web API Basic Authentication. Here, in this article, I try to explain the ASP.NET Web API Basic Authentication step by step with an example. I hope you enjoy this article.

Summary:
I hope this post will be helpful to understand the concept of ASP.NET Web API Basic Authentication
Please share this post with your friends and colleagues.
For any queries please post a comment below.
Happy Coding 😉
Read More
  • Share This:  
  •  Facebook
  •  Twitter
  •  Google+
  •  Stumble
  •  Digg

Authentication and Authorization in Web API

 Admin     July 19, 2020     .Net, Asp.Net, C#, Web API     No comments   

In this article, I am going to discuss the Authentication and Authorization in Web API. Here I will give you an overview of Authentication and Authorization in Web API and from the next article onwards, we will discuss the practical implementation of Authentication and Authorization in ASP.NET Web API with examples.

Once you create a Web API Service, then the most important thing that you need to take care of is security means you need to control access to your Web API Services. So let’s start the discussion with the definition of Authentication and Authorization.

Authentication is the process of identifying the user. For example, one user lets say James logs in with his username and password, and the server uses his username and password to authenticate James.

Authorization is the process of deciding whether the authenticated user is allowed to perform an action on a specific resource (Web API Resource) or not. For example, James (who is an authenticated user) has the permission to get a resource but does not have the permission to create a resource.

Authentication in Web API
The Web API Service assumes that the authentication process should happen in the host Server and we generally host the Web API Service at IIS. The IIS Server uses the HTTP modules for checking the authentication of a user. You can configure your project to use any of the built-in authentication modules which are available in IIS or ASP.NET, or you can also create your own HTTP module to perform custom authentication.

When the host (IIS Server) authenticates the user, it generally creates a principal object (i.e. IPrincipal object) under which the code is going to run. So, once the Principal object (IPrincipal object) is created, then the host (i.e. IIS Server) attach that principal object to the current thread by setting Thread.CurrentPrincipal.

If you are confused at the moment about how the Principal object is created and how the principal object is attached to the current thread, then don’t worry we will discuss all these things in greater detail in our upcoming articles. In this article, I am just going to give you an overview of how authentication and authorization happen in Web API services.

Understanding Principal Object
The Principal object contains two things one is Identity object which actually contains the information about the user and the other one is IsInRole property which is a boolean property and this property is set to true if the user is assigned with any roles else false. The following diagram shows the IPrincipal interface definition.
Authentication and Authorization in Web API - IPrincipal Object

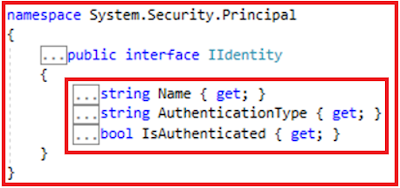
Let’s have a look at the Identity interface definition which contains the user’s information.
Authentication and Authorization in Web API - IIdentity Object

The Identity Object which is a property of Principal Object contains three properties i.e. Name (string type), AuthenticationType (string type), and IsAuthenticated (boolean type). If the user is authenticated, then the Identity.IsAuthenticated property will return true else false. The Name property of the Identity object will store the name of Identity, generally, identity is nothing but the logged-in username. Similarly, the AuthenticationType property returns the type of authentication used to identify the user.

The Identity interface is generally implemented by the GenericIdentity and WindowsIdentity classes. We will discuss how these classes implement the IIdentity interface in our upcoming article.

HTTP Message Handlers for Authentication in Web API
Instead of using the host (i.e. IIS Server where the Web API service is hosted) for authentication, you can also write the authentication logic into a custom HTTP Message Handler. In that case, the HTTP Message Handler is going to check the incoming HTTP request for authenticating the user and then sets the Principal Object.

Differences HTTP Message Handler over HTTP Module:
An HTTP Module sees all the incoming requests that go through the ASP.NET pipeline whereas a message handler only sees the incoming requests which are routed to the Web API Service.

It is also possible to select a specific HTTP Message Handler and then you can use that specific HTTP Message Handler for authentication for a specific route.

The HTTP Modules are specific to IIS whereas the HTTP Message Handlers can be used with both web-hosting (within a server) and self-hosting (within an application).

The HTTP Modules participate in IIS logging, auditing, and so on.

Generally, if you don’t want to support self-hosting, then HTTP Module is a better option but if you want to support self-hosting then HTTP Message Handler is a better option.

Setting the Principal Object
If you are going to implement your own custom logic for authenticating the user then you can set the principal object at two places which are as follows:

Thread.CurrentPrincipal. This is the standard way to set the thread’s principal in .NET.

HttpContext.Current.User. This property is specific to ASP.NET.

The following image shows how to create and set the principal object with the current thread. Here I am showing you both the options to set the Principal object.
Authentication and Authorization in Web API - Setting Principal Object

If you are going to host the Web API service in IIS, then you need to set the principal object in both the places because of the security concerns i.e. security becomes inconsistent. In the case of Self-hosting the HttpContext.Current value is null. To ensure your code is host-agnostic (i.e. to support both web hosting and self-hosting), you need to check for null before assigning the Principal object to the HttpContext.Current as shown in the above image.

Authorization in Web API
The Authorization Process is going to happen before executing the Controller Action Method which provides you the flexibility to decide whether you want to grant access to that resource or not.

We can implement this in ASP.NET Web API by using the Authorization filters which will be executed before the controller action method executed. So, if the request is not authorized for that specific resource, then the filter returns an error response to the client without executing the controller action method. The following diagram explains the above.
Authentication and Authorization in Web API

Using the [Authorize] Attribute
The ASP.NET Web API Framework provides a built-in authorization filter attribute i.e. AuthorizeAttribute and you can use this built-in filter attribute to checks whether the user is authenticated or not. If not, then it simply returns the HTTP status code 401 Unauthorized, without invoking the controller action method.

You can apply the above built-in filter globally, at the controller level, or at the action level.

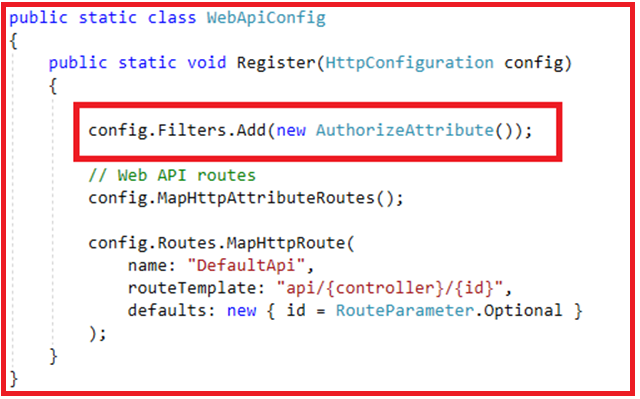
At Globally:
If you want to check the authentication for all the Web API controllers, then it is better to add the AuthorizeAttribute filter to the global filter list within the Register method of the WebApiConfig class as shown in the below image:
Authentication and Authorization in Web API - Applying Authorize Filter Globally

At Controller Level:
If you want to provide authentication for all the action methods of a specific controller, then it is better and recommended to add the Authorize filter at the controller level as shown in the below image.
Authentication and Authorization in Web API - At Controller Level

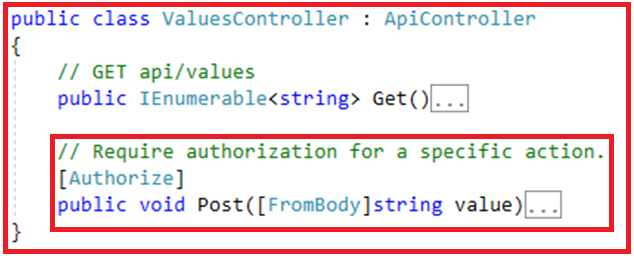
At Action Level:
If you want to provide authentication for specific action methods of a controller, then it is better to add the Authorize filter attribute to the action method which required authentication as shown in the below image.
Authentication and Authorization in Web API - At Action Level

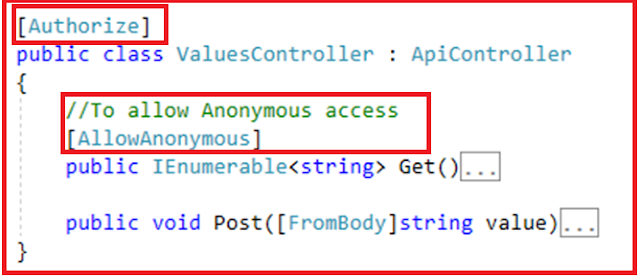
Another way of doing this is, restrict the controller by decorating the controller with Authorize filter attribute and then allow anonymous access to the action methods which does not require authentication by using the AllowAnonymous attribute. In the below example, the Post method is restricted, but the Get method allows anonymous access.
Authentication and Authorization in Web API

As of now, we have discussed two things. If we want to check the authentication before invoking the action method then we need to use the built-in Authorize Filter Attribute. If we want any action method to be accessed by the anonymous users then we need to decorate that action method with AllowAnonymous attribute. Along the way, we can also limit access to specific users or to users with specific roles.

Restrict by Users:
Authentication and Authorization in Web API - Restricted by Users

Restrict by Roles:
Authentication and Authorization in Web API - Restricted by Roles

Note: The point to remember here is that the AuthorizeAttribute filter for Web API is located in the System.Web.Http namespace. In MVC there is also an AuthorizeAttribute filter which is located in the System.Web.Mvc namespace, which is not compatible with Web API controllers.

Authorization Inside a Controller Action
In some scenarios, you might allow a request to proceed, but you need to change the behavior based on the principal. For example, the information that you are going to return from the action depends on the user’s role. Within a controller action method, you can get the current principal object from the ApiController.User property as shown in the below image.
Authentication and Authorization in Web API - Authorization within Controller

In the next article, I will discuss how to implement ASP.NET Web API Basic Authentication with an example. Here, in this article, I try to give you an overview of Authentication and Authorization in Web API. I hope this article will help you with your needs. I would like to have your feedback. Please post your feedback, question, or comments about this article.

Summary:
I hope this post will be helpful to understand the concept of Authentication and Authorization in Web API
Please share this post with your friends and colleagues.
For any queries please post a comment below.
Happy Coding 😉
Read More
  • Share This:  
  •  Facebook
  •  Twitter
  •  Google+
  •  Stumble
  •  Digg

Saturday, July 18, 2020

Web API Versioning Using Custom Media Types

 Admin     July 18, 2020     .Net, Asp.Net, C#, Web API     No comments   

In this article, I am going to discuss Web API Versioning Using Custom Media Types i.e. Vendor Specific Media Types with an example. This is a continuation part of our previous article, so please read our previous article before proceeding to this article where we discussed Web API Versioning Using Accept Header.

So what we want to do here is, instead of using the built-in media types such as application/json or application/xml, we want to use our custom media type which is shown in the below postman request.
Web API Versioning Using Custom Media Types

Notice that in the media type, we have specified the version of the service that we want. The custom media types are prefixed with vnd which indicates that this media type is a vendor-specific media type.

So what we need to do from our CustomControllerSelector class is to read the version number from the custom media type that we have specified in the request.

Modify the CustomControllerSelector class as shown below where we implement the logic to read the version number from the custom media type. The code is self-explanatory, so please go through the lines.

CustomControllerSelector
using System.Linq;
using System.Net.Http;
using System.Text.RegularExpressions;
using System.Web.Http;
using System.Web.Http.Controllers;
using System.Web.Http.Dispatcher;
namespace WebAPIVersioning.Custom
{
    // Derive the CustomControllerSelector from the DefaultHttpControllerSelector class
    public class CustomControllerSelector : DefaultHttpControllerSelector
    {
        private HttpConfiguration _config;
        public CustomControllerSelector(HttpConfiguration config) : base(config)
        {
            _config = config;
        }
        public override HttpControllerDescriptor SelectController(HttpRequestMessage request)
        {
            // First fetch all the available Web API controllers
            var controllers = GetControllerMapping();
            // Get the controller name and the parameter values from the request URI
            var routeData = request.GetRouteData();
            // Get the controller name from route data.
            // The name of the controller in our case is "Employees"
            var controllerName = routeData.Values["controller"].ToString();
            // Set the Default version number to 1
            string versionNumber = "1";
            // Get the version number from the Custom media type
            // We need to use the regular expression for mataching the pattern of the 
            // media type. We have given a name for the matched group that contains
            // the version number which enables us to retrieve the version number 
            // using the group name("version") instead of ZERO based index
            string regex = @"application\/vnd\.dotnettutorials\.([a-z]+)\.v(?<version>[0-9]+)\+([a-z]+)";
            // Users can include multiple Accept headers in the request.
            // So we need to check atlest if any of the Accept headers has our custom 
            // media type by checking if there is a match with regular expression specified
            var acceptHeader = request.Headers.Accept
                .Where(a => Regex.IsMatch(a.MediaType, regex, RegexOptions.IgnoreCase));
            // If there is atleast one Accept header with our custom media type
            if (acceptHeader.Any())
            {
                // Retrieve the first custom media type
                var match = Regex.Match(acceptHeader.First().MediaType, regex, RegexOptions.IgnoreCase);
                // From the version group, get the version number
                versionNumber = match.Groups["version"].Value;
            }
            
            if (versionNumber == "1")
            {
                // if the version number is 1, then append V1 to the controller name.
                // So at this point the, controller name will become EmployeesV1
                controllerName = controllerName + "V1";
            }
            else
            {
                // if version number is 2, then append V2 to the controller name.
                // So at this point the controller name will become EmployeesV2
                controllerName = controllerName + "V2";
            }
            HttpControllerDescriptor controllerDescriptor;
            if (controllers.TryGetValue(controllerName, out controllerDescriptor))
            {
                return controllerDescriptor;
            }
            return null;
        }
    }
}
That’s it; we are done with our implementation. Build the solution and issue a request without using the custom media type from the postman. You will get version 1 of employee objects in JSON format as shown below.
Web API Versioning Using Custom Media Types

Now specify the custom media type and set the version as 2 and issue a request, then you will get version 2 of the employee objects as expected as shown in the below image.
Web API Versioning Using Custom Media Types

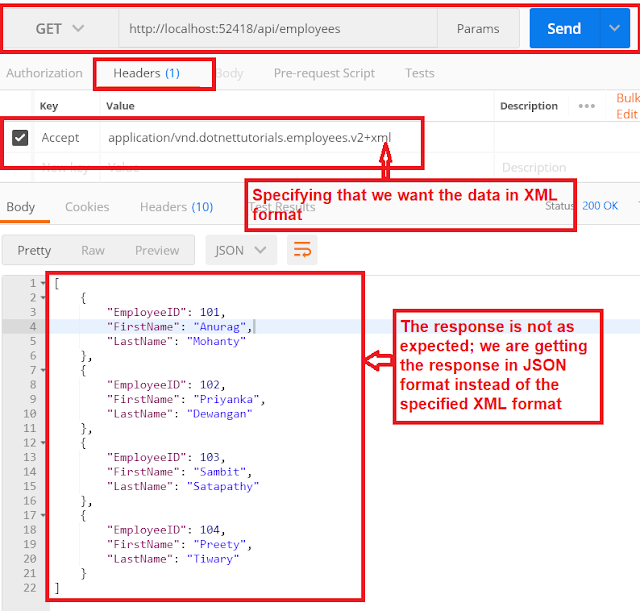
That’s work as expected. But there is a problem. The problem is if you specify that you want the data in XML format instead of JSON format in the request as shown below, then you will get the data in JSON format instead of the XML format.
Web API Versioning Using Custom Media Types

The reason is, we have not added our custom Media Type to the respective media type formatters i.e. JsonFormatter and XmlFormatter.

Adding Custom Media Types:
Include the following two lines of code within the WebApiConfig.cs file to add our custom media types to the JsonFormatter
Web API Versioning Using Custom Media Types

Similarly, include the following two lines of code within the WebApiConfig.cs file to add the custom media types to the XmlFormatter
Web API Versioning Using Custom Media Types

So at this point, the complete code of the WebApiConfig.cs is given below.
using System.Net.Http.Headers;
using System.Web.Http;
using System.Web.Http.Dispatcher;
using WebAPIVersioning.Custom;
namespace WebAPIVersioning
{
    public static class WebApiConfig
    {
        public static void Register(HttpConfiguration config)
        {
            config.MapHttpAttributeRoutes();
            
            //Replacing default controller selector to  our custom controller selector
            config.Services.Replace(typeof(IHttpControllerSelector),
                               new CustomControllerSelector(config));
            
            //Defineing the default route
            config.Routes.MapHttpRoute(
                name: "DefaultRoute",
                routeTemplate: "api/{controller}/{id}",
                defaults: new { id = RouteParameter.Optional }
            );
            //Adding the custom media type to the JsonFormatter
            config.Formatters.JsonFormatter.SupportedMediaTypes
                .Add(new MediaTypeHeaderValue("application/vnd.dotnettutorials.employees.v1+json"));
            config.Formatters.JsonFormatter.SupportedMediaTypes
                .Add(new MediaTypeHeaderValue("application/vnd.dotnettutorials.employees.v2+json"));
            //Adding the custom media type to the XmlFormatter
            config.Formatters.XmlFormatter.SupportedMediaTypes
                .Add(new MediaTypeHeaderValue("application/vnd.dotnettutorials.employees.v1+xml"));
            config.Formatters.XmlFormatter.SupportedMediaTypes
                .Add(new MediaTypeHeaderValue("application/vnd.dotnettutorials.employees.v2+xml"));
        }
    }
}
Now build the solution and issue a request by specifying that you want the data in XML format and you will get the data as expected as shown below.
Web API Versioning Using Custom Media Types

In the next article, I am going to discuss How to Enable SSL in Visual studio Development Server with example. Here, in this article, I try to explain how to implement Web API Versioning Using Custom Media Types step by step with an example. I hope this article will help you with your needs. I would like to have your feedback. Please post your feedback, question, or comments about this article.

Summary:
I hope this post will be helpful to understand how to configure Web API Versioning Using Custom Media Types
Please share this post with your friends and colleagues.
For any queries please post a comment below.
Happy Coding 😉
Read More
  • Share This:  
  •  Facebook
  •  Twitter
  •  Google+
  •  Stumble
  •  Digg

Web API Versioning Using Accept Header

 Admin     July 18, 2020     .Net, Asp.Net, C#, Web API     No comments   

In this article, I am going to discuss Web API Versioning Using Accept Header with an example. This is a continuation part of our previous article, so please read our previous article before proceeding to this article where we discussed Web API Versioning Using Custom Header.

What is the Accept Header?
The Accept header tells the server in which file format the browser wants the data. These file formats are generally called as MIME-types. The MIME stands for Multipurpose Internet Mail Extensions.

In the Content Negotiation in Web API article, we discussed that, if we want the Web API service to return data in XML format then we need to set the Accept header value to application/xml. Similarly, if we want the Web API service to return the data in JSON format then we need to set the Accept header value to application/json.

Implementing Web API Versioning using accept header
In our last article, we discussed how to create a custom header for versioning. So, instead of creating a custom header, which is used only for versioning purposes, we can make use of the built-in Accept header. Within the Accept header, we can add additional parameters to send the additional data along with the request to the server. For example, we can specify the version of the service that we want by using the version parameter as shown in the below image.
Web API Versioning Using Accept Header

What we need to do here is, now we need to read the Version parameter value from the Accept header in our CustomControllerSelector class. So, modify the CustomControllerSelector class as shown below. The code is self-explained, so please read the comments.
using System.Linq;
using System.Net.Http;
using System.Web.Http;
using System.Web.Http.Controllers;
using System.Web.Http.Dispatcher;
namespace WebAPIVersioning.Custom
{
    // Derive the CustomControllerSelector from the DefaultHttpControllerSelector class
    public class CustomControllerSelector : DefaultHttpControllerSelector
    {
        private HttpConfiguration _config;
        public CustomControllerSelector(HttpConfiguration config) : base(config)
        {
            _config = config;
        }
        public override HttpControllerDescriptor SelectController(HttpRequestMessage request)
        {
            // First fetch all the available Web API controllers
            var controllers = GetControllerMapping();
            // Get the controller name and the parameter values from the request URI
            var routeData = request.GetRouteData();
            // Get the controller name from route data.
            // The name of the controller in our case is "Employees"
            var controllerName = routeData.Values["controller"].ToString();
            // Set the Default version number to 1
            string versionNumber = "1";
            // Get the version number from the Accept header
            // Users can include multiple Accept headers in the request
            // Check if any of the Accept headers has a parameter with name version
            var acceptHeader = request.Headers.Accept.Where(a => a.Parameters
                                .Count(p => p.Name.ToLower() == "version") > 0);
            // If there is atleast one header with a "version" parameter
            if (acceptHeader.Any())
            {
                // Get the version parameter value from the Accept header
                versionNumber = acceptHeader.First().Parameters
                                .First(p => p.Name.ToLower() == "version").Value;
            }
            if (versionNumber == "1")
            {
                // if the version number is 1, then append V1 to the controller name.
                // So at this point the, controller name will become EmployeesV1
                controllerName = controllerName + "V1";
            }
            else
            {
                // if version number is 2, then append V2 to the controller name.
                // So at this point the controller name will become EmployeesV2
                controllerName = controllerName + "V2";
            }
            HttpControllerDescriptor controllerDescriptor;
            if (controllers.TryGetValue(controllerName, out controllerDescriptor))
            {
                return controllerDescriptor;
            }
            return null;
        }
    }
}
That’s it; we have done with our implementation. Run the application and then issue a request without the Accept header using the postman as the client, the service falls back to version 1 and returns version 1 employee objects in JSON format as expected as shown in the below image.
Web API Versioning Using Accept Header

Now, specify the version parameter as part of the Accept header then you will get the response in the specified version is expected as shown in the below image.
Web API Versioning Using Accept Header

In the next article, I am going to discuss how to implement the Web API versioning using Custom Media Types with an example. Here, in this article, I try to explain how to implement Web API Versioning Using Accept Header step by step with an example. I hope this article will help you with your needs. I would like to have your feedback. Please post your feedback, question, or comments about this article.

Summary:
I hope this post will be helpful to understand the concept of how to use Web API Versioning Using Accept Header
Please share this post with your friends and colleagues.
For any queries please post a comment below.
Happy Coding 😉
Read More
  • Share This:  
  •  Facebook
  •  Twitter
  •  Google+
  •  Stumble
  •  Digg
Newer Posts Older Posts

Join us on Telegram

Loved Our Blog Posts? Subscribe To Get Updates Directly To Your Inbox

Like us on Facebook

Popular Posts

  • What is Dependency Injection(DI)
    Hi friends! Today we are going to learn about Dependency Injection and in our last session we have come across Static classes and where it s...
  • ASP.NET State Management
    State management is a technique or way to maintain / store the state of an Asp.Net controls, web page information, object/data, and user in ...
  • What is Abstract Class and When we should use Abstract Class
    Hi friends! In our previous sessions we have seen  Difference Between Class and Struct . And in our last session  we learnt Usability of Sec...
  • HTTP Client Message Handler in Web API
    In this article, I am going to discuss HTTP Client Message Handler in Web API with real-time examples. As we already discussed in HTTP Mes...
  • ASP.NET Web API Basic Authentication
    In this article, I am going to discuss how to implement the ASP.NET Web API Basic Authentication step by step with an example. Please read...
  • Views in ASP.NET Core MVC
    In this article, I am going to discuss Views in the ASP.NET Core MVC application. Please read our previous article before proceeding to th...
  • How to find the angle between hour and minute hands of a clock at any given time in C#
    In this article, I am going to discuss how to find the angle between the hour and minute hands of a clock at any given time in C# with an ...

Blog Archive

Contact Form

Name

Email *

Message *

Tags

.Net .Net Core .Net Core MVC Algorithm Angular Anonymous Types Asp.Net Asp.Net MVC Blazor C# Data Structure Database Design Patterns Entity Framework Entity Framework Core Filters Interview Question Management Studio Programming Programs SQL Server SSMS Web API

Copyright © C# Techtics | All Right Reserved.

Protected by Copyscape