In this article, I am going to discuss how to implement Refresh Token in Web API by validating the clients, as well as I, will also discuss how to persist the refresh token into a database. Please read the following two articles before proceeding to this article as we are going to use the same example that we worked in our previous two articles.
Token Based Authentication in Web API: In this article, we discussed how to implement and use the Token Based Authentication in Web API.
Client Validation in Token Based Authentication: In this article, we discussed how to validate the clients while generating the token in Web API.
What is a Refresh Token?
A Refresh Token is a special kind of token that can be used to obtain a new renewed access token which allows access to the protected resources. You can request for the new access tokens by using the Refresh Token in Web API until the Refresh Token is blacklisted.
Why we need Refresh Token in Web API?
The idea of using the refresh token is to issue a short-lived access token (up to 30 minutes) for the first time and then use the refresh token to obtain a new access token and use that access token to access the protected resources.
So, the user needs to provide the username and password along with the client info (i.e. the client id and client secret) to authenticate himself, and if the information provided by the user is valid, then a response contains a short-lived access token along with a long-lived refresh token gets generated.
The refresh token is not an access token it is just an identifier for the access token. Now once the access token is expired, the user can use the refresh token to obtain another short-lived access token and so on.
Why not long-lived access token?
Now, you may have one question in your mind. Why not we are issuing a long-lived access token for the first time?
Let’s discuss why not a long-lived access token or what are the advantages of using refresh token in Web API. Mainly there are three main reasons to use the refresh tokens are as follows
Updating the Access Token Content:
As we already discussed, the access tokens are self-contained tokens means they contain all the information (which is known as claims) of an authenticated user once the access token is generated.
Now, if we issue a long-lived access token, let say for example 1 month, for a user let’s say “Anurag” and let say the user “Anurag” is enrolled with the role “Users” at the moment. So all this information gets stored on the access token which is generated by the Authorization Server.
If you have decided (3 days after he obtained the access token) to add him with the role “Admin” and then there is no way to update this information in the access token which is already generated, you need to ask him to re-authenticate himself again, so that the Authorization server add the updated information to the newly generated access token, and this is not feasible in most of the cases. You might not be able to reach to the users who already obtained the long-lived access tokens.
So to overcome the above issue, you need to issue short-lived access token (30 minutes for example) along with a long-lived refresh token and then the user needs to use the refresh token to obtain the newly updated access token, once the user obtains the new access token, the Authorization Server will be able to add the updated claims or new claims to the new access token being generated.
Revoking the Access from Authenticated users:
Once the user obtained the long-lived access token, then he will be able to access the server resources as long as his access token is not expired and there is no standard way to revoke the access tokens unless and until the Authorization Server implements some custom logic to store the generated access token a database and need to do database checks with each and every request.
But with the refresh token, a database or system admin can simply revoke the access by deleting the refresh token identifier from the database. So, when the user requests a new access token by using the deleted refresh token, the Authorization Server will reject this request because the refresh token is no longer available in the database.
No need to store or ask for the username and password frequently:
Using refresh token allows you to ask the user for his username and password only one time (i.e. for the first time), then the Authorization Server can issue very long-lived refresh token (1 year for example) and the user will stay logged in all this period until and unless system admin tries to revoke (delete) the refresh token. This can be very useful if you are building an API that will be consumed by a front-end application where it is not feasible to keep asking for the username/password frequently.
So for the above three major reasons we need to use Refresh Tokens.
The Refresh Tokens and Clients In order to use the refresh token, we need to be bound to the refresh token with a Client. In simple words, we can define a client as an application who wants to access our resources. Each Client should have a unique Client Id and Client Secret.
The Client Id is a piece of unique public information that identifies the application among other applications. The client id can be included in the source code of your application, but the client secret must stay confidential.
Bounding the refresh token to a client is very important this is because you do not want any refresh token generated by your Authorization Server to be used by another client to obtain the access token.
The schema for the client’s table should be as shown below.
In our previous article, we create the ClientMaster table, so let’s delete the existing ClientMaster table and regenerate the ClientMaster table with the above structure.
Please use below SQL Script to DROP, Create and Populate the ClientMaster table with two different clients which we are going to use in this demo.
The ClientID and ClientSecret columns of the ClientMaster table uniquely identify a particular client.
The Active column is also very important; if the system admin is decided to deactivate a particular client so that any new requests asking for the access token from that particular deactivated client will be rejected by the Authorization Server.
The Refresh Token Life Time column is used to set when the refresh token (not the access token) will expire in minutes.
Finally, the Allowed Origin column is used to configure the CORS and to set “Access-Control-Allow-Origin” on the back-end API.
Refresh Token Schema: As we already discussed, we need to store the refresh tokens generated by the Authorization Server into a database and this is very important to facilitate the management for refresh tokens. The schema for the Refresh Token table as shown in the below image:
Please use below SQL Script to create the RefershToken table.
The ID column of the RefreshToken table contains the hashed value of the refresh token id, the API consumer will receive and send the plain refresh token Id and the UserName column indicates to which user this refresh token belongs, and the same thing is applied for ClientID column indicating that the Token belongs to that particular clients.
By having the ClientID column, as a system admin, you can revoke (delete) the refresh token for a certain user on a certain client and keep the other refresh tokens for the same user obtained by different clients. For example, let say you have two clients having the same username, if you delete one user for a particular client, then the same user of other clients can access the refresh token.
The IssuedTime and ExpiredTime columns are for display purposes only.
Finally, the Protected Ticket column contains the magical signed string which contains a serialized representation for the ticket for a specific user, in other words, it contains all the claims and ticket properties for a user.
We have discussed enough theory, so it’s time to put all the theories into practice. So let’s discuss the step by step procedure to implement the Refresh Token in Web API. As I already told you that we are going to use the same example that we worked with our previous two articles.
Step1: Modify the EDMX file
We need to modify the EDMX file to add the newly generated RefreshToken table and we also need to update the ClientMaster table. Once you modify your EDMX file, the EDMX file should look as shown below.
Step2: Modify the ClientMasterRepository class as shown below
Add a class file with the name Helper.cs and then copy and paste the following code
Step4: Add AuthenticationRepository class file
Add a class file with the name AuthenticationRepository.cs and then copy and paste the following code.
Step5: Modify the Client Validation logic
Here, we need to modify the logic responsible for validating the client information whether the request needs an access token or uses a refresh token to obtain a new access token. To modify the ValidateClientAuthentication method of the MyAuthorizationServerProvider class as shown below.
We are trying to get the Client ID and Client Secret from the authorization header using a basic scheme, so the user needs to send the Client ID and Client Secret in the base64 encode format (client_id:client_secret) and need to send it in the Authorization header of the HTTP Request.
Once we receive the client id and client secret, we need to check it in our database whether the client is already registered with our back-end API or not (means we need to validate the client), if it is not registered we will invalidate the context and reject the request.
If the client is registered, then we will check whether the client is active or not, if it is not active, then we will also invalidate the context and reject the request
And, if we found the client is active, then we need to store the client allowed origin and refresh token lifetime value on the Owin context (if you want then you can store all information of the client), so it will be available once we generate the refresh token.
If all is valid we mark the context as a valid context which means that client validation has passed and the flow can proceed to the next step.
Step6: Validating the Resource Owner Credentials
Once the client validation has been passed, next we need to validate the resource owner credentials i.e. the username and password are correct or not, and then we need to bound the client id to the accession generated. To do so, let’s modify the GrantResourceOwnerCredentials method of the MyAuthorizationServerProvider class as shown below.
First, we need to read the client information from the Owin context and then we add the clientAllowedOrigin value to add the header “Access-Control-Allow-Origin” to Owin context response as shown in the below image.
Then we will check the username and password for the resource owner and if it is valid, then we will generate the set of claims for the above user along with authentication properties which contain the client id and username as shown in the below image.
Now the access token will be generated behind the scenes when we call the context.Validated(ticket) method as shown in the below image.
Step8: Implementing the TokenEndpoint method
Now we need to override the TokenEndpoint method within the MyAuthorizationServerProvider class with the following code.
Step9: Generating Refresh Token in Web API and persisting it into a database
Now we need to generate the Refresh Token and Store it into our database inside the RefreshToken table. To do so, add a class file with the name RefreshTokenProvider.cs under the Models folder and then copy and paste the following code.
As shown above, the class RefreshTokenProvider implements the interface IAuthenticationTokenProvider, and here we need to add our refresh token generation logic inside the method CreateAsync.
Let discuss what we have done inside the CreateAsync method. First, we are getting the client id from the Ticket Properties. The following code does the above things.
Next, we are generating a unique identifier for the refresh token, here, I am using Guid which is enough for this, or you can use your own unique string generation algorithm. The following code exactly does the same.
Then we are reading the refresh token lifetime value from the Owin context and this value was set when we validate the client, this value will be used to determine how long the refresh token will be valid for, this should be in minutes.
Then we are setting the IssuedUtc, and ExpiresUtc values for the ticket, setting those properties will determine how long the refresh token in web API will be valid for.
After setting all context properties we are calling the context.SerializeTicket() method will be responsible to serialize the ticket content and we will be able to store this magical serialized string on to the database. The following diagram shows the above things.
Now we strong the above token record into the RefreshTokens table, note that we are checking the token which will be saved on the database is unique for this Username (User) and the Client, if it not unique first we will delete the existing one and then store the new refresh token. It is better to hash the refresh token identifier before storing it, so if anyone has access to the database he will not be able to see the real refresh tokens.
Finally, we will send back the refresh token id (without hashing it) in the response body. The following does the above thing.
Step10: Modifying the Start class (OwinStartup class)
We need to set the RefreshTokenProvider class within the OAuthAuthorizationServerOptions, so open the class Start which is present inside the app_start folder and replace the code used to set OAuthAuthorizationServerOptions, with the below code, you can notice that we are setting the access token lifetime to a short period now (30 minutes) instead of 24 hours.
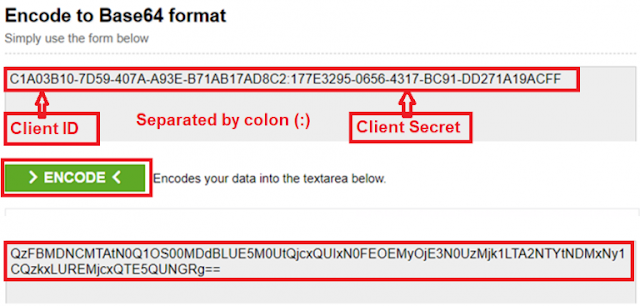
Let’s first create the Base64 Encode value by for the ClientID and ClientSecret by using the following website
https://www.base64encode.org/
Enter the Client ID and Client Secret separated by a colon (:) in “Encode to Base64 format” textbox, and then click on the “Encode” button as shown in the below diagram which will generate the Base64 encoded value.
Example: ClientID: DOTNET and Client Secret: EEF47D9A-DBA9-4D02-B7B0-04F4279A6D20
Base64 Code value: RE9UTkVUOkVFRjQ3RDlBLURCQTktNEQwMi1CN0IwLTA0RjQyNzlBNkQyMA==
Once you generate the Base64 encoded value, let’s see how to use basic authentication in the header to pass the Base64 encoded value. Here we need to use the Authorization header and the value will be the Base64 encoded string followed the “BASIC” as shown below.
Authorization: BASIC RE9UTkVUOkVFRjQ3RDlBLURCQTktNEQwMi1CN0IwLTA0RjQyNzlBNkQyMA==
Let’s see step by step procedure to use the Postman to generate the Access Token
Step1: Select the Method as POST and provide URI as shown below in the below image
Step2: Select the Header tab and provide the Authorization value as shown below.
Authorization: BASIC RE9UTkVUOkVFRjQ3RDlBLURCQTktNEQwMi1CN0IwLTA0RjQyNzlBNkQyMA==
Step3: Select the Body Tab. Then choose the x-www-form-urlencoded option and provide the username and password value. Provide the grant_type value as a password as shown in the below image.
Now click on the Send button which will generate the access token along with the refresh token as shown below.
As shown in the response body, you will notice that we have obtained a refresh_token along with the access token which should be used to obtain a new access token (we will discuss this after a while in this post) this token is bounded to the user Anurag and for the Client DOTNET. Note that the expires_in value is related to the access token, not the refresh token, this access token will expire in 30 mins.
Step12: Generating an Access Token using the Refresh Token in Web API
Now we need to implement the logic needed to generate a new access token when we receive the request from the refresh the token, to do so open the class RefreshTokenProvider and implement the ReceiveAsync method as shown below.
We need to set the “Access-Control-Allow-Origin” header by getting the value from the Owin Context. If you will not set this value, then you will get 405 status code and this is because the method “GrantResourceOwnerCredentials” where we set this header is never get executed once we request the access token using the refresh tokens (grant_type = refresh_token).
Then we get the refresh token id from the request, hash this id and look for the token using the hashed refresh token id in “RefreshToken” table, if the refresh token is found, we will use the magical signed string which contains a serialized representation for the ticket to building the ticket and identities for the user mapped to this refresh token.
Finally, we will remove the existing refresh token from the “RefreshToken” table because in our logic we are allowing only one refresh token per user and client.
Implementing GrantRefreshToken in Web API
Now the request context contains all the claims stored previously for this use. Now we need to implement the logic which will allows us to issue new claims or updating the existing claims and contain them into the new access token generated before sending it to the user, to do so open class MyAuthorizationServerProvider and implement method GrantRefreshToken with the following code.
First, we are reading the client id value from the original ticket and this is the client ids which get stored in the magical signed string. Then we are comparing this client id with the client id sent with the request, if they are different then we will reject this request because we need to make sure that the refresh token used here is bound to the same client when it was generated.
Now, we have the chance to add new claims or remove or update existing claims, to do this we are calling the “context.Validated(newTicket)” method which will generate the new access token and return it in the response body.
Lastly, after this method executes successfully, the flow for the code will hit the “CreateAsync” method which is present in the class “RefreshTokenProvider” and a new refresh token is generated and returned in the response along with the new access token.
Testing the Refresh Token in Web API with Postman to generate new access Token:
Step1: Select the Method as POST and provide URI as shown below in the below image
Step2: Select the Header tab and provide the Authorization value as shown below. This is the Base64 encoded value for the ClientID and Client Secret.
Authorization: BASIC RE9UTkVUOkVFRjQ3RDlBLURCQTktNEQwMi1CN0IwLTA0RjQyNzlBNkQyMA==
Step3: Select the Body Tab. Then choose the x-www-form-urlencoded option and provide the Refresh_Token value and the grant_type value as refresh_token as shown in the below image.
In the next article, I am going to discuss how to use the Refresh Token in different types of Client Applications. We will discuss how to use it from C# and JavaScript clients. Here, in this article, I try to explain how to implement Refresh Token in Web API with an example. I hope this article will help you with your need. I would like to have your feedback. Please post your feedback, question, or comments about this article.
Summary:
I hope this post will be helpful to understand the concept of Refresh Token in Web API
Please share this post with your friends and colleagues.
For any queries please post a comment below.
Happy Coding 😉
Token Based Authentication in Web API: In this article, we discussed how to implement and use the Token Based Authentication in Web API.
Client Validation in Token Based Authentication: In this article, we discussed how to validate the clients while generating the token in Web API.
What is a Refresh Token?
A Refresh Token is a special kind of token that can be used to obtain a new renewed access token which allows access to the protected resources. You can request for the new access tokens by using the Refresh Token in Web API until the Refresh Token is blacklisted.
Why we need Refresh Token in Web API?
The idea of using the refresh token is to issue a short-lived access token (up to 30 minutes) for the first time and then use the refresh token to obtain a new access token and use that access token to access the protected resources.
So, the user needs to provide the username and password along with the client info (i.e. the client id and client secret) to authenticate himself, and if the information provided by the user is valid, then a response contains a short-lived access token along with a long-lived refresh token gets generated.
The refresh token is not an access token it is just an identifier for the access token. Now once the access token is expired, the user can use the refresh token to obtain another short-lived access token and so on.
Why not long-lived access token?
Now, you may have one question in your mind. Why not we are issuing a long-lived access token for the first time?
Let’s discuss why not a long-lived access token or what are the advantages of using refresh token in Web API. Mainly there are three main reasons to use the refresh tokens are as follows
Updating the Access Token Content:
As we already discussed, the access tokens are self-contained tokens means they contain all the information (which is known as claims) of an authenticated user once the access token is generated.
Now, if we issue a long-lived access token, let say for example 1 month, for a user let’s say “Anurag” and let say the user “Anurag” is enrolled with the role “Users” at the moment. So all this information gets stored on the access token which is generated by the Authorization Server.
If you have decided (3 days after he obtained the access token) to add him with the role “Admin” and then there is no way to update this information in the access token which is already generated, you need to ask him to re-authenticate himself again, so that the Authorization server add the updated information to the newly generated access token, and this is not feasible in most of the cases. You might not be able to reach to the users who already obtained the long-lived access tokens.
So to overcome the above issue, you need to issue short-lived access token (30 minutes for example) along with a long-lived refresh token and then the user needs to use the refresh token to obtain the newly updated access token, once the user obtains the new access token, the Authorization Server will be able to add the updated claims or new claims to the new access token being generated.
Revoking the Access from Authenticated users:
Once the user obtained the long-lived access token, then he will be able to access the server resources as long as his access token is not expired and there is no standard way to revoke the access tokens unless and until the Authorization Server implements some custom logic to store the generated access token a database and need to do database checks with each and every request.
But with the refresh token, a database or system admin can simply revoke the access by deleting the refresh token identifier from the database. So, when the user requests a new access token by using the deleted refresh token, the Authorization Server will reject this request because the refresh token is no longer available in the database.
No need to store or ask for the username and password frequently:
Using refresh token allows you to ask the user for his username and password only one time (i.e. for the first time), then the Authorization Server can issue very long-lived refresh token (1 year for example) and the user will stay logged in all this period until and unless system admin tries to revoke (delete) the refresh token. This can be very useful if you are building an API that will be consumed by a front-end application where it is not feasible to keep asking for the username/password frequently.
So for the above three major reasons we need to use Refresh Tokens.
The Refresh Tokens and Clients In order to use the refresh token, we need to be bound to the refresh token with a Client. In simple words, we can define a client as an application who wants to access our resources. Each Client should have a unique Client Id and Client Secret.
The Client Id is a piece of unique public information that identifies the application among other applications. The client id can be included in the source code of your application, but the client secret must stay confidential.
Bounding the refresh token to a client is very important this is because you do not want any refresh token generated by your Authorization Server to be used by another client to obtain the access token.
The schema for the client’s table should be as shown below.
In our previous article, we create the ClientMaster table, so let’s delete the existing ClientMaster table and regenerate the ClientMaster table with the above structure.
Please use below SQL Script to DROP, Create and Populate the ClientMaster table with two different clients which we are going to use in this demo.
USE [SECURITY_DB]
GO
--First DROP ClientMaster table
DROP TABLE ClientMaster
-- Create the ClientMaster table with new structure
CREATE TABLE [ClientMaster](
  [ClientKeyId] INT PRIMARY KEY IDENTITY(1,1),
  [ClientID] VARCHAR(500) NOT NULL,
  [ClientSecret] VARCHAR(500) NOT NULL,
  [ClientName] VARCHAR(100) NOT NULL,
  [Active] BIT NOT NULL,
  [RefreshTokenLifeTime] INT NOT NULL,
  [AllowedOrigin] VARCHAR(500) NOT NULL
)
GO
-- INSERT the client details inti the ClientMaster table
INSERT INTO ClientMaster VALUES('DOTNET',NEWID(),'MyClient1',1,7200,'*')
INSERT INTO ClientMaster VALUES('Tutorials',NEWID(),'Dot Net Tutorials',1,14400,'https://dotnettutorials.net')
GO
Let’s us discuss the use of each column of ClientMaster tableThe ClientID and ClientSecret columns of the ClientMaster table uniquely identify a particular client.
The Active column is also very important; if the system admin is decided to deactivate a particular client so that any new requests asking for the access token from that particular deactivated client will be rejected by the Authorization Server.
The Refresh Token Life Time column is used to set when the refresh token (not the access token) will expire in minutes.
Finally, the Allowed Origin column is used to configure the CORS and to set “Access-Control-Allow-Origin” on the back-end API.
Refresh Token Schema: As we already discussed, we need to store the refresh tokens generated by the Authorization Server into a database and this is very important to facilitate the management for refresh tokens. The schema for the Refresh Token table as shown in the below image:
Please use below SQL Script to create the RefershToken table.
-- Create the RefreshToken table
CREATE TABLE RefreshToken
(
  [ID] VARCHAR(500) PRIMARY KEY,
  [UserName] VARCHAR(500),
  [ClientID] VARCHAR(500),
  [IssuedTime] DATETIME,
  [ExpiredTime] DATETIME,
  [ProtectedTicket] VARCHAR(500)
)
Let discuss the use of each column of the RefreshToken table.
The ID column of the RefreshToken table contains the hashed value of the refresh token id, the API consumer will receive and send the plain refresh token Id and the UserName column indicates to which user this refresh token belongs, and the same thing is applied for ClientID column indicating that the Token belongs to that particular clients.
By having the ClientID column, as a system admin, you can revoke (delete) the refresh token for a certain user on a certain client and keep the other refresh tokens for the same user obtained by different clients. For example, let say you have two clients having the same username, if you delete one user for a particular client, then the same user of other clients can access the refresh token.
The IssuedTime and ExpiredTime columns are for display purposes only.
Finally, the Protected Ticket column contains the magical signed string which contains a serialized representation for the ticket for a specific user, in other words, it contains all the claims and ticket properties for a user.
We have discussed enough theory, so it’s time to put all the theories into practice. So let’s discuss the step by step procedure to implement the Refresh Token in Web API. As I already told you that we are going to use the same example that we worked with our previous two articles.
Step1: Modify the EDMX file
We need to modify the EDMX file to add the newly generated RefreshToken table and we also need to update the ClientMaster table. Once you modify your EDMX file, the EDMX file should look as shown below.
Step2: Modify the ClientMasterRepository class as shown below
namespace TokenAuthenticationInWebAPI.Models
{
    public class ClientMasterRepository : IDisposable
    {
        // SECURITY_DBEntities it is your context class
        SECURITY_DBEntities context = new SECURITY_DBEntities();
        //This method is used to check and validate the Client credentials
        public ClientMaster ValidateClient(string ClientID, string ClientSecret)
        {
            return context.ClientMasters.FirstOrDefault(user =>
             user.ClientID == ClientID
            && user.ClientSecret == ClientSecret);
        }
        public void Dispose()
        {
            context.Dispose();
        }
    }
}
Step3: Adding a Helper classAdd a class file with the name Helper.cs and then copy and paste the following code
using System;
using System.Security.Cryptography;
namespace TokenAuthenticationInWebAPI.Models
{
    public class Helper
    {
        public static string GetHash(string input)
        {
            HashAlgorithm hashAlgorithm = new SHA256CryptoServiceProvider();
            byte[] byteValue = System.Text.Encoding.UTF8.GetBytes(input);
            byte[] byteHash = hashAlgorithm.ComputeHash(byteValue);
            return Convert.ToBase64String(byteHash);
        }
    }
}
The above GetHash method is straightforward; it takes an input of string type and returns its hash value.
Step4: Add AuthenticationRepository class file
Add a class file with the name AuthenticationRepository.cs and then copy and paste the following code.
using System;
using System.Collections.Generic;
using System.Linq;
using System.Threading.Tasks;
namespace TokenAuthenticationInWebAPI.Models
{
    public class AuthenticationRepository : IDisposable
    {
        SECURITY_DBEntities context = new SECURITY_DBEntities();
        //Add the Refresh token
        public async Task<bool> AddRefreshToken(RefreshToken token)
        {
            var existingToken = context.RefreshTokens.FirstOrDefault(r => r.UserName == token.UserName
                            && r.ClientID == token.ClientID);
            if (existingToken != null)
            {
                var result = await RemoveRefreshToken(existingToken);
            }
            context.RefreshTokens.Add(token);
            return await context.SaveChangesAsync() > 0;
        }
        //Remove the Refesh Token by id
        public async Task<bool> RemoveRefreshTokenByID(string refreshTokenId)
        {
            var refreshToken = await context.RefreshTokens.FindAsync(refreshTokenId);
            if (refreshToken != null)
            {
                context.RefreshTokens.Remove(refreshToken);
                return await context.SaveChangesAsync() > 0;
            }
            return false;
        }
        //Remove the Refresh Token
        public async Task<bool> RemoveRefreshToken(RefreshToken refreshToken)
        {
            context.RefreshTokens.Remove(refreshToken);
            return await context.SaveChangesAsync() > 0;
        }
        //Find the Refresh Token by token ID
        public async Task<refreshtoken> FindRefreshToken(string refreshTokenId)
        {
            var refreshToken = await context.RefreshTokens.FindAsync(refreshTokenId);
            return refreshToken;
        }
        //Get All Refresh Tokens
        public List<refreshtoken> GetAllRefreshTokens()
        {
            return context.RefreshTokens.ToList();
        }
        public void Dispose()
        {
            context.Dispose();
        }
    }
}
The methods we add in the above AuthenticationRepository class will add support for manipulating the RefreshToken table that we have added, they are self-explanatory methods and there is nothing special about them.
Step5: Modify the Client Validation logic
Here, we need to modify the logic responsible for validating the client information whether the request needs an access token or uses a refresh token to obtain a new access token. To modify the ValidateClientAuthentication method of the MyAuthorizationServerProvider class as shown below.
public override Task ValidateClientAuthentication(OAuthValidateClientAuthenticationContext context)
{
    string clientId = string.Empty;
    string clientSecret = string.Empty;
    // The TryGetBasicCredentials method checks the Authorization header and
    // Return the ClientId and clientSecret
    if (!context.TryGetBasicCredentials(out clientId, out clientSecret))
    {
        context.SetError("invalid_client", "Client credentials could not be retrieved through the Authorization header.");
        return Task.FromResult<object>(null);
    }
    //Check the existence of by calling the ValidateClient method
    ClientMaster client = (new ClientMasterRepository()).ValidateClient(clientId, clientSecret);
    if (client == null)
    {
        // Client could not be validated.
        context.SetError("invalid_client", "Client credentials are invalid.");
        return Task.FromResult<object>(null);
    }
    else
    {
        if (!client.Active)
        {
            context.SetError("invalid_client", "Client is inactive.");
            return Task.FromResult<object>(null);
        }
        // Client has been verified.
        context.OwinContext.Set<clientmaster>("ta:client", client);
        context.OwinContext.Set<string>("ta:clientAllowedOrigin", client.AllowedOrigin);
        context.OwinContext.Set<string>("ta:clientRefreshTokenLifeTime", client.RefreshTokenLifeTime.ToString());
        context.Validated();
        return Task.FromResult<object>(null);
    }
}
Explanation of the above codeWe are trying to get the Client ID and Client Secret from the authorization header using a basic scheme, so the user needs to send the Client ID and Client Secret in the base64 encode format (client_id:client_secret) and need to send it in the Authorization header of the HTTP Request.
Once we receive the client id and client secret, we need to check it in our database whether the client is already registered with our back-end API or not (means we need to validate the client), if it is not registered we will invalidate the context and reject the request.
If the client is registered, then we will check whether the client is active or not, if it is not active, then we will also invalidate the context and reject the request
And, if we found the client is active, then we need to store the client allowed origin and refresh token lifetime value on the Owin context (if you want then you can store all information of the client), so it will be available once we generate the refresh token.
If all is valid we mark the context as a valid context which means that client validation has passed and the flow can proceed to the next step.
Step6: Validating the Resource Owner Credentials
Once the client validation has been passed, next we need to validate the resource owner credentials i.e. the username and password are correct or not, and then we need to bound the client id to the accession generated. To do so, let’s modify the GrantResourceOwnerCredentials method of the MyAuthorizationServerProvider class as shown below.
public override async Task GrantResourceOwnerCredentials(OAuthGrantResourceOwnerCredentialsContext context)
{
    ClientMaster client = context.OwinContext.Get<clientmaster>("ta:client");
    var allowedOrigin = context.OwinContext.Get<string>("ta:clientAllowedOrigin");
    if (allowedOrigin == null)
    {
        allowedOrigin = "*";
    }
    context.OwinContext.Response.Headers.Add("Access-Control-Allow-Origin", new[] { allowedOrigin });
    UserMaster user = null;
    using (UserMasterRepository _repo = new UserMasterRepository())
    {
        user = _repo.ValidateUser(context.UserName, context.Password);
        if (user == null)
        {
            context.SetError("invalid_grant", "Provided username and password is incorrect");
            return;
        }
    }
    var identity = new ClaimsIdentity(context.Options.AuthenticationType);
    identity.AddClaim(new Claim(ClaimTypes.Role, user.UserRoles));
    identity.AddClaim(new Claim(ClaimTypes.Name, user.UserName));
    identity.AddClaim(new Claim("Email", user.UserEmailID));
    var props = new AuthenticationProperties(new Dictionary<string string="">
                {
                    {
                        "client_id", (context.ClientId == null) ? string.Empty : context.ClientId
                    },
                    {
                        "userName", context.UserName
                    }
                });
    var ticket = new AuthenticationTicket(identity, props);
    context.Validated(ticket);
}
Explanation of the Above Code:First, we need to read the client information from the Owin context and then we add the clientAllowedOrigin value to add the header “Access-Control-Allow-Origin” to Owin context response as shown in the below image.
Then we will check the username and password for the resource owner and if it is valid, then we will generate the set of claims for the above user along with authentication properties which contain the client id and username as shown in the below image.
Now the access token will be generated behind the scenes when we call the context.Validated(ticket) method as shown in the below image.
Step8: Implementing the TokenEndpoint method
Now we need to override the TokenEndpoint method within the MyAuthorizationServerProvider class with the following code.
public override Task TokenEndpoint(OAuthTokenEndpointContext context)
{
    foreach (KeyValuePair<string string=""> property in context.Properties.Dictionary)
    {
        context.AdditionalResponseParameters.Add(property.Key, property.Value);
    }
    return Task.FromResult<object>(null);
}
The above TokenEndpoint method is adding some additional properties to the token response.
Step9: Generating Refresh Token in Web API and persisting it into a database
Now we need to generate the Refresh Token and Store it into our database inside the RefreshToken table. To do so, add a class file with the name RefreshTokenProvider.cs under the Models folder and then copy and paste the following code.
using Microsoft.Owin.Security.Infrastructure;
using System;
using System.Threading.Tasks;
namespace TokenAuthenticationInWebAPI.Models
{
    public class RefreshTokenProvider : IAuthenticationTokenProvider
    {
        public async Task CreateAsync(AuthenticationTokenCreateContext context)
        {
            //Get the client ID from the Ticket properties
            var clientid = context.Ticket.Properties.Dictionary["client_id"];
            if (string.IsNullOrEmpty(clientid))
            {
                return;
            }
            //Generating a Uniqure Refresh Token ID
            var refreshTokenId = Guid.NewGuid().ToString("n");
            using (AuthenticationRepository _repo = new AuthenticationRepository())
            {
                // Getting the Refesh Token Life Time From the Owin Context
                var refreshTokenLifeTime = context.OwinContext.Get<string>("ta:clientRefreshTokenLifeTime");
                //Creating the Refresh Token object
                var token = new RefreshToken()
                {
                    //storing the RefreshTokenId in hash format
                    ID = Helper.GetHash(refreshTokenId),
                    ClientID = clientid,
                    UserName = context.Ticket.Identity.Name,
                    IssuedTime = DateTime.UtcNow,
                    ExpiredTime = DateTime.UtcNow.AddMinutes(Convert.ToDouble(refreshTokenLifeTime))
                };
                //Setting the Issued and Expired time of the Refresh Token
                context.Ticket.Properties.IssuedUtc = token.IssuedTime;
                context.Ticket.Properties.ExpiresUtc = token.ExpiredTime;
                token.ProtectedTicket = context.SerializeTicket();
                var result = await _repo.AddRefreshToken(token);
                if (result)
                {
                    context.SetToken(refreshTokenId);
                }
            }
        }
        public Task ReceiveAsync(AuthenticationTokenReceiveContext context)
        {
            throw new NotImplementedException();
        }
        public void Create(AuthenticationTokenCreateContext context)
        {
            throw new NotImplementedException();
        }
        public void Receive(AuthenticationTokenReceiveContext context)
        {
            throw new NotImplementedException();
        }
    }
}
Explanation of the above code:As shown above, the class RefreshTokenProvider implements the interface IAuthenticationTokenProvider, and here we need to add our refresh token generation logic inside the method CreateAsync.
Let discuss what we have done inside the CreateAsync method. First, we are getting the client id from the Ticket Properties. The following code does the above things.
Next, we are generating a unique identifier for the refresh token, here, I am using Guid which is enough for this, or you can use your own unique string generation algorithm. The following code exactly does the same.
Then we are reading the refresh token lifetime value from the Owin context and this value was set when we validate the client, this value will be used to determine how long the refresh token will be valid for, this should be in minutes.
Then we are setting the IssuedUtc, and ExpiresUtc values for the ticket, setting those properties will determine how long the refresh token in web API will be valid for.
After setting all context properties we are calling the context.SerializeTicket() method will be responsible to serialize the ticket content and we will be able to store this magical serialized string on to the database. The following diagram shows the above things.
Now we strong the above token record into the RefreshTokens table, note that we are checking the token which will be saved on the database is unique for this Username (User) and the Client, if it not unique first we will delete the existing one and then store the new refresh token. It is better to hash the refresh token identifier before storing it, so if anyone has access to the database he will not be able to see the real refresh tokens.
Finally, we will send back the refresh token id (without hashing it) in the response body. The following does the above thing.
Step10: Modifying the Start class (OwinStartup class)
We need to set the RefreshTokenProvider class within the OAuthAuthorizationServerOptions, so open the class Start which is present inside the app_start folder and replace the code used to set OAuthAuthorizationServerOptions, with the below code, you can notice that we are setting the access token lifetime to a short period now (30 minutes) instead of 24 hours.
using System;
using Microsoft.Owin;
using Owin;
using TokenAuthenticationInWebAPI.Models;
using Microsoft.Owin.Security.OAuth;
using System.Web.Http;
[assembly: OwinStartup(typeof(TokenAuthenticationInWebAPI.App_Start.Startup))]
namespace TokenAuthenticationInWebAPI.App_Start
{
    public class Startup
    {
        public void Configuration(IAppBuilder app)
        {
            OAuthAuthorizationServerOptions options = new OAuthAuthorizationServerOptions
            {
                AllowInsecureHttp = true,
                //The Path For generating the Toekn
                TokenEndpointPath = new PathString("/token"),
                //Setting the Token Expired Time (30 minutes)
                AccessTokenExpireTimeSpan = TimeSpan.FromMinutes(30),
                //MyAuthorizationServerProvider class will validate the user credentials
                Provider = new MyAuthorizationServerProvider(),
                //For creating the refresh token and regenerate the new access token
                RefreshTokenProvider = new RefreshTokenProvider()
            };

            app.UseOAuthAuthorizationServer(options);
            app.UseOAuthBearerAuthentication(new OAuthBearerAuthenticationOptions());

            HttpConfiguration config = new HttpConfiguration();
            WebApiConfig.Register(config);
        }
    }
}
Step11: Testing the API using Postman:Let’s first create the Base64 Encode value by for the ClientID and ClientSecret by using the following website
https://www.base64encode.org/
Enter the Client ID and Client Secret separated by a colon (:) in “Encode to Base64 format” textbox, and then click on the “Encode” button as shown in the below diagram which will generate the Base64 encoded value.
Example: ClientID: DOTNET and Client Secret: EEF47D9A-DBA9-4D02-B7B0-04F4279A6D20
Base64 Code value: RE9UTkVUOkVFRjQ3RDlBLURCQTktNEQwMi1CN0IwLTA0RjQyNzlBNkQyMA==
Once you generate the Base64 encoded value, let’s see how to use basic authentication in the header to pass the Base64 encoded value. Here we need to use the Authorization header and the value will be the Base64 encoded string followed the “BASIC” as shown below.
Authorization: BASIC RE9UTkVUOkVFRjQ3RDlBLURCQTktNEQwMi1CN0IwLTA0RjQyNzlBNkQyMA==
Let’s see step by step procedure to use the Postman to generate the Access Token
Step1: Select the Method as POST and provide URI as shown below in the below image
Step2: Select the Header tab and provide the Authorization value as shown below.
Authorization: BASIC RE9UTkVUOkVFRjQ3RDlBLURCQTktNEQwMi1CN0IwLTA0RjQyNzlBNkQyMA==
Step3: Select the Body Tab. Then choose the x-www-form-urlencoded option and provide the username and password value. Provide the grant_type value as a password as shown in the below image.
Now click on the Send button which will generate the access token along with the refresh token as shown below.
As shown in the response body, you will notice that we have obtained a refresh_token along with the access token which should be used to obtain a new access token (we will discuss this after a while in this post) this token is bounded to the user Anurag and for the Client DOTNET. Note that the expires_in value is related to the access token, not the refresh token, this access token will expire in 30 mins.
Step12: Generating an Access Token using the Refresh Token in Web API
Now we need to implement the logic needed to generate a new access token when we receive the request from the refresh the token, to do so open the class RefreshTokenProvider and implement the ReceiveAsync method as shown below.
public async Task ReceiveAsync(AuthenticationTokenReceiveContext context)
{
    var allowedOrigin = context.OwinContext.Get< string>("ta:clientAllowedOrigin");
    context.OwinContext.Response.Headers.Add("Access-Control-Allow-Origin", new[] { allowedOrigin });
    string hashedTokenId = Helper.GetHash(context.Token);
    using (AuthenticationRepository _repo = new AuthenticationRepository())
    {
        var refreshToken = await _repo.FindRefreshToken(hashedTokenId);
        if (refreshToken != null)
        {
            //Get protectedTicket from refreshToken class
            context.DeserializeTicket(refreshToken.ProtectedTicket);
            var result = await _repo.RemoveRefreshTokenByID(hashedTokenId);
        }
    }
}
Explanation of the above method:We need to set the “Access-Control-Allow-Origin” header by getting the value from the Owin Context. If you will not set this value, then you will get 405 status code and this is because the method “GrantResourceOwnerCredentials” where we set this header is never get executed once we request the access token using the refresh tokens (grant_type = refresh_token).
Then we get the refresh token id from the request, hash this id and look for the token using the hashed refresh token id in “RefreshToken” table, if the refresh token is found, we will use the magical signed string which contains a serialized representation for the ticket to building the ticket and identities for the user mapped to this refresh token.
Finally, we will remove the existing refresh token from the “RefreshToken” table because in our logic we are allowing only one refresh token per user and client.
Implementing GrantRefreshToken in Web API
Now the request context contains all the claims stored previously for this use. Now we need to implement the logic which will allows us to issue new claims or updating the existing claims and contain them into the new access token generated before sending it to the user, to do so open class MyAuthorizationServerProvider and implement method GrantRefreshToken with the following code.
public override Task GrantRefreshToken(OAuthGrantRefreshTokenContext context)
{
    var originalClient = context.Ticket.Properties.Dictionary["client_id"];
    var currentClient = context.ClientId;
    if (originalClient != currentClient)
    {
        context.SetError("invalid_clientId", "Refresh token is issued to a different clientId.");
        return Task.FromResult<object>(null);
    }
    // Change auth ticket for refresh token requests
    var newIdentity = new ClaimsIdentity(context.Ticket.Identity);
    newIdentity.AddClaim(new Claim("newClaim", "newValue"));
    var newTicket = new AuthenticationTicket(newIdentity, context.Ticket.Properties);
    context.Validated(newTicket);
    return Task.FromResult<object>(null);
}
Explanation of the above code:First, we are reading the client id value from the original ticket and this is the client ids which get stored in the magical signed string. Then we are comparing this client id with the client id sent with the request, if they are different then we will reject this request because we need to make sure that the refresh token used here is bound to the same client when it was generated.
Now, we have the chance to add new claims or remove or update existing claims, to do this we are calling the “context.Validated(newTicket)” method which will generate the new access token and return it in the response body.
Lastly, after this method executes successfully, the flow for the code will hit the “CreateAsync” method which is present in the class “RefreshTokenProvider” and a new refresh token is generated and returned in the response along with the new access token.
Testing the Refresh Token in Web API with Postman to generate new access Token:
Step1: Select the Method as POST and provide URI as shown below in the below image
Step2: Select the Header tab and provide the Authorization value as shown below. This is the Base64 encoded value for the ClientID and Client Secret.
Authorization: BASIC RE9UTkVUOkVFRjQ3RDlBLURCQTktNEQwMi1CN0IwLTA0RjQyNzlBNkQyMA==
Step3: Select the Body Tab. Then choose the x-www-form-urlencoded option and provide the Refresh_Token value and the grant_type value as refresh_token as shown in the below image.
In the next article, I am going to discuss how to use the Refresh Token in different types of Client Applications. We will discuss how to use it from C# and JavaScript clients. Here, in this article, I try to explain how to implement Refresh Token in Web API with an example. I hope this article will help you with your need. I would like to have your feedback. Please post your feedback, question, or comments about this article.
Summary:
I hope this post will be helpful to understand the concept of Refresh Token in Web API
Please share this post with your friends and colleagues.
For any queries please post a comment below.
Happy Coding 😉


