• Home
  • About
  • Contact
  • ado.net
  • angular
  • c#.net
  • design patterns
  • linq
  • mvc
  • .net core
    • .Net Core MVC
    • Blazor Tutorials
  • sql
  • web api
  • dotnet
    • SOLID Principles
    • Entity Framework
    • C#.NET Programs and Algorithms
  • Others
    • C# Interview Questions
    • SQL Server Questions
    • ASP.NET Questions
    • MVC Questions
    • Web API Questions
    • .Net Core Questions
    • Data Structures and Algorithms

Wednesday, April 22, 2020

Calling Web API Service in a Cross-Domain Using jQuery AJAX

 Admin     April 22, 2020     .Net, Web API     No comments   

In this article, I am going to discuss Calling Web API Service in a Cross-Domain Using jQuery AJAX. Please read our previous article before proceeding to this article where we discussed how to consume a Web API service using jQuery AJAX with an example.

What is the same-origin policy of a browser?
The browsers default behavior is that it allows a web page to make AJAX calls only within the same domain that means the browser security prevents a web page to make AJAX requests to other domains. This is called the same-origin policy.

The origin of a request consists of Scheme, Host and Port number. So, two requests are considered to be as the same origin if they have the same scheme, same host and same port number. If any of these differ, then the requests are considered to be cross-origin, i.e., not belonging to the same origins.

What do you mean by Cross-Domain?
Let us understand Cross-Domain with some examples.

The following 2 URLs have the same origin

http://localhost:1234/api/Employee/GetEmployees
http://localhost:1234/Home/Index

The following 2 URLs have different origins because they have different port numbers (1234 v/s 5678)

http://localhost:1234/api/Employee/GetEmployees
http://localhost:5678/Home/Index

The following 2 URLs have different origins because they have different domains (.com v/s .net)

http://example.com/api/Employee/GetEmployees
http://example.net/Home/Index

The following 2 URLs have different origins because they have different schemes (http v/s https)

https://example.com/api/Employee/GetEmployees
http://example.net/Home/Index

To prove browsers do not allow cross-domain AJAX calls, let’s create a new ASP.NET MVC application. Name it as MVCClient as shown below.

Open Visual Studio and create a new project
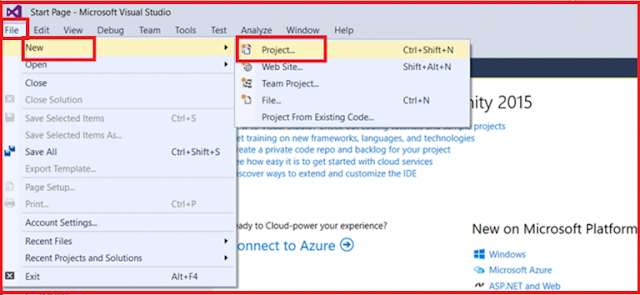
From the Visual Studio context menu, select File => New => Project as shown below
Calling Web API Service in a Cross Domain Using jQuery AJAX - Selecting new project

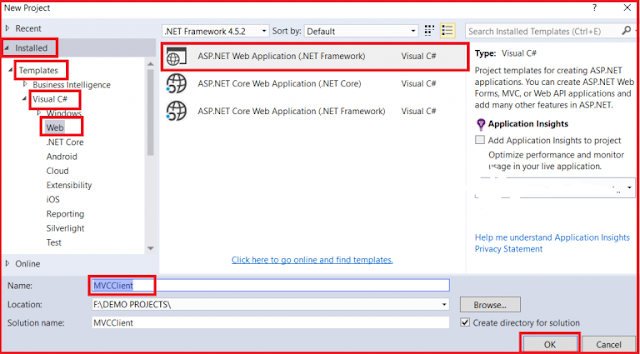
In the “New Project” window select “Visual C#” under the “Installed – Templates” and from the middle pane select the “ASP.NET Web Application” and name the project as “MVCClient” and then click on the “OK” button as shown in the below image
Cross Domain Using jQuery AJAX - Creating new project

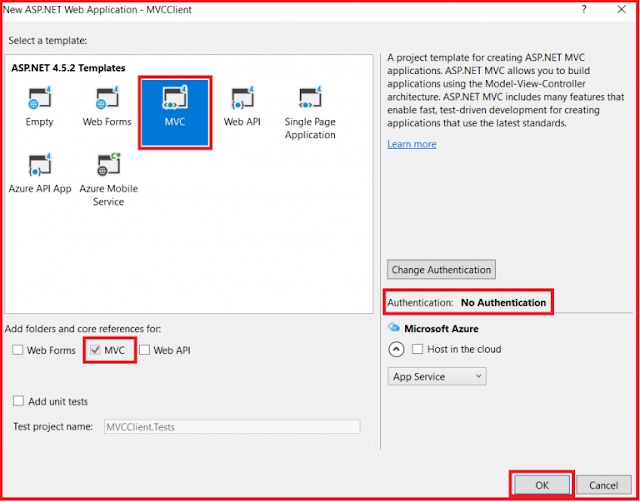
Once you click on the OK button, then a new popup window will open with Name New ASP.NET Project for selecting project Templates and from that window, we are going to select the MVC project template. Next, we need to select the Authentication type for doing that, we just click on Change Authentication button, a new dialog will pop up with the name “Change Authentication” here we are going to select No Authentication option and then click on the OK button as shown in the below image.
Calling Web API Service in a Cross Domain Using jQuery AJAX

Once you click on the OK button, It will take some to time create the project for us.

Add an HTML page.
Right-click on the project then select Add => Html Page as shown below
Calling Web API Service in a Cross Domain Using jQuery AJAX

Provide the Name as HtmlPage1.html and click on the Ok button as shown below.
Calling Web API Service in a Cross Domain Using jQuery AJAX

Copy and paste the following HTML and jQuery code in HtmlPage1.html file.
<!DOCTYPE html>
<html>
<head>
    <title></title>
    <meta charset="utf-8" />
    <script src="Scripts/jquery-3.3.1.js"></script>
    <script type="text/javascript">
        $(document).ready(function () {
            var ulEmployees = $('#ulEmployees');
            $('#btnGetEmployees').click(function () {
                $.ajax({
                    type: 'GET',
                    // Make sure to change the port number to
                    // where you have the employee service
                    // running on your local machine
                    url: 'http://localhost:53009/api/Employees/GetEmployees',
                    dataType: 'json',
                    success: function (data) {
                        ulEmployees.empty();
                        $.each(data, function (index, val) {
                            ulEmployees.append('<li> First Name - ' + val.FirstName + " Last Name - " + val.LastName + " Gender- " + val.Gender + '</li>');
                        });
                    }
                });
            });
            $('#btnClear').click(function () {
                ulEmployees.empty();
            });
        });
    </script>
</head>
<body>
    <div>
        <input id="btnGetEmployees" type="button" value="Get All Employees" />
        <input id="btnClear" type="button" value="Clear" />
        <ul id="ulEmployees" />
    </div>
</body>
</html>

Now first run the Service Project. Then run HtmlPage1.html file from the client project. When you click on the “Get All Employees” button on “HtmlPage1.html” page, you get the following error. To see the error launch browser tools and click on the console tab.

Failed to load http://localhost:53009/api/Employee/GetEmployees: No ‘Access-Control-Allow-Origin’ header is present on the requested resource. Origin ‘http://localhost:62611’ is therefore not allowed access.

On the other hand, when you click on the “Get All Employees” button on “HtmlPage1.html” page that is present in the same project as the ASP.NET Web API Service, the employee data is displayed without any problem. So this proves, browsers do not allow cross-domain AJAX requests. There are 2 ways to get around this problem
  1. Using JSONP (JSON with Padding)
  2. Enabling CORS (Cross-Origin Resource Sharing)
In this article let’s use JSONP to overcome the browser cross-domain restriction. In our next article, we will discuss enabling CORS.

What is JSONP and what does it do?
JSONP stands for JSON with Padding. The job of JSONP is to wraps the data into a function. For example, if you have the following JSON object
{    
   “FirstName”: “Pranaya”,
    “LastName”: “Kumar”,
    “Gender”: “Male”
}

JSONP will wrap the data in a function as shown below
CallbackFunction({    
    “FirstName”: “Pranaya”,
    “LastName”: “Kumar”,
    “Gender”: “Male”,
})

Browsers allow consuming JavaScript (JavaScript function) that is present in a different domain but not data. Since the data is wrapped in a JavaScript function, this can be consumed by a web page that is present in a different domain.

Steps to make ASP.NET Web API Service return JSONP formatted data and consume it from a cross-domain AJAX request

Step1: To support JSONP format, execute the following command using NuGet Package Manager Console which installs WebApiContrib.Formatting.Jsonp package.

Install-Package WebApiContrib.Formatting.Jsonp

Step2: Modify the Register() method of WebApiConfig class in WebApiConfig.cs file in App_Start folder of our web API project.
public static class WebApiConfig
{
    public static void Register(HttpConfiguration config)
    {
        // Web API routes
        config.MapHttpAttributeRoutes();
        config.Routes.MapHttpRoute(
            name: "DefaultApi",
            routeTemplate: "api/{controller}/{action}/{id}",
            defaults: new { id = RouteParameter.Optional }
        );
        var jsonpFormatter = new JsonpMediaTypeFormatter(config.Formatters.JsonFormatter);
        config.Formatters.Insert(0, jsonpFormatter);
    }
}

Step3: In the ClientApplication i.e. MVCClient project, set the dataType option of the jQuery ajax function to jsonp
dataType: ‘jsonp’
Complete Code:
<!DOCTYPE html>
<html>
<head>
    <title></title>
    <meta charset="utf-8" />
    <script src="Scripts/jquery-3.3.1.js"></script>
    <script type="text/javascript">
        $(document).ready(function () {
            var ulEmployees = $('#ulEmployees');
            $('#btnGetEmployees').click(function () {
                $.ajax({
                    type: 'GET',
                    // Make sure to change the port number to
                    // where you have the employee service
                    // running on your local machine
                    url: 'http://localhost:53009/api/Employees/GetEmployees',
                    dataType: 'jsonP',
                    success: function (data) {
                        ulEmployees.empty();
                        $.each(data, function (index, val) {
                            ulEmployees.append('<li> First Name - ' + val.FirstName + " Last Name - " + val.LastName + " Gender- " + val.Gender + '</li>');
                        });
                    }
                });
            });
            $('#btnClear').click(function () {
                ulEmployees.empty();
            });
        });
    </script>
</head>
<body>
    <div>
        <input id="btnGetEmployees" type="button" value="Get All Employees" />
        <input id="btnClear" type="button" value="Clear" />
        <ul id="ulEmployees" />
    </div>
</body>
</html>

Now run the service application first. Then run the client application and navigate to the URL “http://localhost:61757/HtmlPage1.html” and click on Get All Employees which will display all the employees’ information.

Summary:
I Hope this post will be helpful to understand hoow to call Web API services in a Cross-Domain using jQuery AJAX
Please share this post with your friends and colleagues.
For any queries please post a comment below.
Happy Coding 😉
Read More
  • Share This:  
  •  Facebook
  •  Twitter
  •  Google+
  •  Stumble
  •  Digg

Consuming ASP.NET Web API Service From jQuery

 Admin     April 22, 2020     .Net, Web API     No comments   

In this article, I am going to discuss how to Consuming ASP.NET Web API Service From jQuery. We are going to work with the same example that we created in our previous article where we discussed Parameter Binding in ASP.NET WEB API. So please read our previous article before proceeding with this article.

Business Requirements:
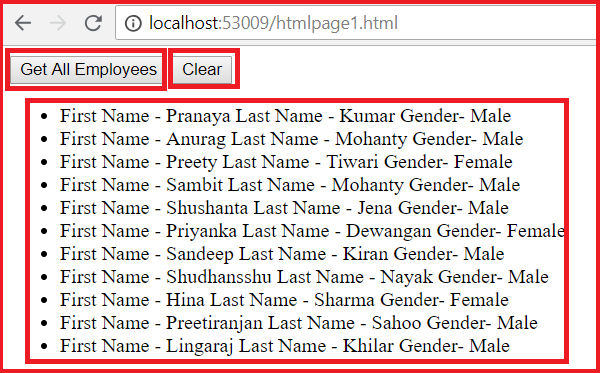
When we click on the “Get All Employees” button, then we need to retrieve all the employee’s information and then display this information in an unordered list as shown in the image below. When we click on the “Clear” button then we need to clear the employees from the unordered list.
Consuming ASP.NET Web API Service From jQuery

Let’s discuss how to consuming ASP.NET Web API Service From jQuery
Modify the Employee Controller of our project as shown below where we create one action which will return the list of employees.
namespace WEB_API_Using_AJAX.Controllers
{
    public class EmployeeController : ApiController
    {
        [HttpGet]
        public IEnumerable<employee> GetEmployees()
        {
            EmployeeDBContext dbContext = new EmployeeDBContext();
            return dbContext.Employees.ToList();
        }
    }
}

Then modify the WebApiConfig class which is present in the inside App_Start folder as shown below. Here we are changing the URI pattern to allow action name as part of the URL.
public static class WebApiConfig
{
    public static void Register(HttpConfiguration config)
    {
        // Web API configuration and services
        // Web API routes
        config.MapHttpAttributeRoutes();
        config.Routes.MapHttpRoute(
            name: "DefaultApi",
            routeTemplate: "api/{controller}/{action}/{id}",
            defaults: new { id = RouteParameter.Optional }
        );
    }
}

Let’s add one Html Page to our project with the name HtmlPage1.html
Right-click on the project and then select Add => Html page as shown below
Consuming WEB API Service From jQuery - Adding HTML Page

In the next pop up specify the name for the HTML page and then click on the Ok button as shown in the image below
Consuming WEB API Service From jQuery - Providing Page Name

Once you created the page then copy and paste the following code in it.
<!DOCTYPE html>
<html>
<head>
    <title></title>
    <meta charset="utf-8" />
    <script src="Scripts/jquery-1.10.2.js"></script>
    <script type="text/javascript">
        $(document).ready(function () {
            var ulEmployees = $('#ulEmployees');
            $('#btnGetEmployees').click(function () {
                $.ajax({
                    type: 'GET',
                    url: "api/Employees/GetEmployees",
                    dataType: 'json',
                    success: function (data) {
                        ulEmployees.empty();
                        $.each(data, function (index, val) {
                            ulEmployees.append('<li> First Name - ' + val.FirstName + " Last Name - " + val.LastName + " Gender- " + val.Gender + '</li>');
                        });
                    }
                });
            });
            $('#btnClear').click(function () {
                ulEmployees.empty();
            });
        });
    </script>
</head>
<body>
    <div>
        <input id="btnGetEmployees" type="button" value="Get All Employees" />
        <input id="btnClear" type="button" value="Clear" />
        <ul id="ulEmployees"></ul>
    </div>
</body>
</html>

That’s it, now run the application and navigate to the following URL in the browser

http://localhost:xxxxx/htmlpage1.html (instead of xxxxx you need to provide the port number where your application is running). It will display the following page.
Consuming WEB API Service From jQuery - HTML Page

Once you click on Get All Employees button it will display the employees data as unordered list as shown below on the below page.
How to Consuming ASP.NET Web API From jQuery

In this example, both the client (i.e. the HTML page that contains the AJAX code) and the ASP.NET Web API service are present in the same project so it worked without any problem. But, if they are present in different projects then this wouldn’t work.

Summary:
I Hope this post will be helpful to understand how to consume ASP.NET Web API Service using jQuery.
Please share this post with your friends and colleagues.
For any queries please post a comment below.
Happy Coding 😉
Read More
  • Share This:  
  •  Facebook
  •  Twitter
  •  Google+
  •  Stumble
  •  Digg

Tuesday, April 21, 2020

Parameter Binding in ASP.NET Web API

 Admin     April 21, 2020     .Net, Web API     No comments   

In this article, I am going to discuss one of the most important concepts i.e. Parameter Binding in ASP.NET Web API Application. Please read our previous article before proceeding to this article where we discussed creating custom method names in Web API application.

What do you mean by Parameter Binding in Web API?
The Parameter Binding in ASP.NET Web API means how the Web API Framework binds the incoming HTTP request data to the parameters of an action method of a Web API controller.

The ASP.NET Web API action methods can take one or more parameters of different types. An action method parameters can be either of a complex type or primitive types. The Web API Framework binds the action method parameters either with the URL’s query string or from the request body of the incoming HTTP Request based on the parameter type.

Default Parameter Binding in Web API
By default, if the parameter type is of the primitive type such as int, bool, double, string, GUID, DateTime, decimal or any other type that can be converted from the string type then Web API Framework sets the action method parameter value from the query string. And if the action method parameter type is a complex type then Web API Framework tries to get the value from the body of the request and this is the default nature of Parameter Binding in Web API Framework.

The following table lists the default rules for Web API Parameter Binding.

Default Parameter Binding in Web API

Note: From the above diagram it clearly shows that we do not have a request body for GET and DELETE HTTP request. So, in that case, it tries to get the data from the query string.

Understanding the Parameter Binding in ASP.NET Web API with an Example.
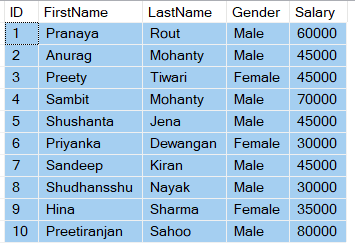
We are going to use a testing tool called “Fiddler” to test these Verbs. Again we are going to use the following Employee table to understand the Parameter binding in Web API concepts.
Web API Parameter Binding

Please use the following SQL Script which will create and populate the Employees database table along with the database with the required test data.
CREATE DATABASE WEBAPI_DB
GO
USE WEBAPI_DB
GO
CREATE TABLE Employees
(
     ID int primary key identity,
     FirstName nvarchar(50),
     LastName nvarchar(50),
     Gender nvarchar(50),
     Salary int
)
GO
INSERT INTO Employees VALUES ('Pranaya', 'Rout', 'Male', 60000)
INSERT INTO Employees VALUES ('Anurag', 'Mohanty', 'Male', 45000)
INSERT INTO Employees VALUES ('Preety', 'Tiwari', 'Female', 45000)
INSERT INTO Employees VALUES ('Sambit', 'Mohanty', 'Male', 70000)
INSERT INTO Employees VALUES ('Shushanta', 'Jena', 'Male', 45000)
INSERT INTO Employees VALUES ('Priyanka', 'Dewangan', 'Female', 30000)
INSERT INTO Employees VALUES ('Sandeep', 'Kiran', 'Male', 45000)
INSERT INTO Employees VALUES('Shudhansshu', 'Nayak', 'Male', 30000)
INSERT INTO Employees VALUES ('Hina', 'Sharma', 'Female', 35000)
INSERT INTO Employees VALUES ('Preetiranjan', 'Sahoo', 'Male', 80000)
GO

Creating a new ASP.NET Web API Project
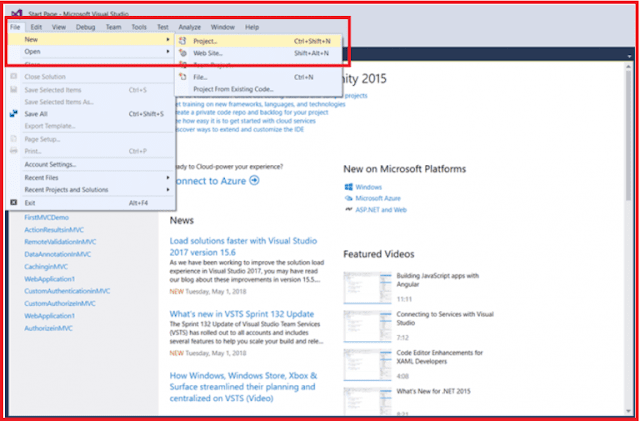
Open Visual Studio and select File -> New –> Project as shown below
Parameter Binding in ASP.NET Web API

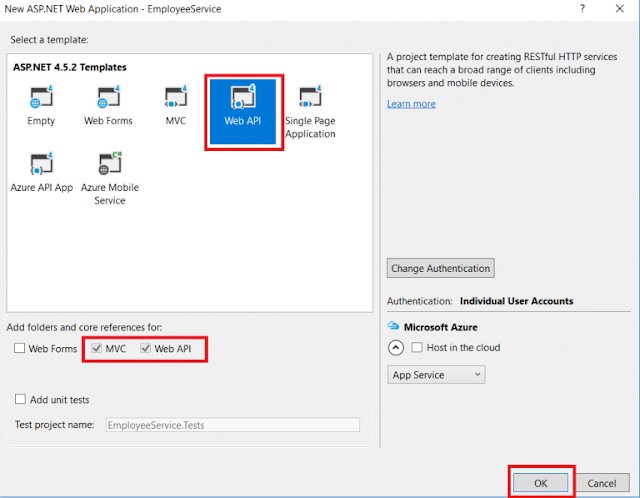
In the “New Project” window, select “Visual C#” under the “Installed – Templates” section. From the middle pane select the “ASP.NET Web Application” and then give a meaningful name to your application, here I provided the name as “EmployeeService” and then click on the “OK” button as shown in the below image
Web API Parameter Binding

Once you click on the OK button a new dialog window will open with Name “New ASP.NET Project” for selecting the Project Templates. From this window, you need to choose the WEB API project template and then click on the OK button as shown below.
Web API Parameter Binding

At this point, you should have the Web API project created.

Adding ADO.NET Entity Data Model to retrieve data from the database
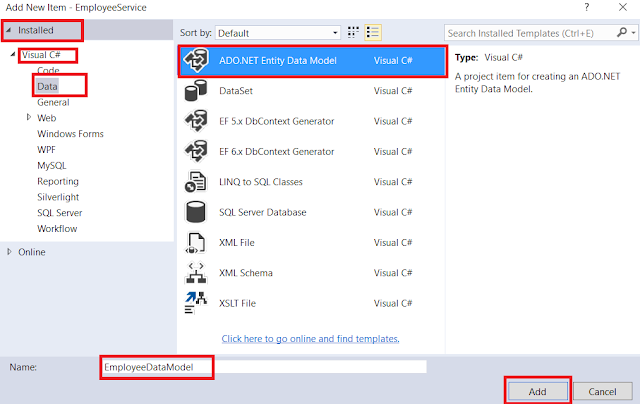
Right-click on the Models folder and then select Add -> New Item option which will open the Add New Item windows. From the “Add New Item” window select the “Data” from the left pane and then select the ADO.NET Entity Data Model from the middle pane of the Add New Item window.

In the name text box, provide a meaningful name like EmployeeDataModel and click on the Add button as shown in the below image.
Web API Parameter Binding

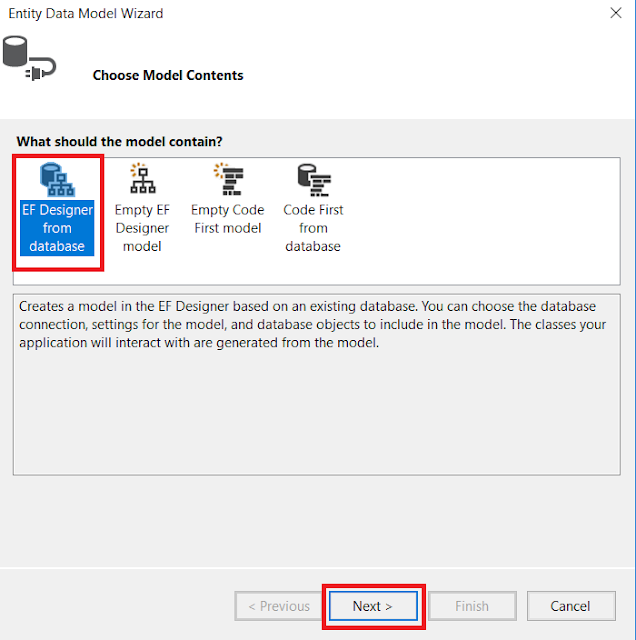
On the Entity Data Model Wizard, select “EF Designer from database” option and click the Next button
Web API Parameter Binding

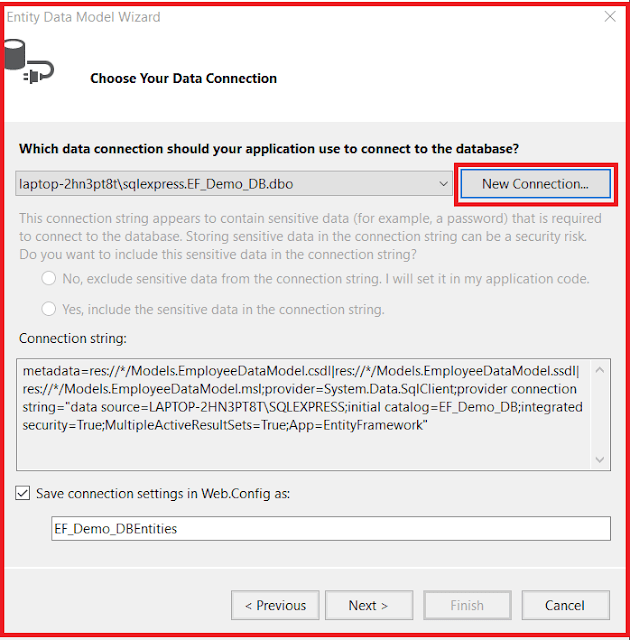
From the Choose Your Data Connection screen, click on the “New Connection” button as shown below
Parameter Bindings in WEB API

Once you click on the New Connection Button it will open the Connection Properties window and from the “Connection Properties” window, set the following things
  • Server Name = provide the server
  • Authentication = Select the authentication type
  • Select or enter a database name = WEBAPI_DB
  • Click the OK button as shown below.

Parameter Bindings in WEB API

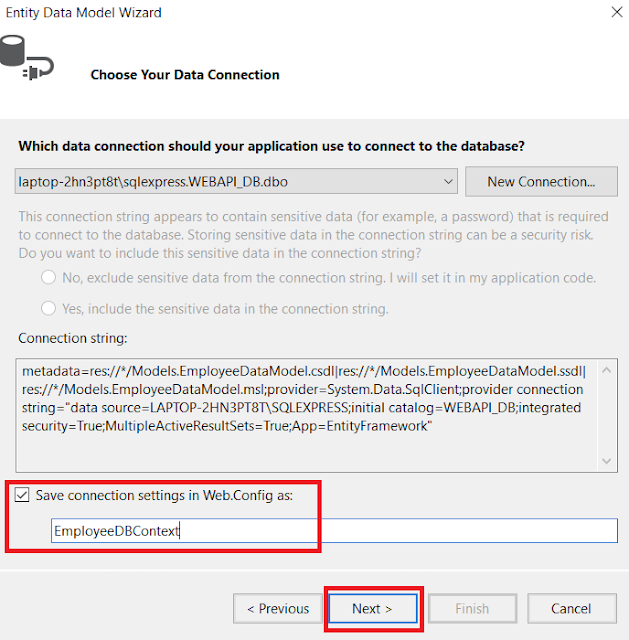
Once you click on the OK button it will navigate back to the Choose Your Data Connection wizard. Here Modify the Connection String as EmployeeDBContext and click on the Next Button as shown in the below image.
Parameter Bindings in WEB API

On the next screen, select Entity Framework 6.x as shown in the below image. This step may be optional if you are using a higher version of visual studio.
Web API Parameter Binding

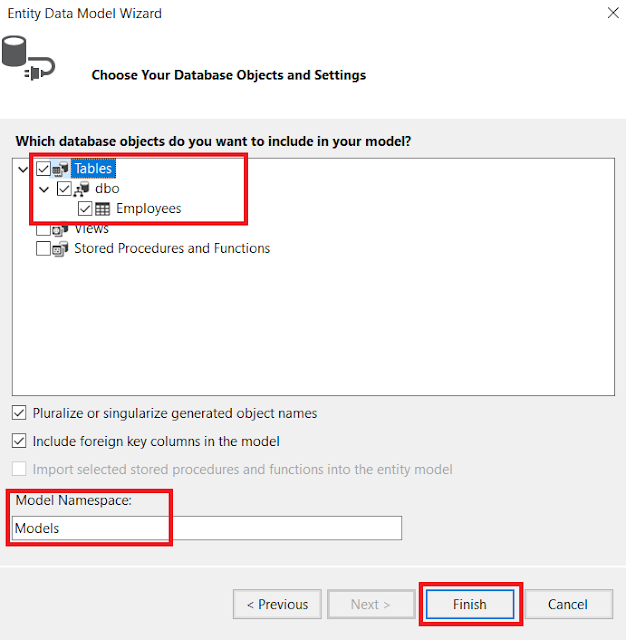
On Choose Your Database Objects and Settings screen, select the “Employees” table, provide the model namespace name and click on the Finish button as shown below.
Web API Parameter Binding

Once you click on the Finish Button the edmx file will be generated.

Adding Web API Controller
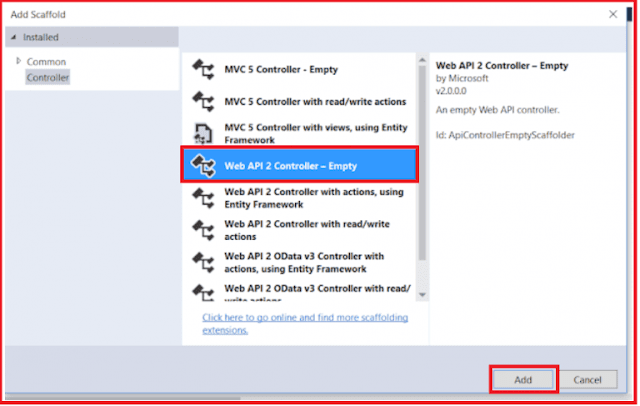
Right-click on the Controllers folder and select Add -> Controller which will open a window to select the controller. From that window select “Web API 2 Controller – Empty” and then click on the “Add” button as shown below.
Parameter Binding in ASP.NET Web API

On the next screen set, the Controller Name as EmployeesController and click on the Add button as shown in the below image.
Parameter Bindings in WEB API

Copy and paste the following code in EmployeesController.
public class EmployeesController : ApiController
{
    public HttpResponseMessage GET()
    {
        using (EmployeeDBContext dbContext = new EmployeeDBContext())
        {
            var Employees =  dbContext.Employees.ToList();
            return Request.CreateResponse(HttpStatusCode.OK, Employees);
        }
    }
}

Depending on the value we specify for query string parameter gender, the Get() method should return the data.

/api/employees?gender=all Return All Employees

/api/employees?gender=Male Return All Male Employees

/api/employees?gender=Female Return All Female Employees

If the value for gender is not Male, Female or All, then the service should return status code 400 Bad Request. For example, if we specify ABC as the value for gender, then the service should return status code 400 Bad Request with the following message.

Value for gender must be Male, Female or All. ABC is invalid.

Below is the modified Get() method
Gender is being passed as a parameter to the Get() method. The default value is “All”. The default value makes the parameter optional. The gender parameter of the Get() method is mapped to the gender parameter sent in the query string
public class EmployeesController : ApiController
{
    public HttpResponseMessage Get(string gender = "All")
    {
        using (EmployeeDBContext dbContext = new EmployeeDBContext())
        {
            switch (gender.ToLower())
            {
                case "all":
                    return Request.CreateResponse(HttpStatusCode.OK,
                        dbContext.Employees.ToList());
                case "male":
                    return Request.CreateResponse(HttpStatusCode.OK,
                        dbContext.Employees.Where(e => e.Gender.ToLower() == "male").ToList());
                case "female":
                    return Request.CreateResponse(HttpStatusCode.OK,
                        dbContext.Employees.Where(e => e.Gender.ToLower() == "female").ToList());
                default:
                    return Request.CreateErrorResponse(HttpStatusCode.BadRequest,
                        "Value for gender must be Male, Female or All. " + gender + " is invalid.");
            }
        }
    }
}

Understanding FromBody and FromUri attributes.
Let us understand their use with an example. Consider the following Put() method. This method updates the specified Employee details. Add the following PUT method within the Employees Controller
public HttpResponseMessage Put(int id, Employee employee)
{
    try
    {
        using (EmployeeDBContext dbContext = new EmployeeDBContext())
        {
            var entity = dbContext.Employees.FirstOrDefault(e => e.ID == id);
            if (entity == null)
            {
                return Request.CreateErrorResponse(HttpStatusCode.NotFound,
                    "Employee with Id " + id.ToString() + " not found to update");
            }
            else
            {
                entity.FirstName = employee.FirstName;
                entity.LastName = employee.LastName;
                entity.Gender = employee.Gender;
                entity.Salary = employee.Salary;
                dbContext.SaveChanges();
                return Request.CreateResponse(HttpStatusCode.OK, entity);
            }
        }
    }
    catch (Exception ex)
    {
        return Request.CreateErrorResponse(HttpStatusCode.BadRequest, ex);
    }
}

To update employee details whose Id is 1 we issue a Put request to the URI /api/employees/1

Note: Query string parameter names must match with the name of an action method parameter. However, they can be in a different order.

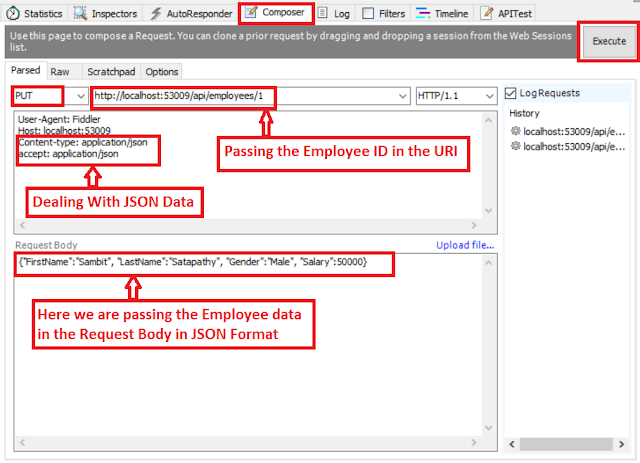
If you are using Fiddler, the PUT request is as shown below. Notice the Id of the employee is in the URI and the employee data is in the request body.
Parameter Binding in ASP.NET Web API

At this point, if you execute the request, the employee data is updated as expected. Now let’s include the Id as a query string parameter. In the first request, Id is specified as part of route data. Notice in Fiddler we have included id parameter as a query string.
Parameter Binding in ASP.NET Web API

When we execute this request, the update succeeds as expected. When a PUT request is issued, Web API maps the data in the request to the PUT method parameters in the Employees Controller. This process is called Parameter Binding.

Default convention used by Web API for Parameter binding.
If the parameter is a simple type like int, bool, double, etc., Web API tries to get the value from the URI (Either from route data or from the Query String) whereas if the parameter is a complex type like Customer, Employee, etc., then the Web API Framework tries to get the value from the request body.

So in our case, the id parameter is a simple type, so Web API tries to get the value from the request URI. The employee parameter is a complex type, so Web API gets the value from the request body.

Note: Name of the complex type properties and query string parameters must match.

We can change this default behavior of the parameter binding process by using [FromBody] and [FromUri] attributes. Notice in the example below we have decorated the id parameter with [FromBody] attribute which will force the Web API Framework to get it from the request body. We have also decorated the employee object with the [FromUri] attribute which will force the Web API Framework to get the employee data from the URI (i.e. Route data or Query String)
public HttpResponseMessage Put([FromBody]int id, [FromUri]Employee employee)
{
    try
    {
        using (EmployeeDBContext dbContext = new EmployeeDBContext())
        {
            var entity = dbContext.Employees.FirstOrDefault(e => e.ID == id);
            if (entity == null)
            {
                return Request.CreateErrorResponse(HttpStatusCode.NotFound,
                    "Employee with Id " + id.ToString() + " not found to update");
            }
            else
            {
                entity.FirstName = employee.FirstName;
                entity.LastName = employee.LastName;
                entity.Gender = employee.Gender;
                entity.Salary = employee.Salary;
                dbContext.SaveChanges();
                return Request.CreateResponse(HttpStatusCode.OK, entity);
            }
        }
    }
    catch (Exception ex)
    {
        return Request.CreateErrorResponse(HttpStatusCode.BadRequest, ex);
    }
}

Here is the request from Fiddler
  1. Employee data is specified in the URI using query string parameters
  2. The id is specified in the request body
Parameter Binding in Web API

When we execute the request the update succeeds as expected

Are multiple FormBody attributes allowed?
No, multiple FormBody attributes are not allowed in a single action.

Summary:
I Hope this post will be helpful to understand the concept of Parameter Binding in ASP.NET Web API.
Please share this post with your friends and colleagues.
For any queries please post a comment below.
Happy Coding 😉
Read More
  • Share This:  
  •  Facebook
  •  Twitter
  •  Google+
  •  Stumble
  •  Digg

Custom Method Names in Web API

 Admin     April 21, 2020     .Net, Web API     No comments   

In this article, I am going to discuss how to create Custom Method Names in Web API application. Please read our previous article before proceeding to this article where we discussed how to implement the CRUD Operation in ASP.NET Web API Application and we are also going to work with the same example.

Understanding the Default Convention used by ASP.NET Web API.
Let’s understand the default convention used by ASP.NET Web API to map HTTP verbs GET, PUT, POST and DELETE to methods in a controller with an example.

By default, the HTTP verb GET is mapped to a method in a controller that has the name Get() or starts with the word Get.

In the following EmployeesController, the method name is Get() so by default convention, this is mapped to the HTTP verb GET. Even if we rename it to GetEmployees() or GetSomething() it will still be mapped to the HTTP verb GET as long as the name of the method is prefixed with the word Get. The word Get is case-insensitive. It can be lowercase, uppercase or a mix of both.
public class EmployeesController : ApiController
{
    public HttpResponseMessage Get()
    {
        using (EmployeeDBContext dbContext = new EmployeeDBContext())
        {
            var Employees =  dbContext.Employees.ToList();
            return Request.CreateResponse(HttpStatusCode.OK, Employees);
        }
    }
}

If the method is not named as GET or if it does not start with the word GET then Web API does not know the method name to which, the GET request must be mapped and the request fails with an error message stating The requested resource does not support HTTP method ‘GET’ with the status code 405 Method Not Allowed.

In the following example, we have renamed Get() method to LoadAllEmployees(). When we issue a GET request the request will fail because ASP.NET Web API does not know it has to map the GET request to this method.
public class EmployeesController : ApiController
{
    public HttpResponseMessage LoadAllEmployees()
    {
        using (EmployeeDBContext dbContext = new EmployeeDBContext())
        {
            var Employees =  dbContext.Employees.ToList();
            return Request.CreateResponse(HttpStatusCode.OK, Employees);
        }
    }
}

To instruct Web API to map HTTP verb GET to LoadAllEmployees() method, decorate the method with [HttpGet] attribute as shown below.
public class EmployeesController : ApiController
{
    [HttpGet]
    public HttpResponseMessage LoadAllEmployees()
    {
        using (EmployeeDBContext dbContext = new EmployeeDBContext())
        {
            var Employees =  dbContext.Employees.ToList();
            return Request.CreateResponse(HttpStatusCode.OK, Employees);
        }
    }
}

Let’s say we have the following two methods in our Employee API controller.
public class EmployeesController : ApiController
{
    [HttpGet]
    public HttpResponseMessage LoadAllEmployees()
    {
        using (EmployeeDBContext dbContext = new EmployeeDBContext())
        {
            var Employees =  dbContext.Employees.ToList();
            return Request.CreateResponse(HttpStatusCode.OK, Employees);
        }
    }
    public HttpResponseMessage LoadEmployeeByID(int id)
    {
        using (EmployeeDBContext dbContext = new EmployeeDBContext())
        {
            var entity = dbContext.Employees.FirstOrDefault(e => e.ID == id);
            if (entity != null)
            {
                return Request.CreateResponse(HttpStatusCode.OK, entity);
            }
            else
            {
                return Request.CreateErrorResponse(HttpStatusCode.NotFound,
                    "Employee with ID " + id.ToString() + "not found");
            }
        }
    }
}

When we navigate to the URI /api/employees/1

Notice, we are getting all the Employees, instead of just the Employee with Id=1. This is because in this case the GET request is mapped to LoadAllEmployees() and not to LoadEmployeeById(int id).

If you want the GET request to be mapped to LoadEmployeeById(int id) when the id parameter is specified in the URI, then decorate the LoadEmployeeById(int id) method also with [HttpGet] attribute as shown below.
public class EmployeesController : ApiController
{
    [HttpGet]
    public HttpResponseMessage LoadAllEmployees()
    {
        using (EmployeeDBContext dbContext = new EmployeeDBContext())
        {
            var Employees =  dbContext.Employees.ToList();
            return Request.CreateResponse(HttpStatusCode.OK, Employees);
        }
    }
    [HttpGet]
    public HttpResponseMessage LoadEmployeeByID(int id)
    {
        using (EmployeeDBContext dbContext = new EmployeeDBContext())
        {
            var entity = dbContext.Employees.FirstOrDefault(e => e.ID == id);
            if (entity != null)
            {
                return Request.CreateResponse(HttpStatusCode.OK, entity);
            }
            else
            {
                return Request.CreateErrorResponse(HttpStatusCode.NotFound,
                    "Employee with ID " + id.ToString() + "not found");
            }
        }
    }
}

That’s OK. But in real-time we may have to implement multiple get or post or put method within a single controller. For example, we have two methods as shown below
public class EmployeesController : ApiController
{
    [HttpGet]
    public HttpResponseMessage LoadAllEmployees()
    {
        using (EmployeeDBContext dbContext = new EmployeeDBContext())
        {
            var Employees =  dbContext.Employees.ToList();
            return Request.CreateResponse(HttpStatusCode.OK, Employees);
        }
    }
    [HttpGet]
    public HttpResponseMessage LoadAllMaleEmployees()
    {
        using (EmployeeDBContext dbContext = new EmployeeDBContext())
        {
            var Employees = dbContext.Employees.Where(x => x.Gender == "Male").ToList();
            return Request.CreateResponse(HttpStatusCode.OK, Employees);
        }
    }
}

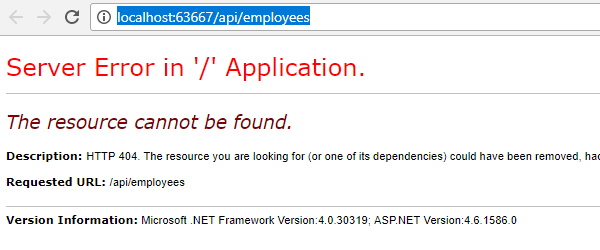
Now when we make a request with the URL /api/employees We will get the below error
Custom Methods Names in Web API

Now the question is how to access these two methods along with how we will provide a unique URL to each resource.

First, let’s see the default implementation of the WebApiConfig class which is present in App_Start Folder.
public static class WebApiConfig
{
    public static void Register(HttpConfiguration config)
    {
        // Web API routes
        config.MapHttpAttributeRoutes();
        config.Routes.MapHttpRoute(
            name: "DefaultApi",
            routeTemplate: "api/{controller}/{id}",
            defaults: new { id = RouteParameter.Optional }
        );
    }
}

The default route specifies the URL route as domain Name Followed by API and controller name. In our example, it will be http://localhost:xxxxx/api/employees where “employees” is the controller name.

Implementing Custom Method Names in Web API:
To implement Custom Method Names in Web API, Let’s change first the default implementation of the WebApiConfig class as shown below where we include the action name as part of the route.
public static class WebApiConfig
{
    public static void Register(HttpConfiguration config)
    {
        // Web API routes
        config.MapHttpAttributeRoutes();
        config.Routes.MapHttpRoute(
            name: "DefaultApi",
            routeTemplate: "api/{controller}/{action}/{id}",
            defaults: new { id = RouteParameter.Optional }
        );
    }
}

Now make a request with the same URL /api/employees It will give us the following error
Custom Methods Names in Web API

So change the URL as we need to include the action name in the URL as we do the changes in the WebApiConfig class.

/api/employees/LoadAllEmployees
/api/employees/LoadAllMaleEmployees

That’s it. We have successfully implemented Custom Method Names in Web API. Now you will get the response as expected.

Summary:
I Hope this post will be helpful to understand the concept of Custom Method Names in Web API.
Please share this post with your friends and colleagues.
For any queries please post a comment below.
Happy Coding 😉
Read More
  • Share This:  
  •  Facebook
  •  Twitter
  •  Google+
  •  Stumble
  •  Digg

How to Implement DELETE Method in Web API

 Admin     April 21, 2020     .Net, Web API     No comments   

In this article, I am going to discuss how to Implement DELETE Method in Web API Application with an example. Please read our previous article where we discussed how to Implement PUT Method Web API before proceeding to this article as we are going to work with the same example.

How to Implement the DELETE Method in ASP.NET Web API?
The Delete Method in Web API allows us to delete an item. We want to delete a specified employee from the Employees database table. To achieve this Include the following Delete method in EmployeesController.
public class EmployeesController : ApiController
{
    public void Delete(int id)
    {
        using (EmployeeDBContext dbContext = new EmployeeDBContext())
        {
            dbContext.Employees.Remove(dbContext.Employees.FirstOrDefault(e => e.ID == id));
            dbContext.SaveChanges();
        }
    }
}

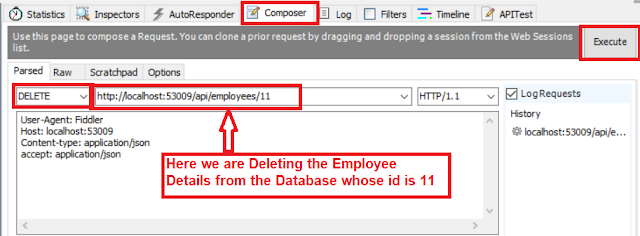
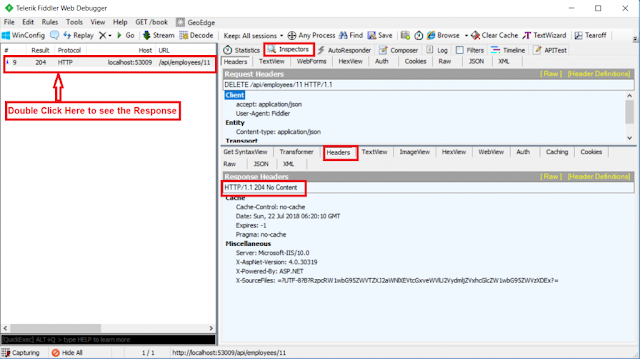
At this point build the solution, run the application and fire up the Fiddler and issue a Delete request.
  • Set the HTTP verb to DELETE
  • Content-Type: application/json. This tells that we are sending JSON formatted data to the server
  • Finally, click on the execute button as shown below
DELETE Method in WEB API

When we click on the Execute button, it will give us the below response
DELETE Method in WEB API

This works fine and deletes the employee record from the database as expected. The problem here is that since the return type of the Delete method is void, we get status code 204 No Content. When the Deletion is successful, we want to return status code 200 OK indicating that the deletion is successful.

Also when we try to delete an employee whose Id does not exist we get back HTTP status code 500 Internal Server Error. We get status code 500, because of a NULL reference exception. If an item is not found, then we need to return status code 404 Not Found.

How to Fix the above issues?
To fix both of these issues modify the code in the Delete method as shown below.
public class EmployeesController : ApiController
{
    public HttpResponseMessage Delete(int id)
    {
        try
        {
            using (EmployeeDBContext dbContext = new EmployeeDBContext())
            {
                var entity = dbContext.Employees.FirstOrDefault(e => e.ID == id);
                if (entity == null)
                {
                    return Request.CreateErrorResponse(HttpStatusCode.NotFound,
                        "Employee with Id = " + id.ToString() + " not found to delete");
                }
                else
                {
                    dbContext.Employees.Remove(entity);
                    dbContext.SaveChanges();
                    return Request.CreateResponse(HttpStatusCode.OK);
                }
            }
        }
        catch (Exception ex)
        {
            return Request.CreateErrorResponse(HttpStatusCode.BadRequest, ex);
        }
    }
}

At this point, issue another DELETE request from the Fiddler. Notice in the response header we have status code 200 OK. Also, when we try to delete an employee whose id does not exist, we get status code 404 Not Found instead of 500 Internal Server Error

Summary:
I Hope this post will be helpful to understand how to implement DELETE Method in Web API
Please share this post with your friends and colleagues.
For any queries please post a comment below.
Happy Coding 😉
Read More
  • Share This:  
  •  Facebook
  •  Twitter
  •  Google+
  •  Stumble
  •  Digg

Monday, April 20, 2020

How to Implement PUT Method in Web API

 Admin     April 20, 2020     .Net, Web API     No comments   

In this article, I am going to discuss how to Implement PUT Method in Web API with one example. Please read our previous article where we discussed how to implement the POST Method in Web API before proceeding to this article as we are going to work with the same example.

How to Implement PUT method in ASP.NET Web API?
The PUT method in Web API allows us to update an item. Here, we want to update the employee by Id. Include the following Put method in EmployeesController. Notice the id of the employee that we want to update and the Employee object with which we want to update are being passed as parameters to the Post method. The Employee parameter is decorated with the [FromBody] attribute. This tells Web API to get employee data from the request body.
public class EmployeesController : ApiController
{
    public void Put(int id, [FromBody]Employee employee)
    {
        using (EmployeeDBContext dbContext = new EmployeeDBContext())
        {
            var entity = dbContext.Employees.FirstOrDefault(e => e.ID == id);
            entity.FirstName = employee.FirstName;
            entity.LastName = employee.LastName;
            entity.Gender = employee.Gender;
            entity.Salary = employee.Salary;
            dbContext.SaveChanges();
        }
    }
}

At this point build the solution, run the application and fire up Fiddler and issue a Put request.
  • Set the HTTP verb to PUT
  • Content-Type: application/json. This tells that we are sending JSON formatted data to the server
  • In the Request Body, include the updated employee object with which you want to update
  • Finally, click on the execute button as shown below
Implementing PUT Method in WEB API

When we click on the Execute button, it will give us the below response.
Implementing PUT Method in WEB API

This works fine and updates the employee record in the database as expected. The problem here is that since the return type of the Put method is void, we get status code 204 No Content. When the update is successful, we want to return status code 200 OK indicating that the update is successful.

Also when we try to update an employee whose Id does not exist we get back HTTP status code 500 Internal Server Error. We get status code 500, because of a NULL reference exception. To fix both of these issues modify the code in the Put method as shown below.
public class EmployeesController : ApiController
{
    public HttpResponseMessage Put(int id, [FromBody]Employee employee)
    {
        try
        {
            using (EmployeeDBContext dbContext = new EmployeeDBContext())
            {
                var entity = dbContext.Employees.FirstOrDefault(e => e.ID == id);
                if (entity == null)
                {
                    return Request.CreateErrorResponse(HttpStatusCode.NotFound,
                        "Employee with Id " + id.ToString() + " not found to update");
                }
                else
                {
                    entity.FirstName = employee.FirstName;
                    entity.LastName = employee.LastName;
                    entity.Gender = employee.Gender;
                    entity.Salary = employee.Salary;
                    dbContext.SaveChanges();
                    return Request.CreateResponse(HttpStatusCode.OK, entity);
                }
            }
        }
        catch (Exception ex)
        {
            return Request.CreateErrorResponse(HttpStatusCode.BadRequest, ex);
        }
    }
}

At this point, issue another Put request from Fiddler. Notice in the response header we have status code 200 OK. Also, when we try to update an employee whose id does not exist, we get status code 404 Not Found instead of 500 Internal Server Error

Summary:
I Hope this post will be helpful to understand How to implement PUT Method in Web API
Please share this post with your friends and colleagues.
For any queries please post a comment below.
Happy Coding 😉
Read More
  • Share This:  
  •  Facebook
  •  Twitter
  •  Google+
  •  Stumble
  •  Digg

How to Implement POST Method in Web API

 Admin     April 20, 2020     .Net, Web API     No comments   

In this article, I am going to discuss how to Implement the POST Method in Web API Application with one example. Please read our previous article where we discussed how to Implement the GET Method in WEB API application before proceeding to this article as we are going to work with the same application.

How to Implement the POST Method in Web API Application?
The Post Method in Web API application allows us to create a new item. Here, we want to add a new Employee to the Employees table. First, Include the following Post() method within the EmployeesController. Notice that the Employee object is being passed as a parameter to the Post method. The Employee parameter is decorated with the [FromBody] attribute. We will discuss [FromBody] attribute in details in a later article but for now to understand this [FormBody] attribute tells the Web API to get the employee data from the request body.
public class EmployeesController : ApiController
{
    public void Post([FromBody] Employee employee)
    {
        using (EmployeeDBContext dbContext = new EmployeeDBContext())
        {
            dbContext.Employees.Add(employee);
            dbContext.SaveChanges();
        }
    }
}

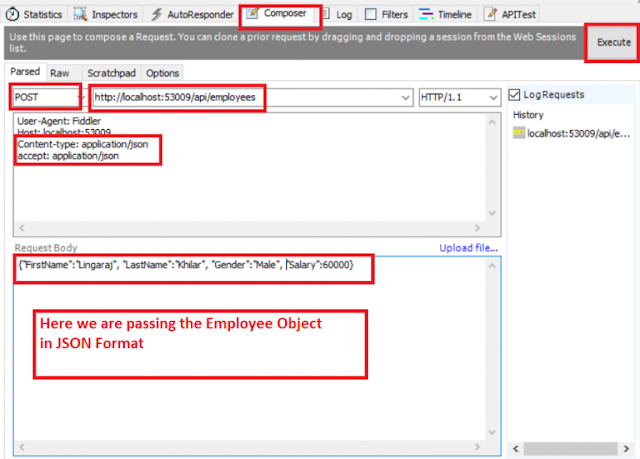
At this point build the solution. Run the application and Fire up Fiddler and issue a Post request
  • Set the HTTP verb to POST
  • Content-Type: application/json. This tells that we are sending JSON formatted data to the server
  • In the Request Body, include the employee object that we want to add to the Employees database table in JSON format
  • Finally, click on the Execute button as shown in the below image
Implementing POST Method in WEB API

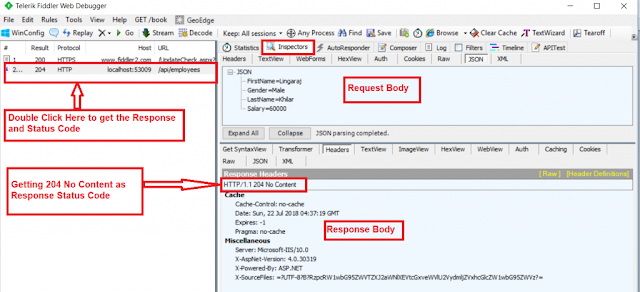
When we click on the Execute button, it will give us the below Response.
Implementing POST Method in WEB API

This works fine and adds the employee to the database as expected. The problem here is that since the return type of the Post method is void, we get status code 204 No Content. As per REST standard, when a new item is created, it should return the status code 201 Item Created. With 201 status code, we may also include the location i.e. URI of the newly created item.

Let’s see how to achieve this. To achieve this, we need to modify the POST method as shown below.
public class EmployeesController : ApiController
{
    public HttpResponseMessage Post([FromBody] Employee employee)
    {
        try
        {
            using (EmployeeDBContext dbContext = new EmployeeDBContext())
            {
                dbContext.Employees.Add(employee);
                dbContext.SaveChanges();
                var message = Request.CreateResponse(HttpStatusCode.Created, employee);
                message.Headers.Location = new Uri(Request.RequestUri +
                    employee.ID.ToString());
                return message;
            }
        }
        catch (Exception ex)
        {
            return Request.CreateErrorResponse(HttpStatusCode.BadRequest, ex);
        }
    }
}

At this point, issue another Post request from Fiddler. Notice in the response header we have status code 201 Created and also the location i.e. the URI of the newly created item as shown in the below image.
Implementing POST Method in WEB API

Points to Remember while working with Web API Post Method:
  • If a method return type is void in Web API Service then by default Web API Service return the status code 204 No Content.
  • When a new item is created, we should be returning status code 201 Item Created.
  • With 201 status code, we should also include the location i.e. URI of the newly created item.
  • When an item is not found, instead of returning NULL and status code 200 OK, return 404 Not Found status code along with a meaningful message such as “Employee with Id = 15 not found“
Summary:
I Hope this post will be helpful to understand how to implement POST Method in Web API
Please share this post with your friends and colleagues.
For any queries please post a comment below.
Happy Coding 😉
Read More
  • Share This:  
  •  Facebook
  •  Twitter
  •  Google+
  •  Stumble
  •  Digg
Newer Posts Older Posts

Join us on Telegram

Loved Our Blog Posts? Subscribe To Get Updates Directly To Your Inbox

Like us on Facebook

Popular Posts

  • What is Dependency Injection(DI)
    Hi friends! Today we are going to learn about Dependency Injection and in our last session we have come across Static classes and where it s...
  • Navigation Menus in ASP.NET Core
    In this article, I am going to discuss how to create Responsive Navigation Menus in ASP.NET Core Application using bootstrap and JQuery. P...
  • What is Abstract Class and When we should use Abstract Class
    Hi friends! In our previous sessions we have seen  Difference Between Class and Struct . And in our last session  we learnt Usability of Sec...
  • ASP.NET State Management
    State management is a technique or way to maintain / store the state of an Asp.Net controls, web page information, object/data, and user in ...
  • HTTP Client Message Handler in Web API
    In this article, I am going to discuss HTTP Client Message Handler in Web API with real-time examples. As we already discussed in HTTP Mes...
  • Calling Web API Service in a Cross-Domain Using jQuery AJAX
    In this article, I am going to discuss Calling Web API Service in a Cross-Domain Using jQuery AJAX . Please read our previous article befor...
  • Authentication and Authorization in Web API
    In this article, I am going to discuss the Authentication and Authorization in Web API . Here I will give you an overview of Authentication...

Blog Archive

Contact Form

Name

Email *

Message *

Tags

.Net .Net Core .Net Core MVC Algorithm Angular Anonymous Types Asp.Net Asp.Net MVC Blazor C# Data Structure Database Design Patterns Entity Framework Entity Framework Core Filters Interview Question Management Studio Programming Programs SQL Server SSMS Web API

Copyright © C# Techtics | All Right Reserved.

Protected by Copyscape