In this article, I am going to discuss one of the most important concepts i.e. Parameter Binding in ASP.NET Web API Application. Please read our previous article before proceeding to this article where we discussed creating custom method names in Web API application.
What do you mean by Parameter Binding in Web API?
The Parameter Binding in ASP.NET Web API means how the Web API Framework binds the incoming HTTP request data to the parameters of an action method of a Web API controller.
The ASP.NET Web API action methods can take one or more parameters of different types. An action method parameters can be either of a complex type or primitive types. The Web API Framework binds the action method parameters either with the URL’s query string or from the request body of the incoming HTTP Request based on the parameter type.
Default Parameter Binding in Web API
By default, if the parameter type is of the primitive type such as int, bool, double, string, GUID, DateTime, decimal or any other type that can be converted from the string type then Web API Framework sets the action method parameter value from the query string. And if the action method parameter type is a complex type then Web API Framework tries to get the value from the body of the request and this is the default nature of Parameter Binding in Web API Framework.
The following table lists the default rules for Web API Parameter Binding.
Note: From the above diagram it clearly shows that we do not have a request body for GET and DELETE HTTP request. So, in that case, it tries to get the data from the query string.
Understanding the Parameter Binding in ASP.NET Web API with an Example.
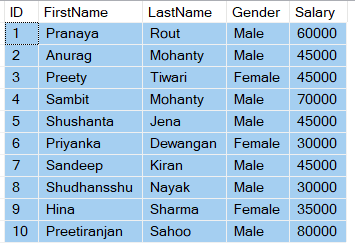
We are going to use a testing tool called “Fiddler” to test these Verbs. Again we are going to use the following Employee table to understand the Parameter binding in Web API concepts.
Please use the following SQL Script which will create and populate the Employees database table along with the database with the required test data.
Creating a new ASP.NET Web API Project
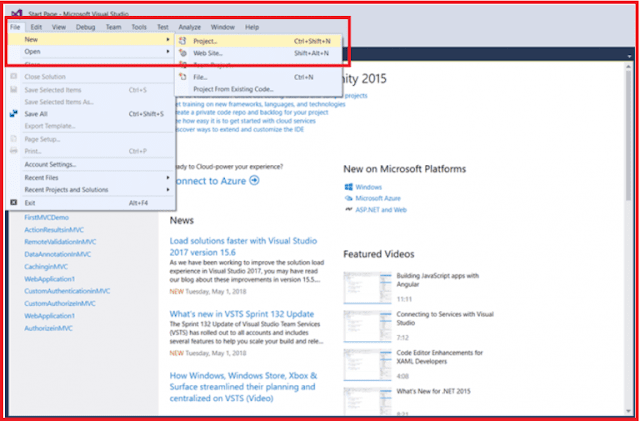
Open Visual Studio and select File -> New –> Project as shown below
In the “New Project” window, select “Visual C#” under the “Installed – Templates” section. From the middle pane select the “ASP.NET Web Application” and then give a meaningful name to your application, here I provided the name as “EmployeeService” and then click on the “OK” button as shown in the below image
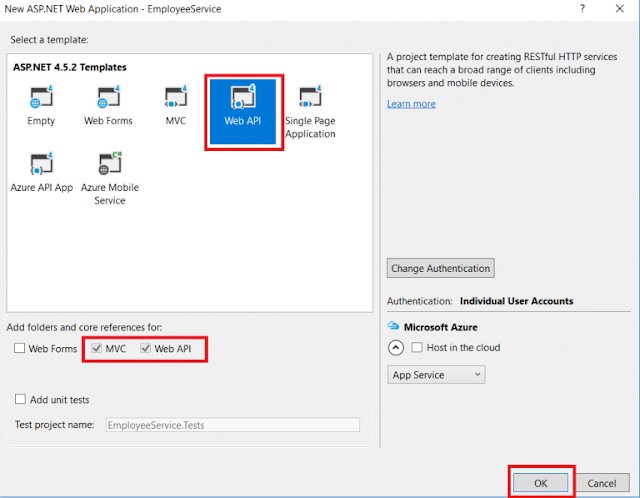
Once you click on the OK button a new dialog window will open with Name “New ASP.NET Project” for selecting the Project Templates. From this window, you need to choose the WEB API project template and then click on the OK button as shown below.
At this point, you should have the Web API project created.
Adding ADO.NET Entity Data Model to retrieve data from the database
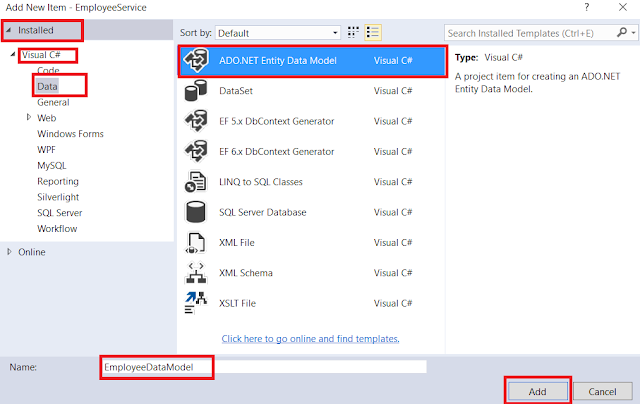
Right-click on the Models folder and then select Add -> New Item option which will open the Add New Item windows. From the “Add New Item” window select the “Data” from the left pane and then select the ADO.NET Entity Data Model from the middle pane of the Add New Item window.
In the name text box, provide a meaningful name like EmployeeDataModel and click on the Add button as shown in the below image.
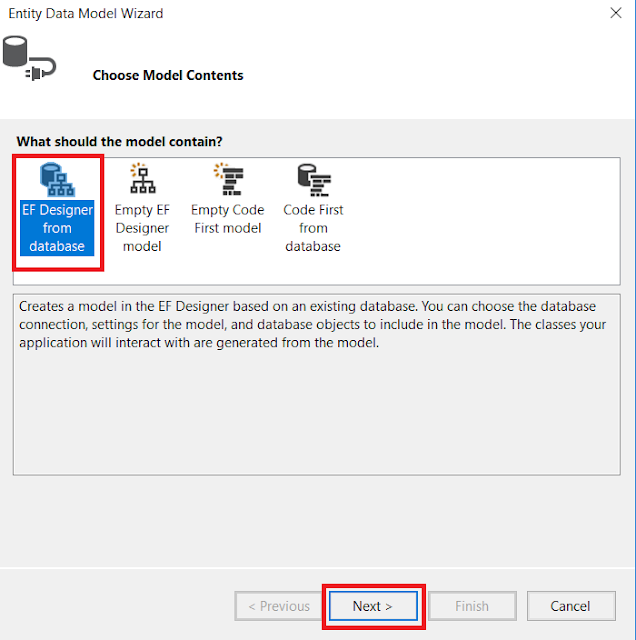
On the Entity Data Model Wizard, select “EF Designer from database” option and click the Next button
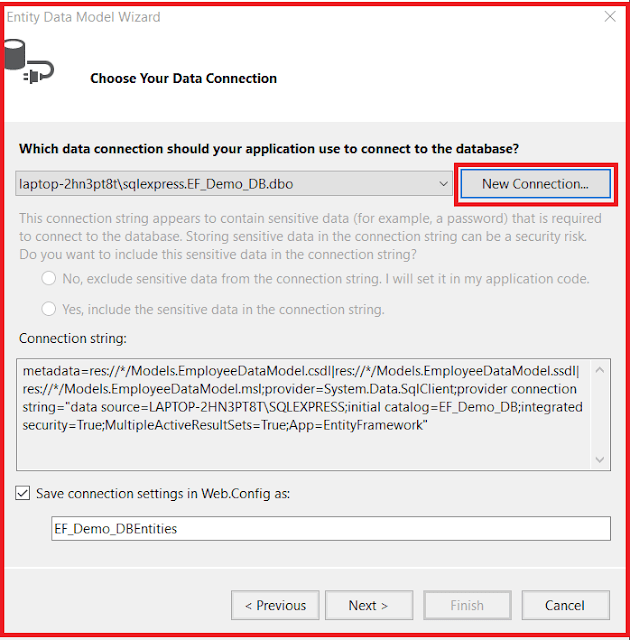
From the Choose Your Data Connection screen, click on the “New Connection” button as shown below
Once you click on the New Connection Button it will open the Connection Properties window and from the “Connection Properties” window, set the following things
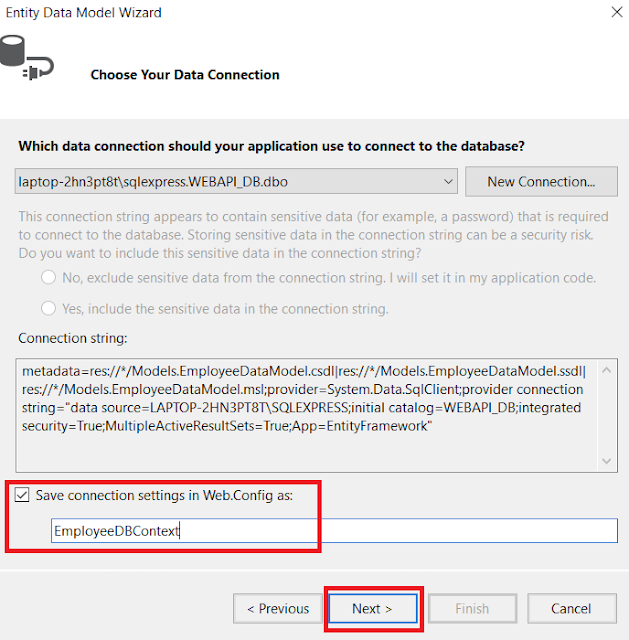
Once you click on the OK button it will navigate back to the Choose Your Data Connection wizard. Here Modify the Connection String as EmployeeDBContext and click on the Next Button as shown in the below image.
On the next screen, select Entity Framework 6.x as shown in the below image. This step may be optional if you are using a higher version of visual studio.
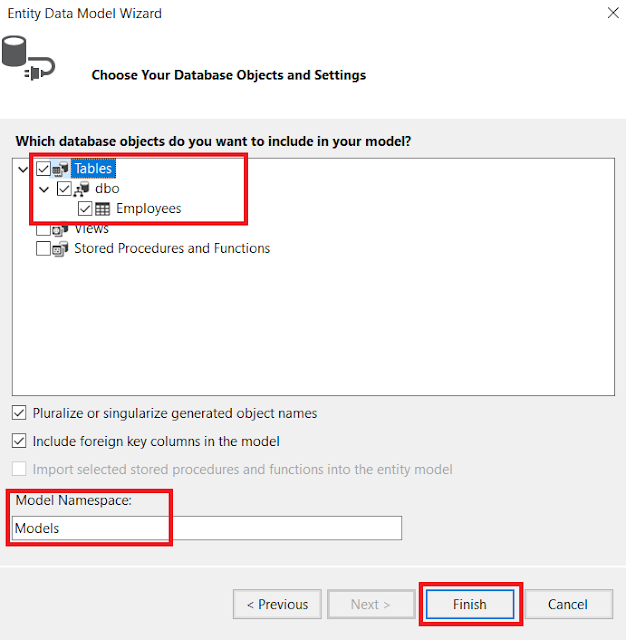
On Choose Your Database Objects and Settings screen, select the “Employees” table, provide the model namespace name and click on the Finish button as shown below.
Once you click on the Finish Button the edmx file will be generated.
Adding Web API Controller
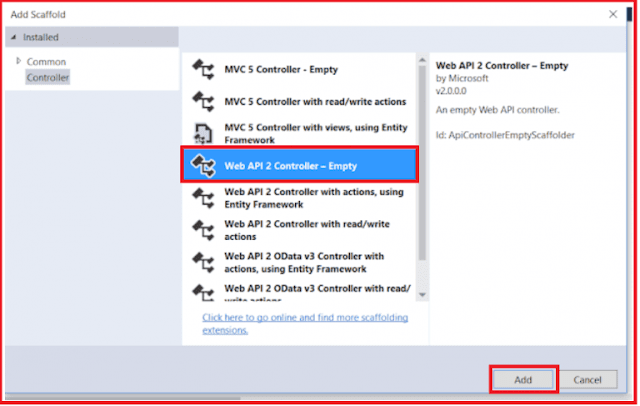
Right-click on the Controllers folder and select Add -> Controller which will open a window to select the controller. From that window select “Web API 2 Controller – Empty” and then click on the “Add” button as shown below.
On the next screen set, the Controller Name as EmployeesController and click on the Add button as shown in the below image.
Copy and paste the following code in EmployeesController.
Depending on the value we specify for query string parameter gender, the Get() method should return the data.
/api/employees?gender=all Return All Employees
/api/employees?gender=Male Return All Male Employees
/api/employees?gender=Female Return All Female Employees
If the value for gender is not Male, Female or All, then the service should return status code 400 Bad Request. For example, if we specify ABC as the value for gender, then the service should return status code 400 Bad Request with the following message.
Value for gender must be Male, Female or All. ABC is invalid.
Below is the modified Get() method
Gender is being passed as a parameter to the Get() method. The default value is “All”. The default value makes the parameter optional. The gender parameter of the Get() method is mapped to the gender parameter sent in the query string
Understanding FromBody and FromUri attributes.
Let us understand their use with an example. Consider the following Put() method. This method updates the specified Employee details. Add the following PUT method within the Employees Controller
To update employee details whose Id is 1 we issue a Put request to the URI /api/employees/1
Note: Query string parameter names must match with the name of an action method parameter. However, they can be in a different order.
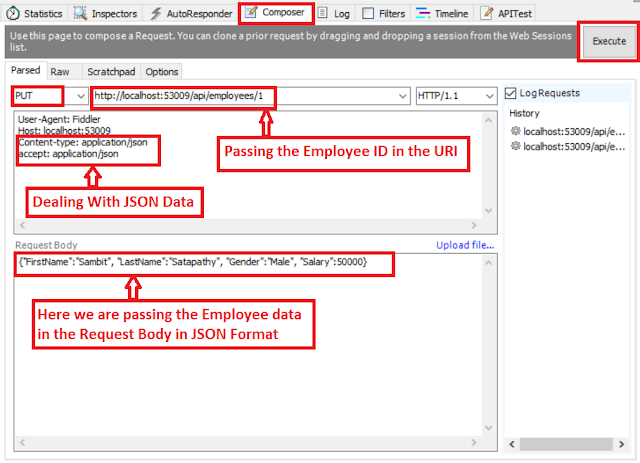
If you are using Fiddler, the PUT request is as shown below. Notice the Id of the employee is in the URI and the employee data is in the request body.
At this point, if you execute the request, the employee data is updated as expected. Now let’s include the Id as a query string parameter. In the first request, Id is specified as part of route data. Notice in Fiddler we have included id parameter as a query string.
When we execute this request, the update succeeds as expected. When a PUT request is issued, Web API maps the data in the request to the PUT method parameters in the Employees Controller. This process is called Parameter Binding.
Default convention used by Web API for Parameter binding.
If the parameter is a simple type like int, bool, double, etc., Web API tries to get the value from the URI (Either from route data or from the Query String) whereas if the parameter is a complex type like Customer, Employee, etc., then the Web API Framework tries to get the value from the request body.
So in our case, the id parameter is a simple type, so Web API tries to get the value from the request URI. The employee parameter is a complex type, so Web API gets the value from the request body.
Note: Name of the complex type properties and query string parameters must match.
We can change this default behavior of the parameter binding process by using [FromBody] and [FromUri] attributes. Notice in the example below we have decorated the id parameter with [FromBody] attribute which will force the Web API Framework to get it from the request body. We have also decorated the employee object with the [FromUri] attribute which will force the Web API Framework to get the employee data from the URI (i.e. Route data or Query String)
Here is the request from Fiddler
When we execute the request the update succeeds as expected
Are multiple FormBody attributes allowed?
No, multiple FormBody attributes are not allowed in a single action.
Summary:
I Hope this post will be helpful to understand the concept of Parameter Binding in ASP.NET Web API.
Please share this post with your friends and colleagues.
For any queries please post a comment below.
Happy Coding 😉
What do you mean by Parameter Binding in Web API?
The Parameter Binding in ASP.NET Web API means how the Web API Framework binds the incoming HTTP request data to the parameters of an action method of a Web API controller.
The ASP.NET Web API action methods can take one or more parameters of different types. An action method parameters can be either of a complex type or primitive types. The Web API Framework binds the action method parameters either with the URL’s query string or from the request body of the incoming HTTP Request based on the parameter type.
Default Parameter Binding in Web API
By default, if the parameter type is of the primitive type such as int, bool, double, string, GUID, DateTime, decimal or any other type that can be converted from the string type then Web API Framework sets the action method parameter value from the query string. And if the action method parameter type is a complex type then Web API Framework tries to get the value from the body of the request and this is the default nature of Parameter Binding in Web API Framework.
The following table lists the default rules for Web API Parameter Binding.
Note: From the above diagram it clearly shows that we do not have a request body for GET and DELETE HTTP request. So, in that case, it tries to get the data from the query string.
Understanding the Parameter Binding in ASP.NET Web API with an Example.
We are going to use a testing tool called “Fiddler” to test these Verbs. Again we are going to use the following Employee table to understand the Parameter binding in Web API concepts.
Please use the following SQL Script which will create and populate the Employees database table along with the database with the required test data.
CREATE DATABASE WEBAPI_DB
GO
USE WEBAPI_DB
GO
CREATE TABLE Employees
(
     ID int primary key identity,
     FirstName nvarchar(50),
     LastName nvarchar(50),
     Gender nvarchar(50),
     Salary int
)
GO
INSERT INTO Employees VALUES ('Pranaya', 'Rout', 'Male', 60000)
INSERT INTO Employees VALUES ('Anurag', 'Mohanty', 'Male', 45000)
INSERT INTO Employees VALUES ('Preety', 'Tiwari', 'Female', 45000)
INSERT INTO Employees VALUES ('Sambit', 'Mohanty', 'Male', 70000)
INSERT INTO Employees VALUES ('Shushanta', 'Jena', 'Male', 45000)
INSERT INTO Employees VALUES ('Priyanka', 'Dewangan', 'Female', 30000)
INSERT INTO Employees VALUES ('Sandeep', 'Kiran', 'Male', 45000)
INSERT INTO Employees VALUES('Shudhansshu', 'Nayak', 'Male', 30000)
INSERT INTO Employees VALUES ('Hina', 'Sharma', 'Female', 35000)
INSERT INTO Employees VALUES ('Preetiranjan', 'Sahoo', 'Male', 80000)
GO
Creating a new ASP.NET Web API Project
Open Visual Studio and select File -> New –> Project as shown below
In the “New Project” window, select “Visual C#” under the “Installed – Templates” section. From the middle pane select the “ASP.NET Web Application” and then give a meaningful name to your application, here I provided the name as “EmployeeService” and then click on the “OK” button as shown in the below image
Once you click on the OK button a new dialog window will open with Name “New ASP.NET Project” for selecting the Project Templates. From this window, you need to choose the WEB API project template and then click on the OK button as shown below.
At this point, you should have the Web API project created.
Adding ADO.NET Entity Data Model to retrieve data from the database
Right-click on the Models folder and then select Add -> New Item option which will open the Add New Item windows. From the “Add New Item” window select the “Data” from the left pane and then select the ADO.NET Entity Data Model from the middle pane of the Add New Item window.
In the name text box, provide a meaningful name like EmployeeDataModel and click on the Add button as shown in the below image.
On the Entity Data Model Wizard, select “EF Designer from database” option and click the Next button
From the Choose Your Data Connection screen, click on the “New Connection” button as shown below
Once you click on the New Connection Button it will open the Connection Properties window and from the “Connection Properties” window, set the following things
- Server Name = provide the server
- Authentication = Select the authentication type
- Select or enter a database name = WEBAPI_DB
- Click the OK button as shown below.
Once you click on the OK button it will navigate back to the Choose Your Data Connection wizard. Here Modify the Connection String as EmployeeDBContext and click on the Next Button as shown in the below image.
On the next screen, select Entity Framework 6.x as shown in the below image. This step may be optional if you are using a higher version of visual studio.
On Choose Your Database Objects and Settings screen, select the “Employees” table, provide the model namespace name and click on the Finish button as shown below.
Once you click on the Finish Button the edmx file will be generated.
Adding Web API Controller
Right-click on the Controllers folder and select Add -> Controller which will open a window to select the controller. From that window select “Web API 2 Controller – Empty” and then click on the “Add” button as shown below.
On the next screen set, the Controller Name as EmployeesController and click on the Add button as shown in the below image.
Copy and paste the following code in EmployeesController.
public class EmployeesController : ApiController
{
    public HttpResponseMessage GET()
    {
        using (EmployeeDBContext dbContext = new EmployeeDBContext())
        {
            var Employees =  dbContext.Employees.ToList();
            return Request.CreateResponse(HttpStatusCode.OK, Employees);
        }
    }
}
Depending on the value we specify for query string parameter gender, the Get() method should return the data.
/api/employees?gender=all Return All Employees
/api/employees?gender=Male Return All Male Employees
/api/employees?gender=Female Return All Female Employees
If the value for gender is not Male, Female or All, then the service should return status code 400 Bad Request. For example, if we specify ABC as the value for gender, then the service should return status code 400 Bad Request with the following message.
Value for gender must be Male, Female or All. ABC is invalid.
Below is the modified Get() method
Gender is being passed as a parameter to the Get() method. The default value is “All”. The default value makes the parameter optional. The gender parameter of the Get() method is mapped to the gender parameter sent in the query string
public class EmployeesController : ApiController
{
    public HttpResponseMessage Get(string gender = "All")
    {
        using (EmployeeDBContext dbContext = new EmployeeDBContext())
        {
            switch (gender.ToLower())
            {
                case "all":
                    return Request.CreateResponse(HttpStatusCode.OK,
                        dbContext.Employees.ToList());
                case "male":
                    return Request.CreateResponse(HttpStatusCode.OK,
                        dbContext.Employees.Where(e => e.Gender.ToLower() == "male").ToList());
                case "female":
                    return Request.CreateResponse(HttpStatusCode.OK,
                        dbContext.Employees.Where(e => e.Gender.ToLower() == "female").ToList());
                default:
                    return Request.CreateErrorResponse(HttpStatusCode.BadRequest,
                        "Value for gender must be Male, Female or All. " + gender + " is invalid.");
            }
        }
    }
}
Understanding FromBody and FromUri attributes.
Let us understand their use with an example. Consider the following Put() method. This method updates the specified Employee details. Add the following PUT method within the Employees Controller
public HttpResponseMessage Put(int id, Employee employee)
{
    try
    {
        using (EmployeeDBContext dbContext = new EmployeeDBContext())
        {
            var entity = dbContext.Employees.FirstOrDefault(e => e.ID == id);
            if (entity == null)
            {
                return Request.CreateErrorResponse(HttpStatusCode.NotFound,
                    "Employee with Id " + id.ToString() + " not found to update");
            }
            else
            {
                entity.FirstName = employee.FirstName;
                entity.LastName = employee.LastName;
                entity.Gender = employee.Gender;
                entity.Salary = employee.Salary;
                dbContext.SaveChanges();
                return Request.CreateResponse(HttpStatusCode.OK, entity);
            }
        }
    }
    catch (Exception ex)
    {
        return Request.CreateErrorResponse(HttpStatusCode.BadRequest, ex);
    }
}
To update employee details whose Id is 1 we issue a Put request to the URI /api/employees/1
Note: Query string parameter names must match with the name of an action method parameter. However, they can be in a different order.
If you are using Fiddler, the PUT request is as shown below. Notice the Id of the employee is in the URI and the employee data is in the request body.
At this point, if you execute the request, the employee data is updated as expected. Now let’s include the Id as a query string parameter. In the first request, Id is specified as part of route data. Notice in Fiddler we have included id parameter as a query string.
When we execute this request, the update succeeds as expected. When a PUT request is issued, Web API maps the data in the request to the PUT method parameters in the Employees Controller. This process is called Parameter Binding.
Default convention used by Web API for Parameter binding.
If the parameter is a simple type like int, bool, double, etc., Web API tries to get the value from the URI (Either from route data or from the Query String) whereas if the parameter is a complex type like Customer, Employee, etc., then the Web API Framework tries to get the value from the request body.
So in our case, the id parameter is a simple type, so Web API tries to get the value from the request URI. The employee parameter is a complex type, so Web API gets the value from the request body.
Note: Name of the complex type properties and query string parameters must match.
We can change this default behavior of the parameter binding process by using [FromBody] and [FromUri] attributes. Notice in the example below we have decorated the id parameter with [FromBody] attribute which will force the Web API Framework to get it from the request body. We have also decorated the employee object with the [FromUri] attribute which will force the Web API Framework to get the employee data from the URI (i.e. Route data or Query String)
public HttpResponseMessage Put([FromBody]int id, [FromUri]Employee employee)
{
    try
    {
        using (EmployeeDBContext dbContext = new EmployeeDBContext())
        {
            var entity = dbContext.Employees.FirstOrDefault(e => e.ID == id);
            if (entity == null)
            {
                return Request.CreateErrorResponse(HttpStatusCode.NotFound,
                    "Employee with Id " + id.ToString() + " not found to update");
            }
            else
            {
                entity.FirstName = employee.FirstName;
                entity.LastName = employee.LastName;
                entity.Gender = employee.Gender;
                entity.Salary = employee.Salary;
                dbContext.SaveChanges();
                return Request.CreateResponse(HttpStatusCode.OK, entity);
            }
        }
    }
    catch (Exception ex)
    {
        return Request.CreateErrorResponse(HttpStatusCode.BadRequest, ex);
    }
}
Here is the request from Fiddler
- Employee data is specified in the URI using query string parameters
- The id is specified in the request body
When we execute the request the update succeeds as expected
Are multiple FormBody attributes allowed?
No, multiple FormBody attributes are not allowed in a single action.
Summary:
I Hope this post will be helpful to understand the concept of Parameter Binding in ASP.NET Web API.
Please share this post with your friends and colleagues.
For any queries please post a comment below.
Happy Coding 😉








0 comments:
Post a Comment
If you like this website, please share with your friends on Facebook, Twitter, LinkedIn.