In this article, I am going to discuss how to Implement the GET Method in Web API Application with an example. Please read our previous article where we discussed Media Type Formatter in Web API with examples.
Understanding CRUD Operations.
In general, when we talk about a database table, there are four operations (known as CRUD Operations) that we perform on it. They are as follows
Request Verbs (GET, POST, AND DELETE)
These describe what should be done with the resource.
Request Header
When a client sends a request to the server, the request contains a header and a body. The request method contains additional information, such as – what type of response is required. For example, The response should be in XML, JSON, or some other format. Request Body
The request body contains the data that we want to send to the server. For example, a post request contains the data for a new item that we want to create. The data format may be in XML or in JSON
Response Body
The response body contains the data of the response from the server. For example, if the request is for a specific employee, the response body includes employee details in XML, JSON, and so on.
Response Status Codes
The Response Status codes are nothing but the HTTP status codes which specifically gives the status of the response to the client. Some of the common status codes are 404 not found, 200 OK, 204 No content, 500 Internal Server Error and so on.
Use the below SQL Script to create and populate the necessary database table with some test data. The below script
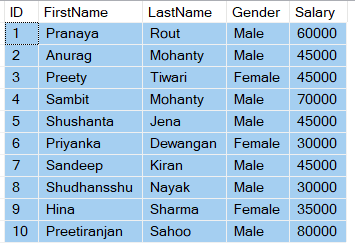
Fetch the records: SELECT * FROM Employees Will give the following result
Creating a new ASP.NET Web API Project
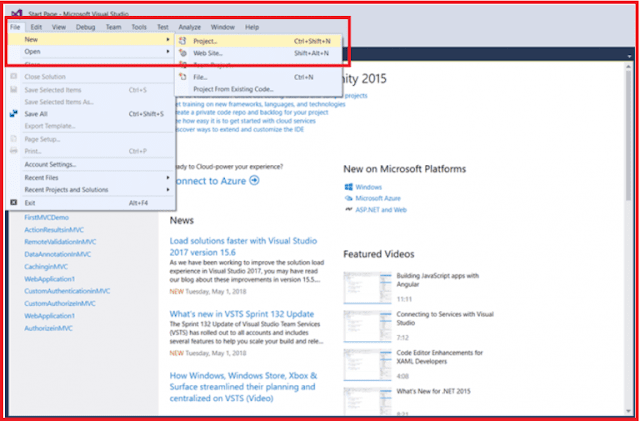
Open Visual Studio and select File – New – Project as shown below
From the “New Project” window, from the left pane select the “Visual C#” which is under the “Installed – Templates” section. Similarly, from the middle pane select ASP.NET Web Application and then provide the name of the project as “EmployeeService“. Finally, click on the “OK” button as shown in the image below.
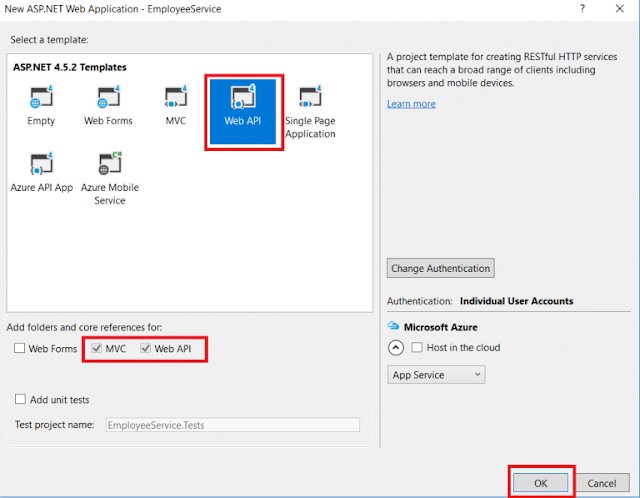
Once we click on the OK button a new dialog will pop up with Name “New ASP.NET Project” for selecting project Templates.
In this dialog, we are going to choose the Web API project template and click on the OK button. At this point, you should have the Web API project created.
Adding ADO.NET Entity Data Model to retrieve data from the database
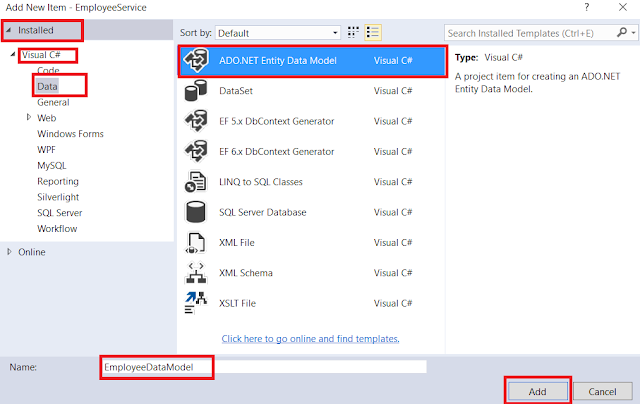
Right-click on the Models folder and then select Add – New Item option which will open the Add New Item window and from the “Add New Item” window select the “Data” option from the left pane and from the middle pane select ADO.NET Entity Data Model. In the Name text box, type EmployeeDataModel and finally click the Add button as shown in the below image.
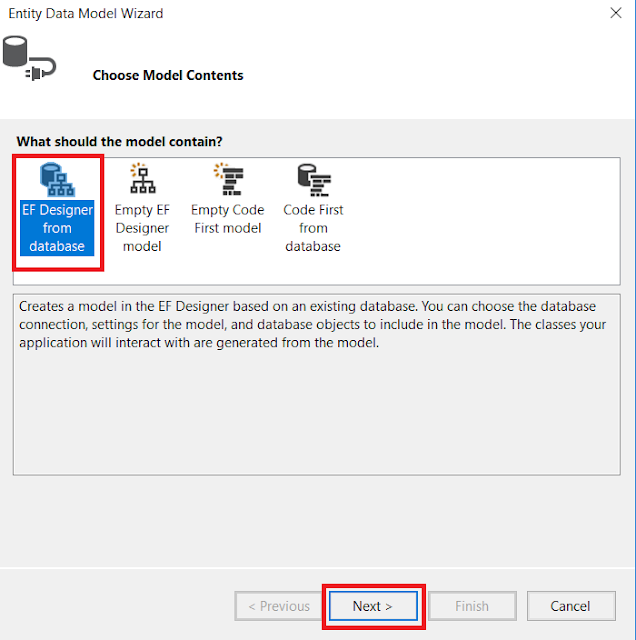
Once you click on the Add button, it will open the Entity Data Model Wizard and from that wizard select “EF Designer from database” option and click on the “Next” button as shown below.
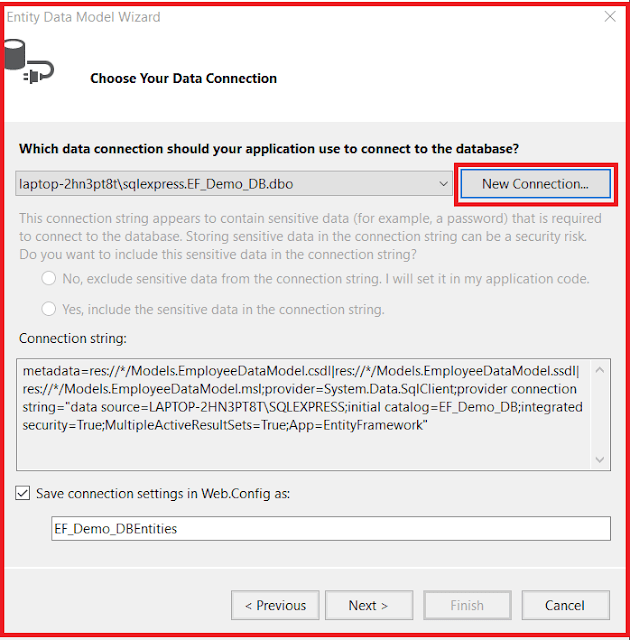
On the next screen, click on the “New Connection” button as shown in the image below
Once you click on the New Connection Button it will open the Connection Properties window. On “Connection Properties” window, set
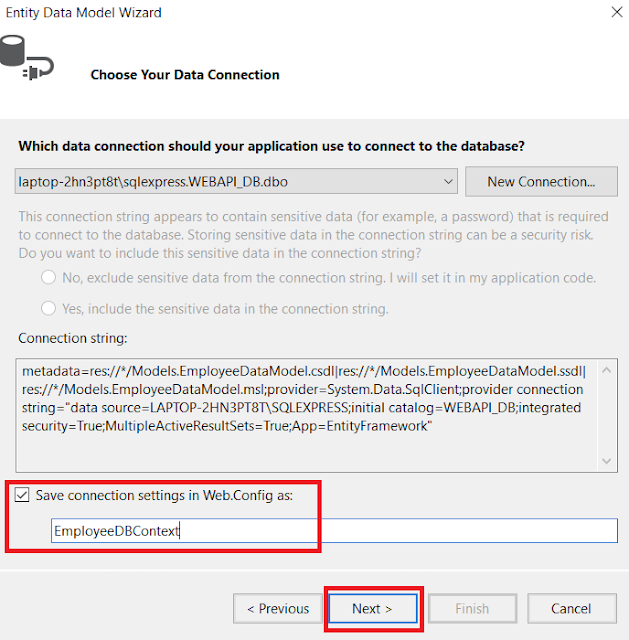
Once you click on the OK button it will navigate back to the Choose Your Data Connection wizard. Here Modify the Connection String as EmployeeDBContext and click on the Next Button as shown in the below image.
On the next screen, select Entity Framework 6.x as shown in the below image. This step may be optional if you are using a higher version of visual studio.
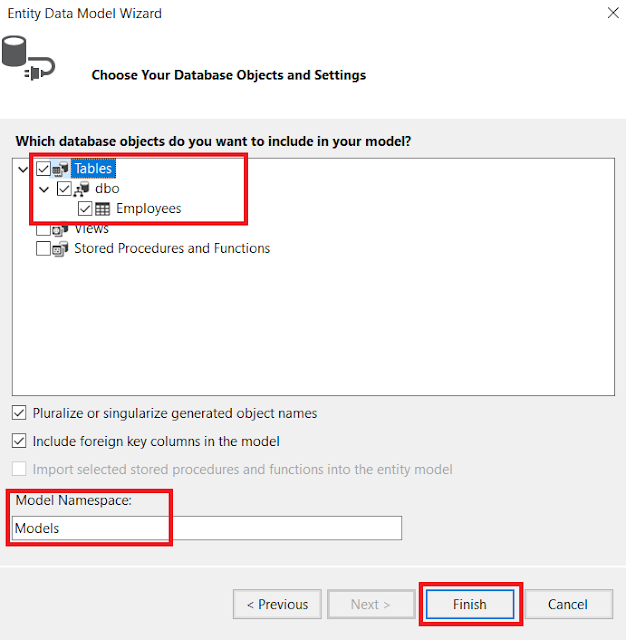
On Choose Your Database Objects and Settings screen, select the “Employees” table, provide the model namespace name and click on Finish button as shown below.
Once you click on the Finish Button the following edmx file will be generated within the Models folder as shown below.
Adding Web API Controller
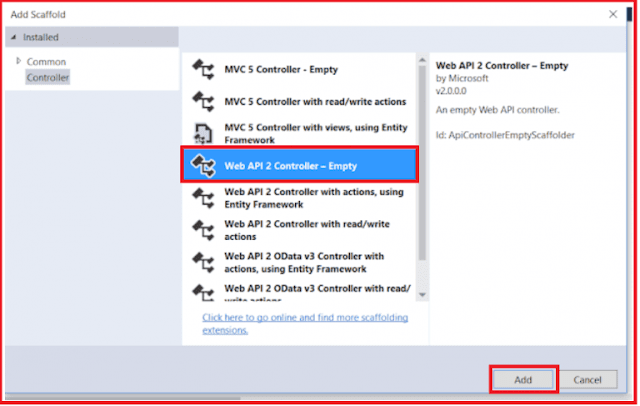
Right-click on the Controllers folder and select Add – Controller option and then select “Web API 2 Controller – Empty” and click on the “Add” button as shown below.
On the next screen set, the Controller Name as EmployeesController and click on the Add button as shown in the below image.
Implementing the GET method in ASP.NET Web API:
Copy and paste the following code in EmployeesController.cs
At this point when we navigate to /api/employees we should see all employees and when we navigate to /api/employees/1 we should see all the details of the employee whose Id=1
We have two get methods one without parameter and one with a parameter. Whenever we pass the id parameter then it will return the employee whose id we passed and if we do not pass the id parameter value then it will return all the employees.
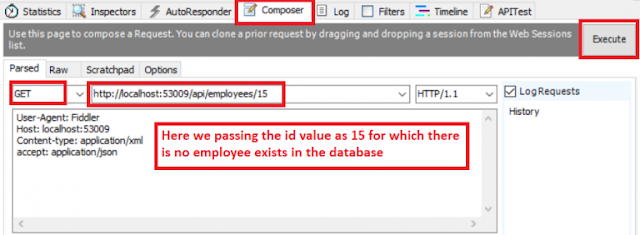
Let’s see what will happen when we issue a request for an employee whose id that does not exist with one example.
Here we are trying to get the details of an employee whose id does not exist in the database. So when we click on the execute button it will give us the below response.
The above image clearly shows that we get null as the response and the status code is 200 OK. According to the standards of REST when an item is not found, then it should return 404 Not Found.
To achieve this, we need to modify the Employees Controller as shown below.
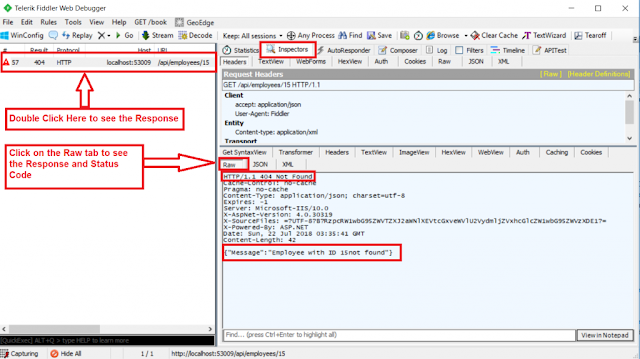
At this point, when we issue a request for an employee with ID = 15 which does not exist we get a 404 along with the message “Employee with Id 15 not found” as shown below.
Summary:
I Hope this post will be helpful to understand how to implement GET Method in Web API
Please share this post with your friends and colleagues.
For any queries please post a comment below.
Happy Coding 😉
Understanding CRUD Operations.
In general, when we talk about a database table, there are four operations (known as CRUD Operations) that we perform on it. They are as follows
- C- Create a Row,
- R- Read a Row,
- U- Update a Row, and
- D- Delete a Row
Request Verbs (GET, POST, AND DELETE)
These describe what should be done with the resource.
Request Header
When a client sends a request to the server, the request contains a header and a body. The request method contains additional information, such as – what type of response is required. For example, The response should be in XML, JSON, or some other format. Request Body
The request body contains the data that we want to send to the server. For example, a post request contains the data for a new item that we want to create. The data format may be in XML or in JSON
Response Body
The response body contains the data of the response from the server. For example, if the request is for a specific employee, the response body includes employee details in XML, JSON, and so on.
Response Status Codes
The Response Status codes are nothing but the HTTP status codes which specifically gives the status of the response to the client. Some of the common status codes are 404 not found, 200 OK, 204 No content, 500 Internal Server Error and so on.
Use the below SQL Script to create and populate the necessary database table with some test data. The below script
- Create a database called WEBAPI_DB
- Creates the Employees table and populate it with some test data
CREATE DATABASE WEBAPI_DB
GO
USE WEBAPI_DB
GO
CREATE TABLE Employees
(
     ID int primary key identity,
     FirstName nvarchar(50),
     LastName nvarchar(50),
     Gender nvarchar(50),
     Salary int
)
GO
INSERT INTO Employees VALUES ('Pranaya', 'Rout', 'Male', 60000)
INSERT INTO Employees VALUES ('Anurag', 'Mohanty', 'Male', 45000)
INSERT INTO Employees VALUES ('Preety', 'Tiwari', 'Female', 45000)
INSERT INTO Employees VALUES ('Sambit', 'Mohanty', 'Male', 70000)
INSERT INTO Employees VALUES ('Shushanta', 'Jena', 'Male', 45000)
INSERT INTO Employees VALUES ('Priyanka', 'Dewangan', 'Female', 30000)
INSERT INTO Employees VALUES ('Sandeep', 'Kiran', 'Male', 45000)
INSERT INTO Employees VALUES('Shudhansshu', 'Nayak', 'Male', 30000)
INSERT INTO Employees VALUES ('Hina', 'Sharma', 'Female', 35000)
INSERT INTO Employees VALUES ('Preetiranjan', 'Sahoo', 'Male', 80000)
GO
Fetch the records: SELECT * FROM Employees Will give the following result
Creating a new ASP.NET Web API Project
Open Visual Studio and select File – New – Project as shown below
From the “New Project” window, from the left pane select the “Visual C#” which is under the “Installed – Templates” section. Similarly, from the middle pane select ASP.NET Web Application and then provide the name of the project as “EmployeeService“. Finally, click on the “OK” button as shown in the image below.
Once we click on the OK button a new dialog will pop up with Name “New ASP.NET Project” for selecting project Templates.
In this dialog, we are going to choose the Web API project template and click on the OK button. At this point, you should have the Web API project created.
Adding ADO.NET Entity Data Model to retrieve data from the database
Right-click on the Models folder and then select Add – New Item option which will open the Add New Item window and from the “Add New Item” window select the “Data” option from the left pane and from the middle pane select ADO.NET Entity Data Model. In the Name text box, type EmployeeDataModel and finally click the Add button as shown in the below image.
Once you click on the Add button, it will open the Entity Data Model Wizard and from that wizard select “EF Designer from database” option and click on the “Next” button as shown below.
On the next screen, click on the “New Connection” button as shown in the image below
Once you click on the New Connection Button it will open the Connection Properties window. On “Connection Properties” window, set
- Server Name = provide the server name
- Authentication = Select the authentication type
- Select or enter a database name = WEBAPI_DB
- Click the OK button as shown below.
Once you click on the OK button it will navigate back to the Choose Your Data Connection wizard. Here Modify the Connection String as EmployeeDBContext and click on the Next Button as shown in the below image.
On the next screen, select Entity Framework 6.x as shown in the below image. This step may be optional if you are using a higher version of visual studio.
On Choose Your Database Objects and Settings screen, select the “Employees” table, provide the model namespace name and click on Finish button as shown below.
Once you click on the Finish Button the following edmx file will be generated within the Models folder as shown below.
Adding Web API Controller
Right-click on the Controllers folder and select Add – Controller option and then select “Web API 2 Controller – Empty” and click on the “Add” button as shown below.
On the next screen set, the Controller Name as EmployeesController and click on the Add button as shown in the below image.
Implementing the GET method in ASP.NET Web API:
Copy and paste the following code in EmployeesController.cs
public class EmployeesController : ApiController
{
    public IEnumerable<employee> Get()
    {
        using (EmployeeDBContext dbContext = new EmployeeDBContext())
        {
            return dbContext.Employees.ToList();
        }
    }
    public Employee Get(int id)
    {
        using (EmployeeDBContext dbContext = new EmployeeDBContext())
        {
            return dbContext.Employees.FirstOrDefault(e => e.ID == id);
        }
    }
}
At this point when we navigate to /api/employees we should see all employees and when we navigate to /api/employees/1 we should see all the details of the employee whose Id=1
We have two get methods one without parameter and one with a parameter. Whenever we pass the id parameter then it will return the employee whose id we passed and if we do not pass the id parameter value then it will return all the employees.
Let’s see what will happen when we issue a request for an employee whose id that does not exist with one example.
Here we are trying to get the details of an employee whose id does not exist in the database. So when we click on the execute button it will give us the below response.
The above image clearly shows that we get null as the response and the status code is 200 OK. According to the standards of REST when an item is not found, then it should return 404 Not Found.
To achieve this, we need to modify the Employees Controller as shown below.
public class EmployeesController : ApiController
{
    public HttpResponseMessage Get()
    {
        using (EmployeeDBContext dbContext = new EmployeeDBContext())
        {
            var Employees =  dbContext.Employees.ToList();
            return Request.CreateResponse(HttpStatusCode.OK, Employees);
        }
    }
    public HttpResponseMessage Get(int id)
    {
        using (EmployeeDBContext dbContext = new EmployeeDBContext())
        {
            var entity = dbContext.Employees.FirstOrDefault(e => e.ID == id);
            if(entity != null)
            {
                return Request.CreateResponse(HttpStatusCode.OK, entity);
            }
            else
            {
                return Request.CreateErrorResponse(HttpStatusCode.NotFound,
                    "Employee with ID " + id.ToString() + "not found");
            }
        }
    }
}
At this point, when we issue a request for an employee with ID = 15 which does not exist we get a 404 along with the message “Employee with Id 15 not found” as shown below.
Summary:
I Hope this post will be helpful to understand how to implement GET Method in Web API
Please share this post with your friends and colleagues.
For any queries please post a comment below.
Happy Coding 😉








0 comments:
Post a Comment
If you like this website, please share with your friends on Facebook, Twitter, LinkedIn.