• Home
  • About
  • Contact
  • ado.net
  • angular
  • c#.net
  • design patterns
  • linq
  • mvc
  • .net core
    • .Net Core MVC
    • Blazor Tutorials
  • sql
  • web api
  • dotnet
    • SOLID Principles
    • Entity Framework
    • C#.NET Programs and Algorithms
  • Others
    • C# Interview Questions
    • SQL Server Questions
    • ASP.NET Questions
    • MVC Questions
    • Web API Questions
    • .Net Core Questions
    • Data Structures and Algorithms

Monday, August 24, 2020

Views in ASP.NET Core MVC

 Admin     August 24, 2020     .Net, .Net Core, .Net Core MVC, Asp.Net, C#     No comments   

In this article, I am going to discuss Views in the ASP.NET Core MVC application. Please read our previous article before proceeding to this article where we discussed Controllers in ASP.NET Core MVC application. As part of this article, we are going to discuss the following concepts related to Views in ASP.NET Core MVC Application.
  1. What are Views in ASP.NET Core MVC Application?
  2. Where View Files are Stored in ASP.NET Core MVC Application?
  3. How to create View in ASP.NET Core?
  4. What are the difference between View() and View(object model) Extension Methods?
  5. How to specify the Absolute view file path?
  6. What are the Advantages of Using Views in ASP.NET Core MVC Application?
What are Views in ASP.NET Core MVC Application?
In the Model-View-Controller (MVC) pattern, the View is the component that contains logic to represent the model data (the model data provided to it by a controller) as a user interface with which the end-user can interact. The Views in MVC are HTML templates with embedded Razor mark-up which generate content that sends to the client. In our upcoming articles, we will discuss the Razor syntax in detail.

Where View Files are Stored in ASP.NET Core MVC Application?
In ASP.NET Core MVC, views are having a “.cshtml” extension if the programming language is C# with Razor mark-up. Usually, each controller will have its own folder in which the controller-specific view files are going to be stored. The controller-specific folders are going to be created within the Views folder. The point that you need to remember is the view file name is the same as the action method name of a controller with .cshtml extension.

Let’s say, we have an ASP.NET Core MVC application with two controllers i.e. HomeController and StudentController. The HomeController is created with the following three action methods.
  1. AboutUs()
  2. ContactUs()
  3. Index()
On the other hand, the StudentController is created with the following four action methods.
  1. Index()
  2. Details()
  3. Edit()
  4. Delete()
The following is the folder and file structure of the Views
Views in ASP.NET Core MVC

As you can see a separate folder is created for each controller within the Views Folder. The Home Controller is represented by a Home folder and the Student Controller is represented by a Student folder inside the Views folder. The Home folder contains the views for the Index, AboutUs, and ContactUs webpages. So whenever a user request for any of these webpages then the Home Controller action method determine which of the above three views to use to build the webpage and return to the user.

Similarly, the Student folder contains the views for the Index, Details, Edit, and Delete webpages. So whenever a user request for any of these webpages then the Student Controller action method determine which of the above views to use in order to build the webpage and return to the user.

In addition to action-specific views, we also have provided with partial views, layouts, and view components that can also be used to reduce the repetition and allow for reuse within the application’s views.

Understanding Views with an Example:
To understand the views, let first modify the HomeController as shown below.
using Microsoft.AspNetCore.Mvc;
namespace FirstCoreMVCApplication.Controllers
{
    public class HomeController : Controller
    {
        public ViewResult Details()
        {
            return View();
        }
    }
}
As you can see in the above HomeController, we have only one action method i.e. Details. As the return type of the Details() action method is ViewResult, so this action method is going to return a view. In order to return a view, here we are using the View() extension method which is provided by Microsoft.AspNetCore.Mvc.Controller Base class.

Now run the application and navigate to the “/Home/Details” URL and you will see the following error.
Views in ASP.NET Core MVC application

Let us understand why we got the above error.
As we are returning a view from the Details action method of Home Controller, by default the ASP.NET Core MVC Framework will look for a file with the name Details.cshtml in the following three locations.

First, it will look for the “Details.cshtml” file within the “/Views/Home” folder as the action method belongs to Home Controller.

Then it will look in the “/Views/Shared/” folder

Finally, it will try to find out the “Details.cshtml” file in “/Pages/Shared/” folder.

If the requested “.cshtml” file found in any of the above folders, then the View generates the HTML and sends the generated HTML back to the user who initially made the request. On the other hand, if the requested file is not found in any of the above locations, then we will get the error.

How to create Views in ASP.NET Core MVC Application?
First, create the Views folder at the root level of the application. Once you create the Views Folder, then create a Home folder within that Views folder.

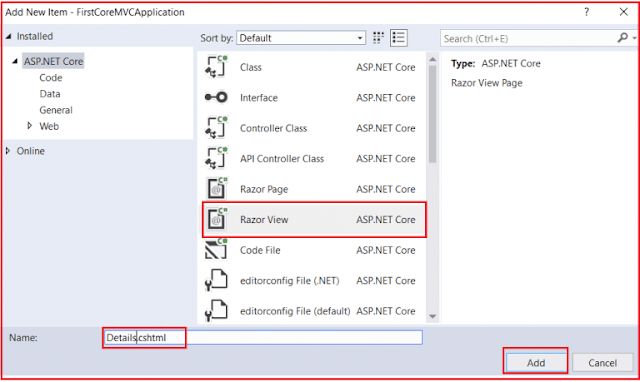
Now Right-click on the Home folder and select Add => New Item from the context menu which will open the following Add New Item window. From this window, select Razor View, provide the name as Details.cshtml, and finally click on the Add button as shown below.
Creating Views in ASP.NET Core MVC

Once you created the Details.cshtml view, then the Views folder structure should look like below.
Views Structure

Now open the Details.cshtml file and then copy and paste the following code in it.
<html xmlns="http://www.w3.org/1999/xhtml">
<head>
    <title></title>
</head>
<body>
    <h1>Details view belongs to Views/Home folder</h1>
</body>
</html>
That’s it. Run the application and navigates to the “/Home/Details” URL and you will see the output as expected in the browser. If you go to the definition of Controller base class, then you will find there four overload versions of the View method as shown in the below image.
overload versions of the View method

Let us discuss the use and significance of each of the above-overloaded versions of the View Extension method.

What are the difference between View() and View(object model) Extension Methods?
If you are using the View() or View(object model) extension method to return a view, then it will look for the view file with the same name as the action method name.

For example, in the below code we are using the View() extension method which does not take any parameter to return a view from the Details action method of Home Controller. So in this case, by default, the MVC framework will look for a view with the name Details.cshtml within the “Views/Home” folder.
View() extension method

View(string viewName) method
This overloaded method takes the name or path of the view as an input parameter and then return that view as a response. To understand this let’s create a view with the name Test.cshtml within the Home folder.

Right-click on the Home folder and then select add => new item which will open add new item window. From that window select the Razor view and provide the name as Test.cshtml and click on the Add button which will add the Test.cshtml view within the Home folder. Open the Test.cshtml view file and then copy and paste the below code.
<html xmlns="http://www.w3.org/1999/xhtml">
<head>
    <title></title>
</head>
<body>
    <h1>Test view coming from Views/Home Folder</h1>
</body>
</html>
Now modify the Details action method of Home controller as shown below to use the View extension method which takes the view name as a parameter.
View extension method which takes the view name as a parameter

Now run the application and navigate to the “/Home/Details” URL and you will see that the response is coming from the Test view.

Note: You need to specify the view name without extension. Using this overloaded version, it is also possible to specify the file path. You can specify either the absolute path or relative path.

How to specify the Absolute view file path?
Let us modify the Details action method of the Home controller as shown below to specify the Absolute path of the view file. So here, the ASP.NET Core MVC framework will look for a view file with the name “Test.cshtml” within the “Views/Home” folder.
Specifying the Absolute view file path

Note: When you are using the absolute path, then it is mandatory to use the .cshtml extension.

When you are using an absolute path, in order to get to the project’s root directory, you can use / or ~/. So you can use any one of the following and all are going to do the same thing.
Specifying the Absolute view file path

What are the Advantages of Using Views in ASP.NET Core MVC Application?
The Views in MVC application provides the separation of concerns (codes). It separates the user interface from the business logic or you can say from the rest of the application. The ASP.NET Core MVC views use the Razor syntax which makes it easy to switch between the HTML markup and C# code. The Common or repetitive aspects of the application’s user interface can be easily reused between views using layout and shared directives or partial views.

In the next article, I am going to discuss how to pass data to views in ASP.NET Core MVC application with examples. Here, In this article, I try to explain Views in ASP.NET Core MVC application with an example. I hope you enjoy this article.

Summary:
I hope this post will be helpful to understand the concept of Views in ASP.NET Core MVC
Please share this post with your friends and colleagues.
For any queries please post a comment below.
Happy Coding 😉
Read More
  • Share This:  
  •  Facebook
  •  Twitter
  •  Google+
  •  Stumble
  •  Digg

Sunday, August 23, 2020

Controllers in ASP.NET Core MVC

 Admin     August 23, 2020     .Net, .Net Core, .Net Core MVC, Asp.Net, C#     No comments   

In this article, I am going to discuss the Controllers in ASP.NET Core MVC application with an example. Please read our previous article before proceeding to this article where we discussed ASP.NET Core Dependency Injection with an example. As part of this article, we are going to discuss the following pointers.
  1. What are Controllers in ASP.NET Core MVC Application?
  2. What are action Methods?
  3. How to return JSON Data from Controller Action Method?
  4. Returning ObjectResult from Controller Action Method in ASP.NET Core MVC Application?
  5. How to return a View from the Controller Action Method?
What are Controllers in ASP.NET Core MVC Application?
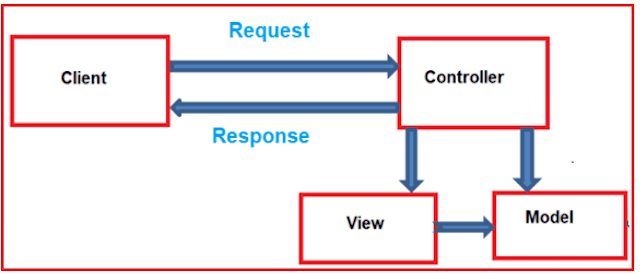
The Controllers in ASP.NET Core MVC application are the classes having a set of public methods. These public methods are called as actions (action methods). These action methods are the methods of a Controller which is actually going to handle the incoming HTTP Requests.

The Controllers in MVC application logically group similar types of actions together. This aggregation of actions or grouping similar types of action together allows us to define sets of rules such as caching, routing, and authorization which is going to be applied collectively.
Controllers in ASP.NET Core MVC Application

By convention, the controller classes in ASP.NET Core MVC application should reside in the project’s root-level Controllers folder and inherits from the Microsoft.AspNetCore.Mvc.Controller base class.

We can consider a class as a Controller when at least one of the following conditions is true.
  1. The class name is suffixed with the word “Controller” or if the class inherits from a class whose name is suffixed with the word “Controller”
  2. The class is decorated with the [Controller] attribute.
Let us have a look at the following Controller:
Controllers in ASP.NET Core MVC Application
With the above Controller place in our application, whenever the user type the following URL and hit the enter key

http://localhost:xxxx/home/GetStudentDetails/102

Then the above URL “/home/GetStudentDetails/102” is mapped to the “GetStudentDetails” method of the HomeController as shown in the below image.
Mapping URL TO Actions in ASP.NET MVC Core Application

How the above mapping is done that we will discuss in our upcoming articles. For now, just understand that the above mapping is done by the routing rules which are defined for your application.

In ASP.NET Core MVC the action methods of a controller can return different types of data such as JSON, View, String, Object, XML, etc.

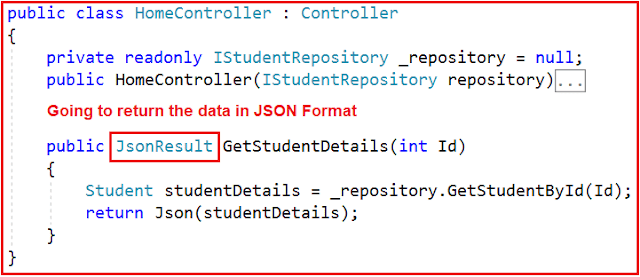
Controller Action Method Returning JSON Data:
In the below example, the GetStudentDetails action method always going to returns the data in JSON format irrespective of the content negotiation. This is because of the return type of the GetStudentDetails() method which is set to JsonResult. In this case, it is going to ignore the Accept Header values.
Controller Action Method Returning JSON Data

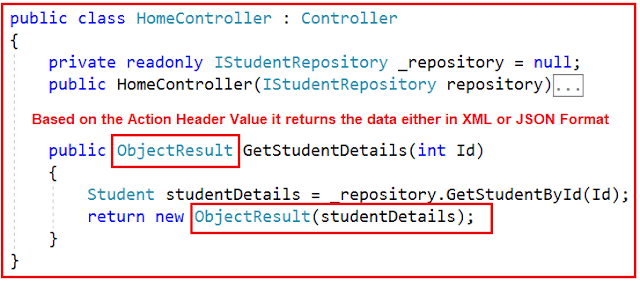
Controller Action Method returning ObjectResult:
In the following example, it looks for the Accept Header value and if the value is set to application/xml, then it returns the data in XML format whereas if the value is set to application/json, then the data is going to return in JSON format.
Controller Action Method returning ObjectResult

Note: In order to return XML data from an action method, you need to register the XML Serializer Formatter by calling the AddXmlSerializerFormatters() method within the ConfigureServices() method of the Startup.cs class as shown in the below image.
Adding XML Serializer in MVC Core

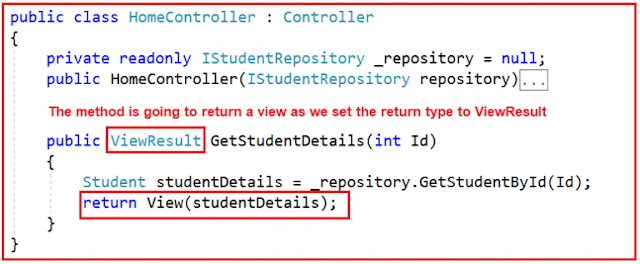
Controller Action Method returning View:
In order to return a view from an action method in ASP.NET Core MVC, you need to use ViewResult as the return type of the action method. In the following example, the GetStudentDetails action method is going to return a View as the return of the method is set to ViewResult.
Controller Action Method returning View

At this point, if you run the application and navigate to “/home/GetStudentDetails/102” URL, then you will get the following error.
Controller Action Method returning View Error

The reason for the above error is we do not have the required View file in our application. In the next article, I am going to discuss the Views in the ASP.NET Core MVC application. In this article, I try to explain Controllers in the ASP.NET Core MVC application. I hope you enjoy this article.

Summary:
I hope this post will be helpful to understand the concept of Controllers in ASP.NET Core MVC
Please share this post with your friends and colleagues.
For any queries please post a comment below.
Happy Coding 😉
Read More
  • Share This:  
  •  Facebook
  •  Twitter
  •  Google+
  •  Stumble
  •  Digg

ASP.NET Core Dependency Injection

 Admin     August 23, 2020     .Net, .Net Core, .Net Core MVC, Asp.Net, C#     No comments   

In this article, I am going to discuss the ASP.NET Core Dependency Injection with an example. Please read our previous article before proceeding to this article where we discussed Models in ASP.NET Core MVC application. The Dependency Injection Design Pattern is one of the most used design Patterns in real-time applications. But the good thing is that ASP.NET Core Provides inbuilt support for Dependency Injection. As part of this article, we are going to discuss the following pointers in details.
  1. Understanding the need for ASP.NET Core Dependency Injection
  2. What is Dependency Injection?
  3. How to register a Service with ASP.NET Core Dependency Injection Container?
  4. What are the different methods ASP.NET Core Provides to register a service with Dependency Injection Contains?
  5. Understanding the AddSingleton, AddScoped and AddTransient Methods
  6. What are the advantages of using Dependency Injection?
Understanding the need for ASP.NET Core Dependency Injection
Let us understand the need for ASP.NET Core Dependency Injection with an example. In our previous article, we have created the following classes within the Models folder.

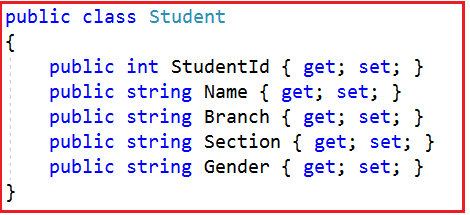
Student.cs: This is our model class which is going to store the student data.
Student Model

IStudentRepository.cs: This is our student service interface. Here we need to declare the methods. As of now, we have only one method which will retrieve the student details based on student id.
IStudentRepository interface

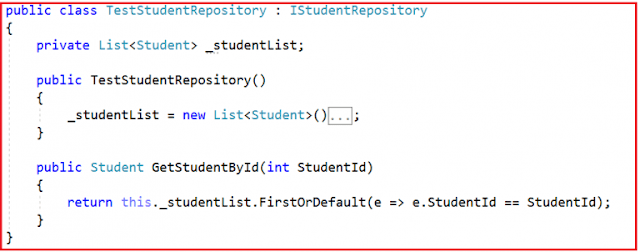
TestStudentRepository.cs: This is the implementation class of our IStudentRepository service interface. Here we implement the GetStudentById method.
TestStudentRepository class

Startup.cs:
This is the class file where we need to register the required MVC services to dependency injection container and configuring the MVC middleware to the request processing pipeline.
Registering MVC Services and Middleware

HomeController.cs:
This is our MVC controller.
Controller

As shown in the above example, in order to get student data, the HomeController class depends on the TestStudentRepository class. Here within the HomeController class, we create an instance of TestStudentRepository class and then invoke the GetStudentById() method. This is tight coupling because the HomeController class is now tightly coupled with the TestStudentRepository class.

Tomorrow if the implementation class of the IStudentRepository is changed then we need to change the code in the HomeController class as they both are tightly coupled. We can overcome this problem by implementing dependency injection design pattern.

What is Dependency Injection?
The Dependency Injection a process of injecting the object of a class into a class that depends on it. The Dependency Injection is the most commonly used design pattern nowadays to remove the dependencies between the objects. So, the Dependency Injection design pattern allows us to develop loosely coupled software components.

Let us discuss the step by step procedure to implement dependency injection in ASP.NET Core MVC application.

Modifying the HomeController:
First, modify the HomeController as shown below to use dependency injection.
using FirstCoreMVCApplication.Models;
using Microsoft.AspNetCore.Mvc;
namespace FirstCoreMVCApplication.Controllers
{
    public class HomeController : Controller
    {
        //Create a reference variable of IStudentRepository
        private readonly IStudentRepository _repository = null;
        //Initialize the variable through constructor
        public HomeController(IStudentRepository repository)
        {
            _repository = repository;
        }
        public JsonResult GetStudentDetails(int Id)
        {
            //Use the _repository to call the GetStudentById method 
            Student studentDetails = _repository.GetStudentById(Id);
            return Json(studentDetails);
        }
    }
}
Code Explanation: Here within the HomeController, instead of creating an instance of an implementation of the IStudentRepository, we are injecting an instance of IStudentRepository through the constructor of HomeController class. As we are injecting the dependency object through a constructor, it is called as constructor dependency injection.

We created the variable as read-only which will ensure that once we injected the dependency object then that value can never be changed.

At this point, run the application and navigate to the /Home/GetStudentDetails/102 URL. You will get the following error.
ASP.NET Core Dependency Injection Error

We get the above error because the ASP.NET dependency injection container does not identify which class instance to provide if someone requests an object which implements the IStudentRepository.

In real-time, the IStudentRepository may have many implementation classes. As of now, we have only one implementation class of IStudentRepository i.e. TestStudentRepository. In a later article, we will discuss providing another implementation of the IStudentRepository which will retrieve the student data from a database.

So, in order to overcome the above InvalidOperationException error, let’s register the TestStudentRepository class with the ASP.NET Core dependency injection container.

How to register a Service with ASP.NET Core Dependency Injection Container?
We need to register a service with ASP.NET Core Dependency Injection Container within the ConfigureServices() method of the Startup class.

Before we can discuss how to register a service with the Dependency Injection Container, it is important to understand the lifetime of service. When a class receives the dependency object through dependency injection, then whether the instance it receives is unique to that instance of the class or not depends on the lifetime of the service. Setting the lifetime of the dependency object determines how many times the dependency object needs to be created.

What are the different methods ASP.NET Core Provides to register a service with Dependency Injection Contains?
The ASP.NET core provides 3 methods to register a service with the ASP.NET Core Dependency Injection container. The method that we use to register a service will determine the lifetime of that service.
  1. AddSingleton
  2. AddScoped
  3. AddTransient
AddSingleton():
When we use the AddSingleton() method to register a service, then it will create a singleton service. It means a single instance of that service is created and that singleton instance is shared among all the components of the application that require it. That singleton service is created when we requested for the first time.

AddScoped():
Scoped means instance per request. When we use the AddScoped() method to register a service, then it will create a Scoped service. It means, an instance of the service is created once per each HTTP request and uses that instance in other calls of the same request.

AddTransient():
When we use the AddTransient() method to register a service, then it will create a Transient service. It means a new instance of the specified service is created each time when it is requested and they are never shared.

Note: In the real-time applications, you need to register the components such as application-wide configuration as Singleton. The Database access classes like Entity Framework contexts are recommended to be registered as Scoped so that the connection can be re-used. If you want to run anything in parallel then it is better to register the component as Transient.

In this article, we are going to use the AddSingleton() method to register the component. In our upcoming articles, we will discuss the rest two methods.

Registering the TestStudentRepository with ASP.NET Core Dependency Injection
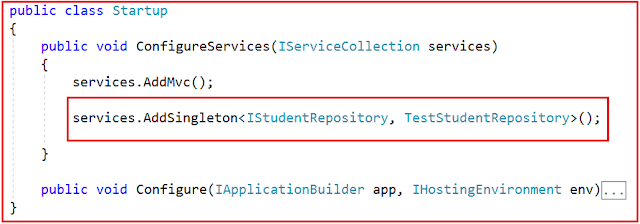
Here we need to call the AddSingleton() method on the services instance within the ConfigureServices() method of the Startup class as shown below.
Registering a Service with ASP.NET Core Dependency Injection Container

With the above changes, now run the application and navigate to Home/GetStudentDetails/102 URL and you will see the output as expected.

What are the advantages of using ASP.NET Core Dependency Injection?
The ASP.NET Core Dependency Injection allows us to develop loosely coupled software components. Using the ASP.NET Core Dependency Injection, it is very easy to swap with a different implementation of a component.

In the next article, I am going to discuss the Controllers in ASP.NET Core MVC application. Here, in this article, I try to explain the ASP.NET Core Dependency Injection with an example. I hope this article will help you to understand the concept of Dependency Injection in ASP.NET Core Application.

Summary:
I hope this post will be helpful to understand the concept of ASP.NET Core Dependency Injection
Please share this post with your friends and colleagues.
For any queries please post a comment below.
Happy Coding 😉
Read More
  • Share This:  
  •  Facebook
  •  Twitter
  •  Google+
  •  Stumble
  •  Digg

Model in ASP.NET Core MVC

 Admin     August 23, 2020     .Net, .Net Core, .Net Core MVC, Asp.Net, C#     1 comment   

In this article, I am going to discuss the Model in ASP.NET Core MVC application with an example. Please read our previous article before proceeding to this article where we discussed how to set up MVC in asp.net core application. We are going to work with the same example that we started in our previous article.

What is a Model in ASP.NET Core MVC?
Model in ASP.NET Core MVC contains a set of classes that are used to represent the domain data as well as it also contains logic to manage the domain data. So in the simple word we can say that the model in MVC is used to manage the data i.e. the state of the application in memory. It is not mandatory, but it is a good programming practice to store all model classes within the Models folder.

Let us see how to create and work with models in ASP.NET Core MVC.

Adding Models folder:
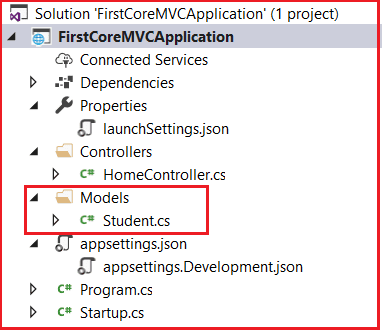
Right-click on your project, then select add => new folder option which will add a new folder. Then rename the folder name as Models. Here we want to create a model for displaying the student detail. So, create a class file with the name Student.cs within the Models folder. Once you create the Student model then the folder structure of your application should looks as shown below.
Model in ASP.NET Core MVC Application

Now open the Student.cs class file and then copy and paste the following code.
using System;
namespace FirstCoreMVCApplication.Models
{
    public class Student
    {
        public int StudentId { get; set; }
        public string Name { get; set; }
        public string Branch { get; set; }
        public string Section { get; set; }
        public string Gender { get; set; }
    }
}
This is our student model which is going to store the student data in memory. As we already discussed, the model in asp.net core MVC also contains business logic to manage the data. So in our example, to manage the student data i.e. to perform the CRUD operation on the student data we are going to use the following IStudentRepository interface.

Creating IStudentRepository interface:
Right-click on the Models folder and then add an interface with the name IStudentRepository.cs. Once you create the interface then copy and paste the following code in it.
namespace FirstCoreMVCApplication.Models
{
    public interface IStudentRepository
    {
        Student GetStudentById(int StudentId);
    }
}
As you can see, we created the above interface with one method i.e. GetStudentById() method which will retrieve the student details by the student id.

Creating TestStudentRepository class:
Let us create an implementation class for the above IStudentRepository interface. In our upcoming article, we will discuss how to retrieve the student details from a database. But for this demo, lets hardcoded the student details. So, create a class file with the name TestStudentRepository within the Models folder and then copy and paste the following code in it.
using System.Collections.Generic;
using System.Linq;
namespace FirstCoreMVCApplication.Models
{
    public class TestStudentRepository : IStudentRepository
    {
        private List<Student> _studentList;
        public TestStudentRepository()
        {
            _studentList = new List<Student>()
            {
                new Student() { StudentId = 101, Name = "James", Branch = "CSE", Section = "A", Gender = "Male" },
               new Student() { StudentId = 102, Name = "Smith", Branch = "ETC", Section = "B", Gender = "Male" },
                new Student() { StudentId = 103, Name = "David", Branch = "CSE", Section = "A", Gender = "Male" },
               new Student() { StudentId = 104, Name = "Sara", Branch = "CSE", Section = "A", Gender = "Female" },
                new Student() { StudentId = 105, Name = "Pam", Branch = "ETC", Section = "B", Gender = "Female" }
            };
        }
        public Student GetStudentById(int StudentId)
        {
            return this._studentList.FirstOrDefault(e => e.StudentId == StudentId);
        }
    }
}
Modify the HomeController as shown below to use the TestStudentRepository to retrieve the student details.
using FirstCoreMVCApplication.Models;
using Microsoft.AspNetCore.Mvc;
namespace FirstCoreMVCApplication.Controllers
{
    public class HomeController : Controller
    {
        public JsonResult GetStudentDetails(int Id)
        {
            TestStudentRepository repository = new TestStudentRepository();
            Student studentDetails = repository.GetStudentById(Id);
            return Json(studentDetails);
        }
    }
}
Now run the application and you will see the student data in JSON format as expected in the browser. The way we implemented the GetStudentDetails method of Home Controller is not loosely coupled. That means tomorrow if the implementation class of the IStudentRepository is changed then we need to change the code in the Home Controller class as both are tightly coupled. We can overcome this problem by implementing dependency injection design pattern.

In our next article, we are going to discuss how to implement the dependency injection in ASP.NET core MVC application. Here, in this article, I try to explain the Model in ASP.NET Core MVC application. I hope this article will help you with your need. I would like to have your feedback. Please post your feedback, question, or comments about this article.

Summary:
I hope this post will be helpful to understand the concept of Model in ASP.NET Core MVC
Please share this post with your friends and colleagues.
For any queries please post a comment below.
Happy Coding 😉
Read More
  • Share This:  
  •  Facebook
  •  Twitter
  •  Google+
  •  Stumble
  •  Digg

Difference Between AddMvc and AddMvcCore

 Admin     August 23, 2020     .Net, .Net Core, .Net Core MVC, Asp.Net, C#     No comments   

In this article, I am going to discuss the Difference Between AddMvc and AddMvcCore Method in the ASP.NET Core application. I strongly recommended you read our previous article before proceeding to this article where we discussed the use of the AddMvc method to Setup the MVC in ASP.NET Core application.

Along with the AddMvc() method, we can also use the AddMvcCore() method to Set up the MVC in the ASP.NET Core application. So, in short, we can say that the IServiceCollection interface provides two methods such as AddMvc() and AddMvcCore() to set up MVC in an ASP.NET Core application.

We are going to work with the same example that we created in our previous article. In our previous article, we use the AddMvc() method. Before going to understand the difference between AddMvc and AddMvcCore method, let us first do some changes into our HomeController.

Let us have a look at the HomeController class.
Difference Between AddMvc and AddMvcCore Method in ASP.NET Core application

As you can see in the above image, the HomeController class is not inherited from the base Controller class. But still, it works as expected and we get the output when we run the application. This is because within the index action method we are simply returning a string.

But this is not going to be worked if we want to return an HTML View or JSON Data from the Index action method. If you want to return the JSON Data or HTML View from an action method then the Controller class should inherit from the base Controller class which is provided by the ASP.NET Core framework.

The base Controller class which is belongs to Microsoft.AspNetCore.Mvc namespace provides the supports to return different types of results such as JSONResult, ViewResult, etc.

Returning JSON Data from Action Method:
So let’s modify the HomeController class to return JsonResult from the Index action method. First import the Microsoft.AspNetCore.Mvc namespace and then inherit the HomeController class from the base Controller class as shown below.
using Microsoft.AspNetCore.Mvc;
namespace FirstCoreMVCApplication.Controllers
{
    public class HomeController : Controller
    {
        public JsonResult Index()
        {
            return Json(new { Name = "James", Department = "IT", Salary = 25000 });
        }
    }
}
Following is the code of our Startup class. As you can see, here we are using the AddMvc() method to configure the MVC services to the dependency injection container.
using AddMvc() Method

Now run the application and navigate to the root URL of your application. You will see the JSON data as expected in the browser.

Using AddMvcCore() method:
Now let us modify the ConfigureServices() method of the Startup class as shown below to use the AddMvcCore() method to register the MVC services to the dependency injection container.
using AddMvcCore() Method

With the above changes in the ConfigureServices() method, now run the application and navigate to the root URL of the application. You will get the following error.
Difference Between AddMvc() and AddMvcCore() Method

The above error clearly states that there is no JSON Formatter registered with the dependency injection container in order to return JSON data. We got this error when we use the AddMvcCore() method but not with the AddMvc() method. The reason is the AddMvc() method registered the Json Formatters within the dependency injection container but not the AddMvcCore() method.

As asp.net core is open source, so you can see the source code of the AddMvc() method by navigating to the following GitHub page.

https://github.com/aspnet/Mvc/blob/edb5baf81c07e3e9db8c3019439414094acb6ef8/src/Microsoft.AspNetCore.Mvc/MvcServiceCollectionExtensions.cs

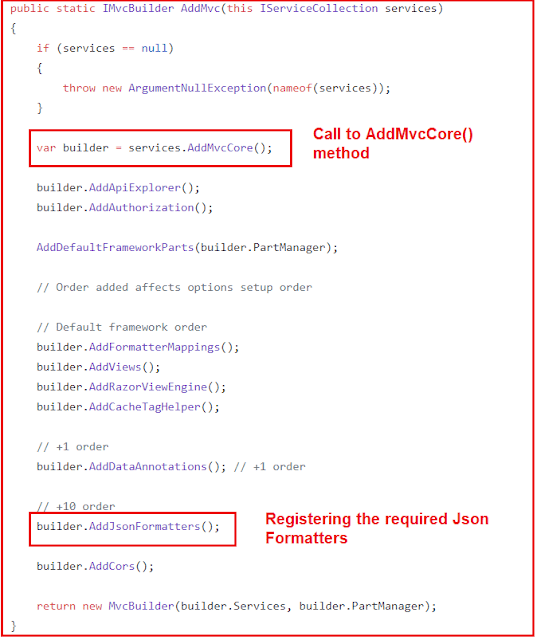
Please have a look at the source code of the AddMvc() method.
source code of AddMvc() method

Now let’s have a look at the AddMvcCore() method source code by visiting the following GitHub page.

https://github.com/aspnet/Mvc/blob/1521f9298bc44e70d0fc5f9bc0814e101bbcc479/src/Microsoft.AspNetCore.Mvc.Core/DependencyInjection/MvcCoreServiceCollectionExtensions.cs

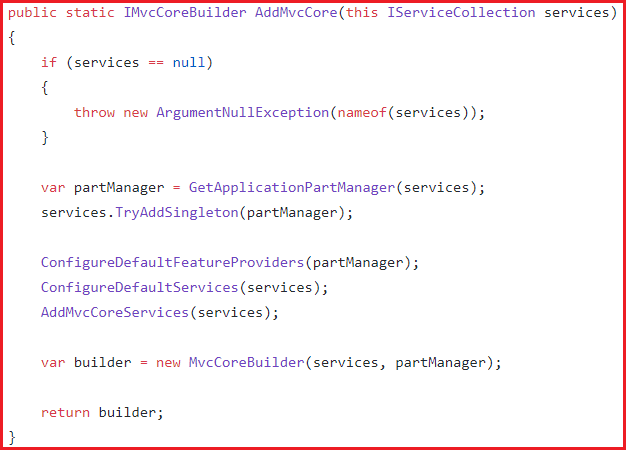
Please have a look at the source code of the AddMvcCore() method.
source code of AddMvcCore() method

So the difference is that, the AddMvcCore() method adds only the required MVC services to the dependency injection container whereas the AddMvc() method adds all the required MVC services. As you can see from the source code of the AddMvc() method, it internally calls the AddMvcCore() method to add all the core services which are required for MVC.

So let’s modify the ConfigureServices() method of the Startup class as shown below to register the JsonFormatters with AddMvcCore() method to return JSON data.
public class Startup
{
    public void ConfigureServices(IServiceCollection services)
    {
        var bilder = services.AddMvcCore();
        bilder.AddJsonFormatters();
    }
    public void Configure(IApplicationBuilder app, IHostingEnvironment env)
    {
        if (env.IsDevelopment())
        {
            app.UseDeveloperExceptionPage();
        }
        app.UseMvcWithDefaultRoute();
    }
}
With the above changes, now run the application and you will see the output as expected.

In the next article, I am going to discuss working with Models in the ASP.NET Core MVC application. Here, in this article, I try to explain the Difference Between AddMvc and AddMvcCore method in ASP.NET Core application step by step with an example. I would like to have your feedback. Please post your feedback, question, or comments about this article.

Summary:
I hope this post will be helpful to understand the concept of Difference Between AddMvc and AddMvcCore methods
Please share this post with your friends and colleagues.
For any queries please post a comment below.
Happy Coding 😉
Read More
  • Share This:  
  •  Facebook
  •  Twitter
  •  Google+
  •  Stumble
  •  Digg

Set up MVC in ASP.NET Core Application

 Admin     August 23, 2020     .Net, .Net Core, .Net Core MVC, Asp.Net, C#     No comments   

In this article, I am going to discuss how to Set up MVC in ASP.NET Core Application step by step. Please read our previous article before proceeding to this article where we discussed the Basics of ASP.NET Core MVC Application.

It is possible in ASP.NET Core to build an entire application using only the asp.net core middlewares. But the ASP.NET Core MVC framework provides us the features that we can use to create HTML pages and HTTP-based APIs easily. So, here we will see how to set up MVC in ASP.NET Core Application. To do so, let us first create an Empty ASP.NET Core Web Application.

Creating a new ASP.NET Core Application:
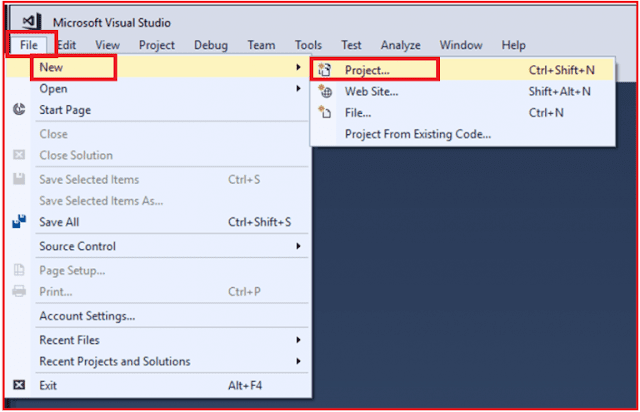
To create a new ASP.NET Core application, Open Visual Studio. Then select File => New => Project option as shown in the below image.
How to Setup MVC in ASP.NET Core Application

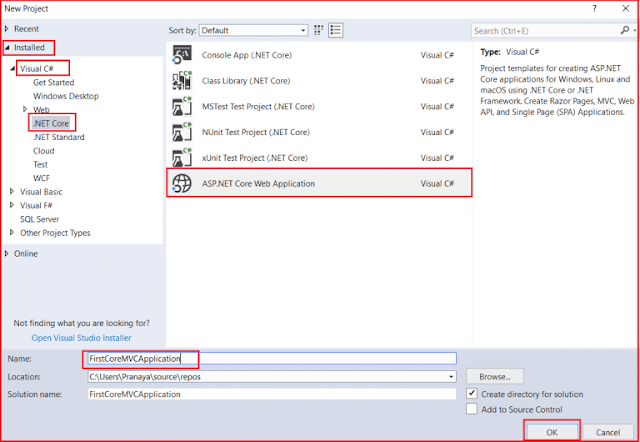
Once you click on the Project option, then it will open the New Project dialog window. In the “New Project” dialog, from the left pane expand the “Installed” template section. Then expand the “Visual C#” section and select “.NET Core“. From the middle pane select ASP.NET Core Web Application. Provide the name as “FirstCoreMVCApplication” and select the location where you want to store the Project. Finally, click on the OK button as shown below.
How to Setup MVC in ASP.NET Core Application

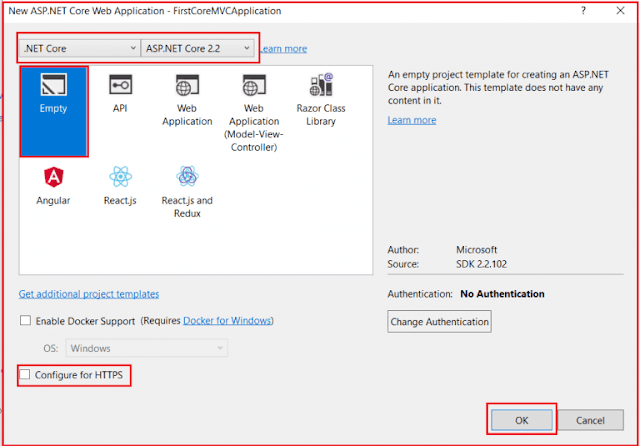
Once you click on the OK button, it will open the following window where we need to select the ASP.NET Core version and template types. So, select ASP.NET Core 2.2 which is the latest version as of this writing from the version selector drop-down list. Select the template as Empty as we are going to do everything from scratch. Then uncheck the Configure for HTTPS checkbox. Finally, click on the OK button as shown in the below image.
How to Set up MVC in ASP.NET Core Application

That’s it. The project is created with the default template. The default template by default does not include the setup for MVC. Now let us see how to set up MVC in asp.net core application.

Setup MVC in ASP.NET Core Application:
There are two simple steps required to set up MVC in ASP.NET Core Application.

Step1:
First, we need to add the required MVC services to the dependency injection container. To do so you need to add the following code within the ConfigureServices() method of the Startup class which is present within the Startup.cs class file. This code will include all the required services which are required to develop asp.net core MVC application.
Set up MVC in ASP.NET Core Application

Note: Along with AddMVC() method, we also have AddMvcCore() method. In the next article, we will discuss the AddMvcCore() method in detail as well as we will also discuss the difference between two methods and when to use one over another.

Step2:
In the second step, we need to add the required MVC middleware to the application request processing pipeline. Here also, the framework provides two middlewares i.e. UseMvcWithDefaultRoute() and UseMvc(). In this article, we are going to use the UseMvcWithDefaultRoute() middleware and in our upcoming articles, we will discuss the use of UseMvc() middleware.

So, Modify the Startup class as shown below.
public class Startup
{
    // This method gets called by the runtime. Use this method to 
    // add services to the container.
    public void ConfigureServices(IServiceCollection services)
    {
        //Configuring the MVC service to the dependency injection container
        services.AddMvc();
    }
    // This method gets called by the runtime. Use this method to 
    // configure the HTTP request pipeline.
    public void Configure(IApplicationBuilder app, IHostingEnvironment env)
    {
        if (env.IsDevelopment())
        {
            app.UseDeveloperExceptionPage();
        }
        //Configuring the MVC middleware to the request processing pipeline
        app.UseMvcWithDefaultRoute();
        app.Run(async (context) =>
        {
            await context.Response.WriteAsync("Hello World!");
        });
    }
}
That’s it. We are done with the MVC setup in asp.net core application. Now run the application and navigate the root URL of your application. When you navigate to the URL, you will see the “Hello World!” message in the browser.

Understanding the UseMvcWithDefaultRoute() middleware
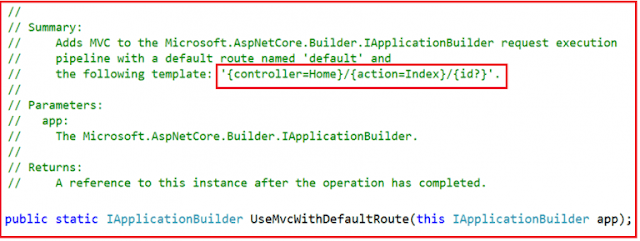
Let have a look at the definition of the UseMvcWithDefaultRoute() middleware.
Understanding the UseMvcWithDefaultRoute() middleware

As shown in the above definition, the default controller is Home and the default action is Index for our application. With this keep in mind let us discuss how the request is handled when we issue a request to the root URL i.e. “http://localhost:52190/”.

As we have not specified the controller and action in the URL, so the MVC middleware will look for the default index action method of the Home controller. As of now, we have not created the Home Controller. So the MVC middleware will pass that request to the next middleware which is registered using the Run() method and this is the middleware that will serve the request and returns the “Hello World!” message which we saw in the browser.

Now let us see, what happens if we remove the middleware which is registered using the Run(). So, modify the Configure method as shown below.
Understanding the UseMvcWithDefaultRoute() middleware

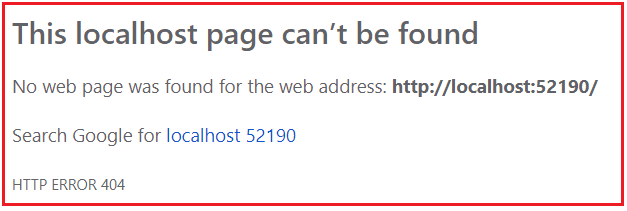
Now run the application and navigate to the root URL of your application and you see the following page.
Understanding the UseMvcWithDefaultRoute() middleware

Now we see the HTTP Error 404. The reason for this is the UseMvcWithDefaultRoute() middleware did not find the Home Controller with the Index() action method and there is no other middleware in the request processing pipeline as result we get 404 error.

Adding Home Controller:
In ASP.NET Core MVC application, all the Controllers should be present within a specific folder called Controllers. So first we need to add the Controllers folder with the root project folder. Once you add the Controllers folder then add a new class file with the name HomeController within the Controllers folder.

Once you add the HomeController class, your project folder structure should be as shown below.
Understanding the UseMvcWithDefaultRoute() middleware

Now open the HomeController class and then copy and paste the following code in it.
public class HomeController
{
    public string Index()
    {
        return "This is Index action from MVC Controller";
    }
}
Now run the application and navigate to the root URL of the application and you will see the message as “This is Index action from MVC Controller” in the browser.

So in short, to Setup MVC in asp.net core application, first we need to add the required MVC services to dependency injection container and secondly, we need to configure the MVC middleware in the request processing pipeline.

In the next article, I am going to discuss the difference between AddMvc and AddMvcCore and when to use one over another in the ASP.NET Core MVC application. Here, in this article, I try to explain how to Setup MVC in ASP.NET Core Application step by step with an example. I hope you enjoy this article.

Summary:
I hope this post will be helpful to understand the Setup of MVC in ASP.NET Core Application
Please share this post with your friends and colleagues.
For any queries please post a comment below.
Happy Coding 😉
Read More
  • Share This:  
  •  Facebook
  •  Twitter
  •  Google+
  •  Stumble
  •  Digg

Introduction to ASP.NET Core MVC Framework

 Admin     August 23, 2020     .Net, .Net Core, .Net Core MVC, Asp.Net, C#     No comments   

In this article, I am going to give you a brief introduction to ASP.NET Core MVC Framework. Please read our previous article where we discussed Developer Exception Page Middleware Components in ASP.NET Core MVC Application. As part of this article, we are going to discuss the following pointers.
  1. What is MVC?
  2. How MVC Design Pattern Works?
  3. Understanding Model, View, and Controller.
  4. Where the MVC Design Pattern is used in the real-time three-layer application?
  5. What is ASP.NET Core MVC?
What is MVC?
The MVC stands for Model View and Controller. It is an architectural software design pattern that is basically used to develop interactive applications. An interactive application is an application where there is user interaction involved and based on the user interaction some event handling occurred.

The most important point that you need to remember is, it is not only used for developing web-based applications but also we can use this MVC design pattern to develop the Desktop or mobile-based application.

The MVC (Model-View-Controller) design pattern was introduced in the 1970s which divides an application into 3 major components. They are Model, View, and Controller. The main objective of the MVC design pattern is the separation of concerns. It means the domain model and business logic are separated from the user interface (i.e. view). As a result, maintaining and testing the application becomes simpler and easier.

How MVC Design Pattern Works?
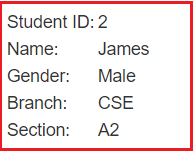
Let us see an example to understand how the MVC pattern works in asp.net core MVC application. For example, we want to design an application, where we need to display the student details on a web page as shown below.
ASP.NET Core MVC

So, when we issue a request something like “http://example.com/student/details/2” from a web browser then the following things are happening in order to handle the request.
ASP.NET Core MVC application

The controller is the component in the MVC design pattern, who actually handles the incoming request. In order to handle the request, the controller components do several things are as follows.

The controller component creates the model that is required by a view. The model is the component in MVC design pattern which basically contains classes that are used to store the domain data or you can say business data.

In the MVC design pattern, the Model component also contains the required logic in order to retrieve the data from a database. Once the model created by the controller, then the controller selects a view to render the domain data or model data. While selecting a view, it is also the responsibility of the controller to pass the model data.

In the MVC design pattern, the only responsibility of view is to render the model data. So, in MVC, the view is the component whose responsibility is to generate the necessary HTML in order to render the model data. Once the HTML is generated by the view, then that HTML is then sent to the client over the network, who initially made the request.

Let us discuss each of the components of the MVC design pattern in detail.

Model:
The Model is the component in MVC Design pattern which is used to manage that data i.e. state of the application in memory. The Model represents a set of classes that are used to describe the application validation logic, business logic, and data access logic. So in our example, the model consists of Student class and the StudentBusinessLayer class.
public class Student
{
    public int StudentID { get; set; }
    public string Name { get; set; }
    public string Gender { get; set; }
    public string Branch { get; set; }
    public string Section { get; set; }
}
public class StudentBusinessLayer
{
    public IEnumerable<Student> GetAll()
    {
        //logic to return all employees
    }
    public Student GetById(int StudentID)
    {
        //logic to return an employee by employeeId
        Student student = new Student()
        {
            StudentID = StudentID,
            Name = "James",
            Gender = "Male",
            Branch = "CSE",
            Section = "A2",
        };
        return student;
    }
    public void Insert(Student student)
    {
        //logic to insert an student
    }
    public void Update(Student student)
    {
        //logic to Update an student
    }
    public void Delete(int StudentID)
    {
        //logic to Delete an student
    }
}
Here, in our example, we use the Student class to hold the student data in memory. The StudentBusinessLayer class is used to manage the student data i.e. going to perform the CRUD operation.

So, in short, we can say that a Model in MVC design pattern contains a set of classes that are used to represent the data and also contains the logic to manage those data. In our example, the Student class is the class that is used to represent the data. The StudentBusinessLayer class is the class that is used to manage the Student data.

View:
The view component in the MVC Design pattern is used to contain the logic to represent the model data as a user interface with which the end-user can interact. Basically, the view is used to render the domain data (i.e. business data) which is provided to it by the controller.

For example, we want to display Student data in a web page. In the following example, the Student model carried the student data to the view. As already discussed, the one and only responsibility of the view is to render that student data. The following code does the same thing.
@model ASPCoreApplication.Models.Student
<html>
<head>
    <title>Student Details</title>
</head>
<body>
    <table>
        <tr>
            <td>Student ID: </td>
            <td>@Model.StudentID</td>
        </tr>
        <tr>
            <td>Name: </td>
            <td>@Model.Name</td>
        </tr>
        <tr>
            <td>Gender: </td>
            <td>@Model.Gender </td>
        </tr>
        <tr>
            <td>Branch: </td>
            <td>@Model.Branch</td>
        </tr>
        <tr>
            <td>Section: </td>
            <td>@Model.Section </td>
        </tr>
    </table>
</body>
</html>
Controller:
The Controller is the component in an MVC application that is used to handle the incoming HTTP Request and based on the user action, the respective controller will work with the model and view and then sends the response back to the user who initially made the request. So, it is the one that will interact with both the models and views to control the flow of application execution.

In our example, when the user issued a request the following URL

http://example.com/student/details/2

Then that request is mapped to the Details action method of the Student Controller. How it will map to the Details action method of the Student Controller that will discuss in our upcoming articles.
public class StudentController : Controller
{
    public ActionResult Details(int studentId)
    {
        StudentBusinessLayer studentBL = new StudentBusinessLayer();
        Student studentDetail = studentBL.GetById(studentId);
        return View(studentDetail);
    }
}
As you can see in the example, the Student Controller creates the Student object within the Details action method. So, here the Student is the Model. To fetch the Student data from the database, the controller uses the StudentBusinessLayer class.

Once the controller creates the Student model with the necessary student data, then it passes that Student model to the Details view. The Details view then generates the necessary HTML in order to present the Student data. Once the HTML is generated, then this HTML is sent to the client over the network who initially made the request.

Note: In MVC design pattern both the Controller and View depend on Model. But the Model never depends on either view or controller. This is one of the main reasons for the separation of concerns. This separation of concerns allows us to build the model and test independently of the visual presentation.

Where MVC is used in the real-time three-layer application?
In general, a real-time application may consist of the following layers
  1. Presentation Layer: This layer is responsible for interacting with the user.
  2. Business Layer: This layer is responsible for implementing the core business logic of the application.
  3. Data Access Layer: This layer is responsible for interacting with the database to perform the CRUD operations.
The MVC design pattern is basically used to implement the Presentation Layer of the application. Please have a look at the following diagram.
Where MVC is used in the real-time three-layer application?

What is ASP.NET Core MVC?
The ASP.NET Core MVC is a lightweight, open-source, highly testable presentation framework that is used for building web apps and Web APIs using the Model-View-Controller design pattern.

The ASP.NET Core MVC Framework provides us with a patterns-based way to develop dynamic websites and web apps with a clean separation of concerns. This ASP.NET Core MVC framework provides us the full control over the mark-up. It also supports for Test-Driven Development and also uses the latest web standards.

In the next article, we are going to discuss how to set up the MVC middleware in asp.net core application. In this article, I try to give a brief introduction to ASP.NET Core MVC Framework. I would like to have your feedback. Please post your feedback, question, or comments about this ASP.NET Core MVC framework article.

Summary:
I hope this post will be helpful to understand the Introduction to ASP.NET Core MVC Framework
Please share this post with your friends and colleagues.
For any queries please post a comment below.
Happy Coding 😉
Read More
  • Share This:  
  •  Facebook
  •  Twitter
  •  Google+
  •  Stumble
  •  Digg
Newer Posts Older Posts

Join us on Telegram

Loved Our Blog Posts? Subscribe To Get Updates Directly To Your Inbox

Like us on Facebook

Popular Posts

  • Comparison Between HttpModule and HttpContext
    Hi friends! Today we are going to list some of the differences between HttpModule and HttpContext. Many of my developer friends are confus...
  • What is Dependency Injection(DI)
    Hi friends! Today we are going to learn about Dependency Injection and in our last session we have come across Static classes and where it s...
  • ASP.NET State Management
    State management is a technique or way to maintain / store the state of an Asp.Net controls, web page information, object/data, and user in ...
  • What is Abstract Class and When we should use Abstract Class
    Hi friends! In our previous sessions we have seen  Difference Between Class and Struct . And in our last session  we learnt Usability of Sec...
  • Static Files Middleware in ASP.NET Core
    In this article, I am going to discuss how to serve static files using Static Files Middleware in ASP.NET Core Application. Please read ou...
  • HTTP Client Message Handler in Web API
    In this article, I am going to discuss HTTP Client Message Handler in Web API with real-time examples. As we already discussed in HTTP Mes...
  • ASP.NET Web API Basic Authentication
    In this article, I am going to discuss how to implement the ASP.NET Web API Basic Authentication step by step with an example. Please read...

Blog Archive

Contact Form

Name

Email *

Message *

Tags

.Net .Net Core .Net Core MVC Algorithm Angular Anonymous Types Asp.Net Asp.Net MVC Blazor C# Data Structure Database Design Patterns Entity Framework Entity Framework Core Filters Interview Question Management Studio Programming Programs SQL Server SSMS Web API

Copyright © C# Techtics | All Right Reserved.

Protected by Copyscape