In this article, I am going to discuss how to Set up MVC in ASP.NET Core Application step by step. Please read our previous article before proceeding to this article where we discussed the Basics of ASP.NET Core MVC Application.
It is possible in ASP.NET Core to build an entire application using only the asp.net core middlewares. But the ASP.NET Core MVC framework provides us the features that we can use to create HTML pages and HTTP-based APIs easily. So, here we will see how to set up MVC in ASP.NET Core Application. To do so, let us first create an Empty ASP.NET Core Web Application.
Creating a new ASP.NET Core Application:
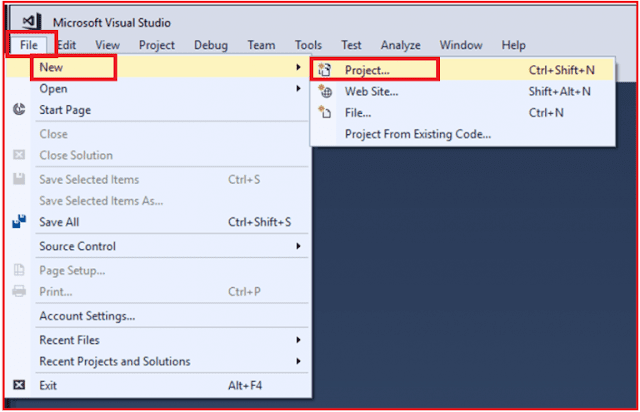
To create a new ASP.NET Core application, Open Visual Studio. Then select File => New => Project option as shown in the below image.
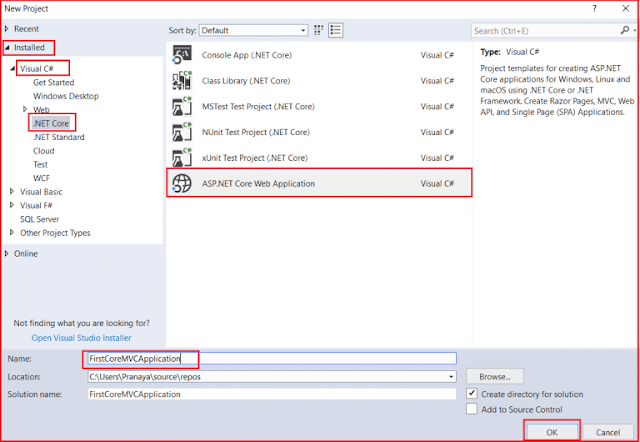
Once you click on the Project option, then it will open the New Project dialog window. In the “New Project” dialog, from the left pane expand the “Installed” template section. Then expand the “Visual C#” section and select “.NET Core“. From the middle pane select ASP.NET Core Web Application. Provide the name as “FirstCoreMVCApplication” and select the location where you want to store the Project. Finally, click on the OK button as shown below.
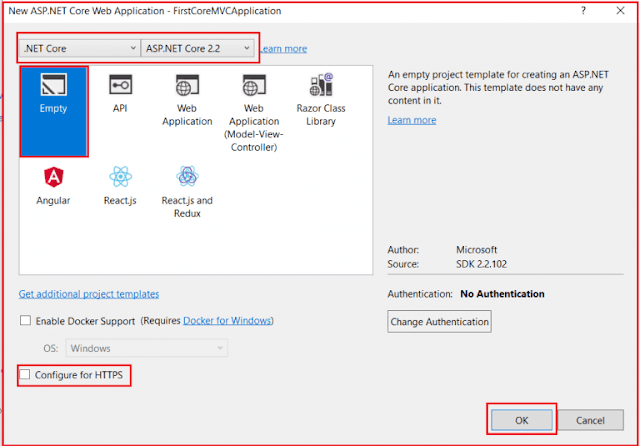
Once you click on the OK button, it will open the following window where we need to select the ASP.NET Core version and template types. So, select ASP.NET Core 2.2 which is the latest version as of this writing from the version selector drop-down list. Select the template as Empty as we are going to do everything from scratch. Then uncheck the Configure for HTTPS checkbox. Finally, click on the OK button as shown in the below image.
That’s it. The project is created with the default template. The default template by default does not include the setup for MVC. Now let us see how to set up MVC in asp.net core application.
Setup MVC in ASP.NET Core Application:
There are two simple steps required to set up MVC in ASP.NET Core Application.
Step1:
First, we need to add the required MVC services to the dependency injection container. To do so you need to add the following code within the ConfigureServices() method of the Startup class which is present within the Startup.cs class file. This code will include all the required services which are required to develop asp.net core MVC application.
Note: Along with AddMVC() method, we also have AddMvcCore() method. In the next article, we will discuss the AddMvcCore() method in detail as well as we will also discuss the difference between two methods and when to use one over another.
Step2:
In the second step, we need to add the required MVC middleware to the application request processing pipeline. Here also, the framework provides two middlewares i.e. UseMvcWithDefaultRoute() and UseMvc(). In this article, we are going to use the UseMvcWithDefaultRoute() middleware and in our upcoming articles, we will discuss the use of UseMvc() middleware.
So, Modify the Startup class as shown below.
Understanding the UseMvcWithDefaultRoute() middleware
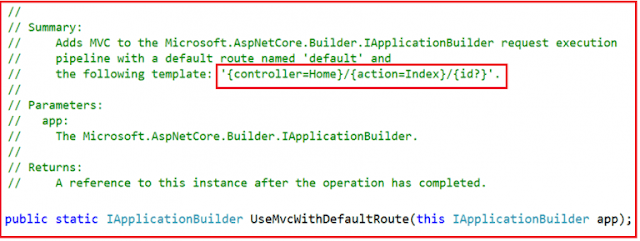
Let have a look at the definition of the UseMvcWithDefaultRoute() middleware.
As shown in the above definition, the default controller is Home and the default action is Index for our application. With this keep in mind let us discuss how the request is handled when we issue a request to the root URL i.e. “http://localhost:52190/”.
As we have not specified the controller and action in the URL, so the MVC middleware will look for the default index action method of the Home controller. As of now, we have not created the Home Controller. So the MVC middleware will pass that request to the next middleware which is registered using the Run() method and this is the middleware that will serve the request and returns the “Hello World!” message which we saw in the browser.
Now let us see, what happens if we remove the middleware which is registered using the Run(). So, modify the Configure method as shown below.
Now run the application and navigate to the root URL of your application and you see the following page.
Now we see the HTTP Error 404. The reason for this is the UseMvcWithDefaultRoute() middleware did not find the Home Controller with the Index() action method and there is no other middleware in the request processing pipeline as result we get 404 error.
Adding Home Controller:
In ASP.NET Core MVC application, all the Controllers should be present within a specific folder called Controllers. So first we need to add the Controllers folder with the root project folder. Once you add the Controllers folder then add a new class file with the name HomeController within the Controllers folder.
Once you add the HomeController class, your project folder structure should be as shown below.
Now open the HomeController class and then copy and paste the following code in it.
So in short, to Setup MVC in asp.net core application, first we need to add the required MVC services to dependency injection container and secondly, we need to configure the MVC middleware in the request processing pipeline.
In the next article, I am going to discuss the difference between AddMvc and AddMvcCore and when to use one over another in the ASP.NET Core MVC application. Here, in this article, I try to explain how to Setup MVC in ASP.NET Core Application step by step with an example. I hope you enjoy this article.
Summary:
I hope this post will be helpful to understand the Setup of MVC in ASP.NET Core Application
Please share this post with your friends and colleagues.
For any queries please post a comment below.
Happy Coding 😉
It is possible in ASP.NET Core to build an entire application using only the asp.net core middlewares. But the ASP.NET Core MVC framework provides us the features that we can use to create HTML pages and HTTP-based APIs easily. So, here we will see how to set up MVC in ASP.NET Core Application. To do so, let us first create an Empty ASP.NET Core Web Application.
Creating a new ASP.NET Core Application:
To create a new ASP.NET Core application, Open Visual Studio. Then select File => New => Project option as shown in the below image.
Once you click on the Project option, then it will open the New Project dialog window. In the “New Project” dialog, from the left pane expand the “Installed” template section. Then expand the “Visual C#” section and select “.NET Core“. From the middle pane select ASP.NET Core Web Application. Provide the name as “FirstCoreMVCApplication” and select the location where you want to store the Project. Finally, click on the OK button as shown below.
Once you click on the OK button, it will open the following window where we need to select the ASP.NET Core version and template types. So, select ASP.NET Core 2.2 which is the latest version as of this writing from the version selector drop-down list. Select the template as Empty as we are going to do everything from scratch. Then uncheck the Configure for HTTPS checkbox. Finally, click on the OK button as shown in the below image.
That’s it. The project is created with the default template. The default template by default does not include the setup for MVC. Now let us see how to set up MVC in asp.net core application.
Setup MVC in ASP.NET Core Application:
There are two simple steps required to set up MVC in ASP.NET Core Application.
Step1:
First, we need to add the required MVC services to the dependency injection container. To do so you need to add the following code within the ConfigureServices() method of the Startup class which is present within the Startup.cs class file. This code will include all the required services which are required to develop asp.net core MVC application.
Note: Along with AddMVC() method, we also have AddMvcCore() method. In the next article, we will discuss the AddMvcCore() method in detail as well as we will also discuss the difference between two methods and when to use one over another.
Step2:
In the second step, we need to add the required MVC middleware to the application request processing pipeline. Here also, the framework provides two middlewares i.e. UseMvcWithDefaultRoute() and UseMvc(). In this article, we are going to use the UseMvcWithDefaultRoute() middleware and in our upcoming articles, we will discuss the use of UseMvc() middleware.
So, Modify the Startup class as shown below.
public class Startup
{
    // This method gets called by the runtime. Use this method to
    // add services to the container.
    public void ConfigureServices(IServiceCollection services)
    {
        //Configuring the MVC service to the dependency injection container
        services.AddMvc();
    }
    // This method gets called by the runtime. Use this method to
    // configure the HTTP request pipeline.
    public void Configure(IApplicationBuilder app, IHostingEnvironment env)
    {
        if (env.IsDevelopment())
        {
            app.UseDeveloperExceptionPage();
        }
        //Configuring the MVC middleware to the request processing pipeline
        app.UseMvcWithDefaultRoute();
        app.Run(async (context) =>
        {
            await context.Response.WriteAsync("Hello World!");
        });
    }
}
That’s it. We are done with the MVC setup in asp.net core application. Now run the application and navigate the root URL of your application. When you navigate to the URL, you will see the “Hello World!” message in the browser.
Understanding the UseMvcWithDefaultRoute() middleware
Let have a look at the definition of the UseMvcWithDefaultRoute() middleware.
As shown in the above definition, the default controller is Home and the default action is Index for our application. With this keep in mind let us discuss how the request is handled when we issue a request to the root URL i.e. “http://localhost:52190/”.
As we have not specified the controller and action in the URL, so the MVC middleware will look for the default index action method of the Home controller. As of now, we have not created the Home Controller. So the MVC middleware will pass that request to the next middleware which is registered using the Run() method and this is the middleware that will serve the request and returns the “Hello World!” message which we saw in the browser.
Now let us see, what happens if we remove the middleware which is registered using the Run(). So, modify the Configure method as shown below.
Now run the application and navigate to the root URL of your application and you see the following page.
Now we see the HTTP Error 404. The reason for this is the UseMvcWithDefaultRoute() middleware did not find the Home Controller with the Index() action method and there is no other middleware in the request processing pipeline as result we get 404 error.
Adding Home Controller:
In ASP.NET Core MVC application, all the Controllers should be present within a specific folder called Controllers. So first we need to add the Controllers folder with the root project folder. Once you add the Controllers folder then add a new class file with the name HomeController within the Controllers folder.
Once you add the HomeController class, your project folder structure should be as shown below.
Now open the HomeController class and then copy and paste the following code in it.
public class HomeController
{
    public string Index()
    {
        return "This is Index action from MVC Controller";
    }
}
Now run the application and navigate to the root URL of the application and you will see the message as “This is Index action from MVC Controller” in the browser.
So in short, to Setup MVC in asp.net core application, first we need to add the required MVC services to dependency injection container and secondly, we need to configure the MVC middleware in the request processing pipeline.
In the next article, I am going to discuss the difference between AddMvc and AddMvcCore and when to use one over another in the ASP.NET Core MVC application. Here, in this article, I try to explain how to Setup MVC in ASP.NET Core Application step by step with an example. I hope you enjoy this article.
Summary:
I hope this post will be helpful to understand the Setup of MVC in ASP.NET Core Application
Please share this post with your friends and colleagues.
For any queries please post a comment below.
Happy Coding 😉






0 comments:
Post a Comment
If you like this website, please share with your friends on Facebook, Twitter, LinkedIn.