In this article, I am going to discuss How to Use Bootstrap in ASP.NET Core MVC Application. Please read our previous article before proceeding to this article where we discussed the How to Installed Bootstrap in ASP.NET Core MVC Application using Library Manager (Libman). Here, I will discuss how to use bootstrap as well as how to create and use custom CSS in a view.
Creating a Custom Style Sheet in ASP.NET Core MVC Application:
First, create a folder with the name CSS within the wwwroot folder. All the custom CSS files are going to be created within this folder. Once you create the CSS folder, let’s add a CSS file with the name MyCustomStyleSheet.css.
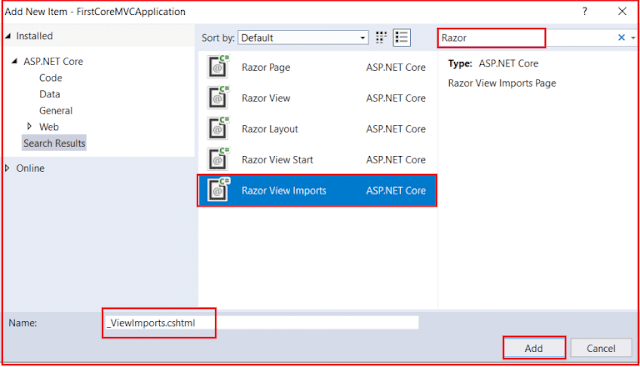
To create a style sheet, right-click on the CSS folder and then select “Add – New Item” from the context menu. Then search for CSS and select Style Sheet, provide a meaningful name and finally click on the Add button as shown in the below image.
Once you add the MyCustomStyleSheet.css file, then your wwwroot folder should looks as shown below.
Note: All the site custom CSS needs to be placed within the MyCustomStyleSheet.css file. So, open the MyCustomStyleSheet.css file and copy and paste the following code in it.
In order to use bootstrap, first, you need to include a reference to the bootstrap.css file. You can add the reference in each individual views. But as we are going to use the Layout file, so we are going to add a reference to the bootstrap.css file in the _Layout.css file. Along with bootstrap.css, we are also including a reference to our custom style sheet i.e. MyCustomStyleSheet.css.
Modifying the _Layout.cshtm file:
Please modify the Layout file which is present in the shared folder as shown below.
Creating Models:
Within the Models folder, add a class file with the name Student.cs and then copy and paste the following code in it.
Please modify the Home Controller as shown below.
Please modify the Startup class as shown below. Here, to serve the bootstrap we need to add the static files middle layer before the MVC middle layer in the request processing pipeline.
Please modify the Index view of Home Controller as shown below.
Please modify the Details view as shown below.
In the next article, I am going to discuss the Tag Helpers in ASP.NET Core MVC Application. Here, in this article, I try to explain How to Use Bootstrap in ASP.NET Core MVC Application.
Summary:
I hope this post will be helpful to understand How to Use Bootstrap in ASP.NET Core MVC
Please share this post with your friends and colleagues.
For any queries please post a comment below.
Happy Coding 😉
Creating a Custom Style Sheet in ASP.NET Core MVC Application:
First, create a folder with the name CSS within the wwwroot folder. All the custom CSS files are going to be created within this folder. Once you create the CSS folder, let’s add a CSS file with the name MyCustomStyleSheet.css.
To create a style sheet, right-click on the CSS folder and then select “Add – New Item” from the context menu. Then search for CSS and select Style Sheet, provide a meaningful name and finally click on the Add button as shown in the below image.
Once you add the MyCustomStyleSheet.css file, then your wwwroot folder should looks as shown below.
Note: All the site custom CSS needs to be placed within the MyCustomStyleSheet.css file. So, open the MyCustomStyleSheet.css file and copy and paste the following code in it.
.btn {
     width: 80px;
}
How to Using Bootstrap in ASP.NET Core MVC Application?In order to use bootstrap, first, you need to include a reference to the bootstrap.css file. You can add the reference in each individual views. But as we are going to use the Layout file, so we are going to add a reference to the bootstrap.css file in the _Layout.css file. Along with bootstrap.css, we are also including a reference to our custom style sheet i.e. MyCustomStyleSheet.css.
Modifying the _Layout.cshtm file:
Please modify the Layout file which is present in the shared folder as shown below.
<!DOCTYPE html>
<html>
<head>
    <meta name="viewport" content="width=device-width" />
    <title>@ViewBag.Title</title>
<link href="~/lib/twitter-bootstrap/css/bootstrap.css" rel="stylesheet" />
    <link href="~/css/MyCustomStyleSheet.css" rel="stylesheet" />
</head>
<body>
    <div class="container">
        @RenderBody()
    </div>
</body>
</html>
As you can see in the HTML code, we have included references for both bootstrap.css as well as MyCustomStyleSheet.css files. Here, we are also using the bootstrap container class for positioning the elements on the page.
Creating Models:
Within the Models folder, add a class file with the name Student.cs and then copy and paste the following code in it.
namespace FirstCoreMVCApplication.Models
{
    public class Student
    {
        public int StudentId { get; set; }
        public string Name { get; set; }
        public string Branch { get; set; }
        public string Section { get; set; }
        public string Gender { get; set; }
    }
}
Modifying the Home Controller:Please modify the Home Controller as shown below.
using FirstCoreMVCApplication.Models;
using Microsoft.AspNetCore.Mvc;
using System.Collections.Generic;
namespace FirstCoreMVCApplication.Controllers
{
    public class HomeController : Controller
    {
        public ViewResult Index()
        {
            List<Student> listStudents = new List<Student>()
            {
               new Student() { StudentId = 101, Name = "James", Branch = "CSE", Section = "A", Gender = "Male" },
               new Student() { StudentId = 102, Name = "Smith", Branch = "ETC", Section = "B", Gender = "Male" },
               new Student() { StudentId = 103, Name = "David", Branch = "CSE", Section = "A", Gender = "Male" },
               new Student() { StudentId = 104, Name = "Sara", Branch = "CSE", Section = "A", Gender = "Female" },
               new Student() { StudentId = 105, Name = "Pam", Branch = "ETC", Section = "B", Gender = "Female" }
            };
            return View(listStudents);
        }
        public ViewResult Details(int Id)
        {
            var studentDetails = new Student() { StudentId = Id, Name = "James", Branch = "CSE", Section = "A", Gender = "Male" };
            return View(studentDetails);
        }
    }
}
Modifying the Startup class:Please modify the Startup class as shown below. Here, to serve the bootstrap we need to add the static files middle layer before the MVC middle layer in the request processing pipeline.
using Microsoft.AspNetCore.Builder;
using Microsoft.AspNetCore.Hosting;
using Microsoft.Extensions.DependencyInjection;
namespace FirstCoreMVCApplication
{
    public class Startup
    {
        public void ConfigureServices(IServiceCollection services)
        {
            services.AddMvc();
        }
        public void Configure(IApplicationBuilder app, IHostingEnvironment env)
        {
            if (env.IsDevelopment())
            {
                app.UseDeveloperExceptionPage();
            }
            //Adding Static Files Middleware to serve the static files
            app.UseStaticFiles();
            //Adding MVC Middleware
            app.UseMvcWithDefaultRoute();
        }
    }
}
Modifying the Index view:Please modify the Index view of Home Controller as shown below.
@model List<FirstCoreMVCApplication.Models.Student>
@{
    ViewBag.Title = "Student List";
    Layout = "~/Views/Shared/_Layout.cshtml";
}
<div class="table-responsive">
    <table class="table">
        <thead>
            <tr>
                <th>ID</th>
                <th>Name</th>
                <th>View</th>
                <th>Update</th>
                <th>Delete</th>
            </tr>
        </thead>
        <tbody>
            @foreach (var student in Model)
            {
                <tr>
                    <td>@student.StudentId</td>
                    <td>@student.Name</td>
                    <td class="text-center">View</td>
                    <td class="text-center">Edit</td>
                    <td class="text-center">Delete</td>
                </tr>
            }
        </tbody>
    </table>
</div>
Modifying the Details View:Please modify the Details view as shown below.
@model FirstCoreMVCApplication.Models.Student
@{
    ViewBag.Title = "Student Details";
    Layout = "~/Views/Shared/_Layout.cshtml";
}
<div class="row justify-content-center m-3">
    <div class="col-sm-8">
        <div class="card">
            <div class="card-header text-center">
                <h1>@Model.Name</h1>
            </div>
            <div class="card-body text-center">
                <h4>Studnet ID : @Model.StudentId</h4>
                <h4>Branch : @Model.Branch</h4>
                <h4>Section : @Model.Section</h4>
                <h4>Gender : @Model.Gender</h4>
            </div>
            <div class="card-footer text-center">
                <a href="#" class="btn btn-primary">Back</a>
                <a href="#" class="btn btn-primary">Edit</a>
                <a href="#" class="btn btn-danger">Delete</a>
            </div>
        </div>
    </div>
</div>
That’s it. Save the changes and run the application and see the output as expected. Here, we have just created the View, Update, Delete, Back buttons but not implemented. In our upcoming articles, I will show you how to implement the CRUD operation in ASP.NET Core MVC Application.
In the next article, I am going to discuss the Tag Helpers in ASP.NET Core MVC Application. Here, in this article, I try to explain How to Use Bootstrap in ASP.NET Core MVC Application.
Summary:
I hope this post will be helpful to understand How to Use Bootstrap in ASP.NET Core MVC
Please share this post with your friends and colleagues.
For any queries please post a comment below.
Happy Coding 😉


