In this article, I am going to discuss the ASP.NET Core Environment Setup required for developing ASP.NET Core application. Please read our previous article before proceeding to this article where we gave a brief overview of the ASP.NET Core Framework. In order to develop the ASP.NET Core application, the following two software is required to install in your machine.
Download and Install an editor (IDE) for .NET Core Development
In my machine, I have windows operating system. So, I am going to use Visual Studio as my editor or you can say Integrated Development Environment for developing the ASP.NET Core application. But this is not mandatory. You can use any editor as per your choice. Some of the Editors are as follows
The Visual Studio Community Edition is free. As of this article, the latest version of Visual Studio is Visual Studio 2017 and it can be downloaded from the following site
https://visualstudio.microsoft.com/
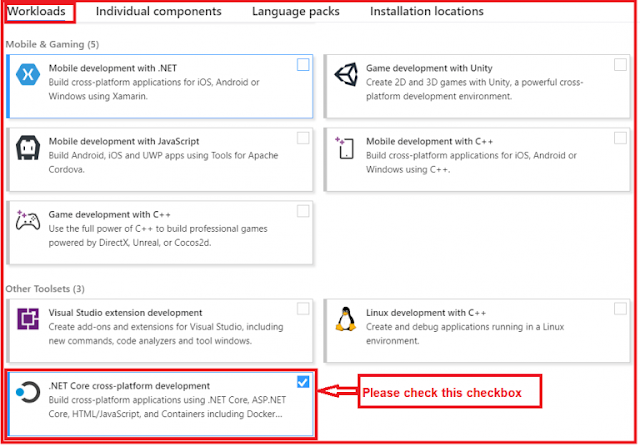
To develop .NET Core applications in Visual Studio 2017 we need .NET Core cross-platform development. So while you are installing the Visual Studio please select .NET Core cross-platform development workload as shown in the below image.
If you already installed the Visual Studio 2017, then make sure the above .NET Core cross-platform development is installed. If not installed then you just install this by using Visual Studio Installer.
By default with this .NET Core cross-platform development, the .NET Core SDK 2.1 is installed. You can also verify this by creating a new ASP.NET Core application.
Creating ASP.NET Core Application:
Open Visual Studio. Then select File => New => Project as shown in the below image.
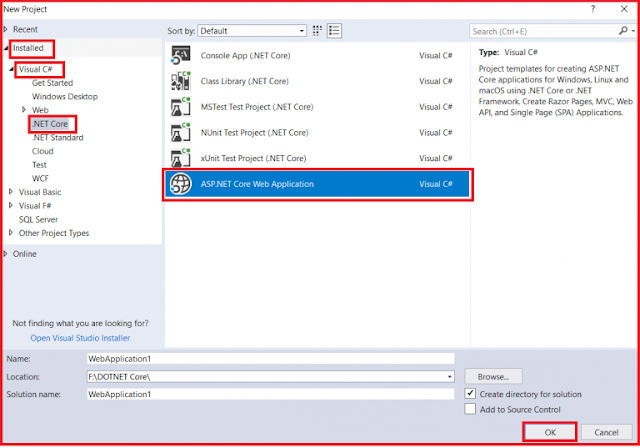
In the “New Project” window, from the left pane select “.NET Core” which is under the “Visual C#” which is under the “Installed” template section. From the middle pane select ASP.NET Core Web Application. Finally, click on the “OK” button as shown in the image below.
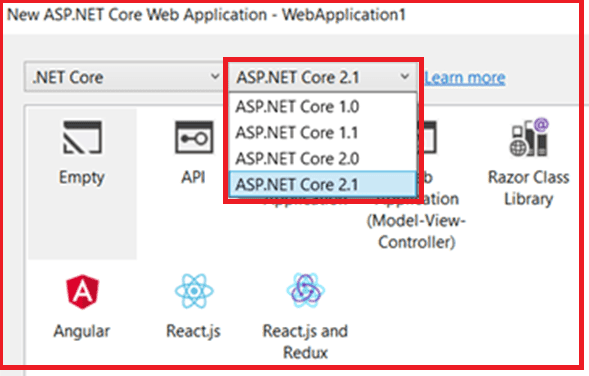
Once you click on the OK button, then it will open the select template section. Here you can observe that the ASP.NET Core 2.1 is installed by default as shown in the below image.
As of this writing, the latest stable version of .NET Core is 2.2 and you can verify this by visiting the following site.
https://github.com/dotnet/core/blob/master/release-notes/download-archive.md
Download and install .NET Core SDK
In order to download the .NET Core SDK latest version, please visits the following side. Then depending on your operating system installed on your machine download the appropriate .NET Core SDK and install it.
https://dotnet.microsoft.com/download
Here you will find two things as shown in the below image
If you want to develop and run the .NET Core application, then you need to download the .NET Core SDK. The .NET Core Runtime is required only to run .NET Core applications.
The .NET Core SDK contains the .NET Core Runtime. So, if you installed the .NET Core SDK, then there is no need to install .NET Core Runtime separately. The .NET Core Runtime just contains the resources or libraries which are required to run existing .NET Core applications.
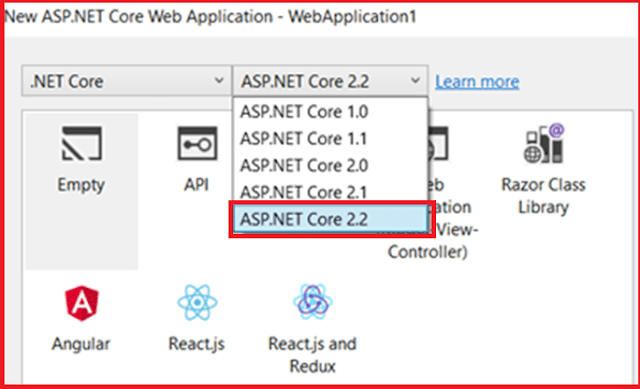
Once you installed the .NET Core SDK 2.2, create a new .NET Core Application. Now you can see that the ASP.NET Core 2.2 along with other versions in the .NET Core dropdown list as shown in the below image.
In the next article, I will discuss Creating First ASP.NET Core Web Application using Visual Studio step by step. Here, in this article, I discussed the ASP.NET Core Environment Setup required for developing ASP.NET Core application. I hope you enjoy this article.
Summary:
I hope this post will be helpful to understand the concept of ASP.NET Core Environment Setup
Please share this post with your friends and colleagues.
For any queries please post a comment below.
Happy Coding 😉
- Integrated Development Environment (IDE)
- .NET Core SDK (Software Development Kit)
Download and Install an editor (IDE) for .NET Core Development
In my machine, I have windows operating system. So, I am going to use Visual Studio as my editor or you can say Integrated Development Environment for developing the ASP.NET Core application. But this is not mandatory. You can use any editor as per your choice. Some of the Editors are as follows
- Visual Studio
- Sublime
- Visual Studio Code
- Vim
- Atom, Etc.
The Visual Studio Community Edition is free. As of this article, the latest version of Visual Studio is Visual Studio 2017 and it can be downloaded from the following site
https://visualstudio.microsoft.com/
To develop .NET Core applications in Visual Studio 2017 we need .NET Core cross-platform development. So while you are installing the Visual Studio please select .NET Core cross-platform development workload as shown in the below image.
If you already installed the Visual Studio 2017, then make sure the above .NET Core cross-platform development is installed. If not installed then you just install this by using Visual Studio Installer.
By default with this .NET Core cross-platform development, the .NET Core SDK 2.1 is installed. You can also verify this by creating a new ASP.NET Core application.
Creating ASP.NET Core Application:
Open Visual Studio. Then select File => New => Project as shown in the below image.
In the “New Project” window, from the left pane select “.NET Core” which is under the “Visual C#” which is under the “Installed” template section. From the middle pane select ASP.NET Core Web Application. Finally, click on the “OK” button as shown in the image below.
Once you click on the OK button, then it will open the select template section. Here you can observe that the ASP.NET Core 2.1 is installed by default as shown in the below image.
As of this writing, the latest stable version of .NET Core is 2.2 and you can verify this by visiting the following site.
https://github.com/dotnet/core/blob/master/release-notes/download-archive.md
Download and install .NET Core SDK
In order to download the .NET Core SDK latest version, please visits the following side. Then depending on your operating system installed on your machine download the appropriate .NET Core SDK and install it.
https://dotnet.microsoft.com/download
Here you will find two things as shown in the below image
If you want to develop and run the .NET Core application, then you need to download the .NET Core SDK. The .NET Core Runtime is required only to run .NET Core applications.
The .NET Core SDK contains the .NET Core Runtime. So, if you installed the .NET Core SDK, then there is no need to install .NET Core Runtime separately. The .NET Core Runtime just contains the resources or libraries which are required to run existing .NET Core applications.
Once you installed the .NET Core SDK 2.2, create a new .NET Core Application. Now you can see that the ASP.NET Core 2.2 along with other versions in the .NET Core dropdown list as shown in the below image.
In the next article, I will discuss Creating First ASP.NET Core Web Application using Visual Studio step by step. Here, in this article, I discussed the ASP.NET Core Environment Setup required for developing ASP.NET Core application. I hope you enjoy this article.
Summary:
I hope this post will be helpful to understand the concept of ASP.NET Core Environment Setup
Please share this post with your friends and colleagues.
For any queries please post a comment below.
Happy Coding 😉


0 comments:
Post a Comment
If you like this website, please share with your friends on Facebook, Twitter, LinkedIn.