• Home
  • About
  • Contact
  • ado.net
  • angular
  • c#.net
  • design patterns
  • linq
  • mvc
  • .net core
    • .Net Core MVC
    • Blazor Tutorials
  • sql
  • web api
  • dotnet
    • SOLID Principles
    • Entity Framework
    • C#.NET Programs and Algorithms
  • Others
    • C# Interview Questions
    • SQL Server Questions
    • ASP.NET Questions
    • MVC Questions
    • Web API Questions
    • .Net Core Questions
    • Data Structures and Algorithms

Tuesday, August 18, 2020

Configuring Middleware Components in ASP.NET Core

 Admin     August 18, 2020     .Net, .Net Core, Asp.Net, C#     1 comment   

In this article, I am going to discuss Configuring Middleware Components in the ASP.NET Core application to handle the request processing pipeline. Please read our previous article before proceeding to this article where we discussed the basics of ASP.NET Core Middleware Components. As part of this article, we are going to discuss the following pointers.
  1. How to Configure Middleware Components in ASP.NET Core application?
  2. What is Request Delegates in ASP.NET Core?
  3. What are Use and Run methods in ASP.NET Core?
  4. What us UseDeveloperExceptionPage Middleware Component?
  5. How to Configure Middleware Components using the Run() extension method?
  6. What is Use extension method?
How to Configure Middleware Components in ASP.NET Core application?
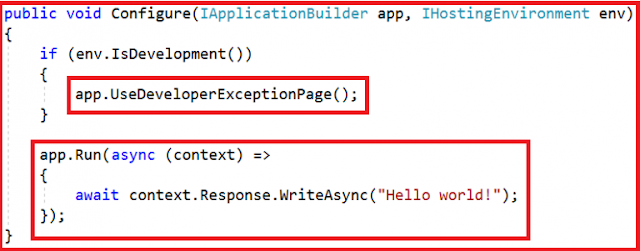
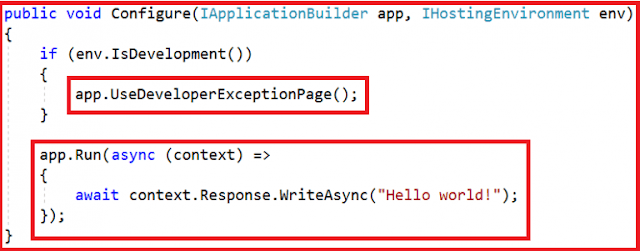
As we already discussed in our previous article that we need to configure the middleware component within the Configure method of the Startup class which is present within the Startup.cs file. So when we create an ASP.NET Core application with the Empty template, then by default the following Startup class is created with the Configure() method as shown in the below image.
Configuring Middleware Components in ASP.NET Core Configure Method

What are Request Delegates in ASP.NET Core?
In ASP.NET Core, Request delegates are used to build the request pipeline i.e. request delegates are used to handle each incoming HTTP request. In ASP.NET Core, you can configure the Request delegates using the Run, Map, and Use extension methods. You can specify a request delegate using an in-line anonymous method (called in-line middleware) or you can specify the request delegates using a reusable class. These reusable classes and in-line anonymous methods are called as middleware or middleware components. Each middleware component in the request processing pipeline is responsible for invoking the next component in the pipeline or short-circuiting the pipeline by not calling the next middleware component.

What is the use of Use and Run methods in ASP.NET Core Web Application?
In ASP.NET Core, you can use the “Use” and “Run” extension methods to register the Inline Middleware component into the Request processing pipeline. The “Run” extension method allows us to add the terminating middleware (the middleware which will not call the next middleware components in the request processing pipeline). On the other hand, the “Use” extension method allows us to add the middleware components which may call the next middleware component in the request processing pipeline.

If you observe the Configure method, then you will see that it gets an instance of the IApplicationBuilder interface, and using that instance along with the extension methods such as Use and Run, it configures the Middleware components.

As you can see, in the configure method, two middleware components are registered in the request processing pipeline using the IApplicationBuilder instance i.e. app. They are as follows
  1. UseDeveloperExceptionPage() Middleware Component
  2. Middleware Component Registered using Run() method
Let us discuss these two middleware components in detail.

What is the use of DeveloperExceptionPage Middleware Component?
As you can see, within the configure method, the UseDeveloperExceptionPage() middleware component is registered into the pipeline and this middleware will come into the picture only when the hosting environment is “development”. This middleware component is going to execute when there is an unhandled exception occurred in the application and since it is in development mode, it is going to show you the culprit line of code. You can consider this as a replacement for the yellow screen of death. In a later article, we will see the use of this middleware component with examples.

How to Configure Middleware Components using the Run() extension method?
The second middleware component is registered by using the Run() extension method. As this component is registered using the Run extension method, so it is going to be a terminating middleware component means it will not call the next middleware component in the request processing pipeline. This middleware component is simply going to write the “Hello World!” message on to the Response object. The points that you need to remember is, this is the component which will respond to each and every incoming HTTP request at the moment.

The second middleware component is registered by using the Run() extension method. As this component is registered using the Run extension method, so it is going to be a terminating middleware component means it will not call the next middleware component in the request processing pipeline. It simply going to write the “Hello World!” message on to the Response object.

At the moment if you run the application, then you will see the “Hello World!” message irrespective of the URL Path. That means all the incoming requests are handled by this middleware (Run) component only.

Run() method in details:
Configure Middleware Components in ASP.NET Core - Run method

We are invoking the Run() method on the IApplicationBuilder instance (app) to register the middleware component into the request processing pipeline. Following is the definition of the Run method.
Configure Middleware Components in ASP.NET Core

As you can see from the definition of the Run() method, it is implemented as an extension method of the IApplicationBuilder interface. This is the reason why we are able to call the Run() method using the IApplicationBuilder instance i.e. app. If you are new to the extension method then please read the below article where we discussed the extension methods in detail.

https://csharptechtics.blogspot.com/2020/08/extension-methods-csharp.html

You can also see from the above image that the Run() method takes an input parameter of type RequestDelegate. Following is the definition of RequestDelegate.
Request Delegate definition

As you can see from the above image, the RequestDelegate is a delegate that takes an input parameter of type HttpContext object. If you are new to delegates then I strongly recommended you read the following article where we discussed the delegates in detail.

https://csharptechtics.blogspot.com/2020/08/delegates-csharp.html

As we already discussed the middleware components in ASP.NET Core application can have access to both HTTP Request and Response and this is because of the above HttpContext object.

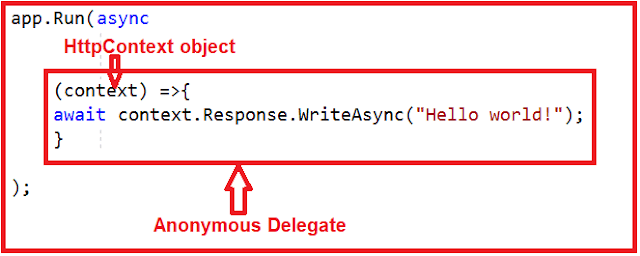
In our example, we are passing the request delegate inline as an anonymous method using lambda expression and moreover we passing the HTTPContext object as an input parameter to the request delegate. The following diagram shows the above
Run Method in ASP.NET Core

Note: Instead of passing the request delegate inline as an anonymous method, you can also define the request delegate in a separate class and pass it here which we will discuss in a later article.

Example:
Let us create another middleware using the Run() extension method. To do this, modify the Configure method of the Startup class as shown below.
public void Configure(IApplicationBuilder app, IHostingEnvironment env)
{
    app.Run(async (context) =>
    {
        await context.Response.WriteAsync("Getting Response from 1st Middleware");
    });
    app.Run(async (context) =>
    {
        await context.Response.WriteAsync("Getting Response from 2nd Middleware");
    });
}
Now we have two middleware components registered with the Run() extension method. If you run the application then you will get the following output.

Getting Response from 1st Middleware

The output is coming from the first middleware component. The reason is, when we registered a middleware component using the Run() extension method then that component becomes a terminal component means it will not call the next middleware component in the request processing pipeline.

Then the question that comes to your mind is how to call the next component in the request processing pipeline, the answer is registered your middleware component using the Use extension method as shown below.
public void Configure(IApplicationBuilder app, IHostingEnvironment env)
{
    app.Use(async (context, next) =>
    {
        await context.Response.WriteAsync("Getting Response from 1st Middleware");
        await next();
    });
    app.Run(async (context) =>
    {
        await context.Response.WriteAsync("Getting Response from 2nd Middleware");
    });
}
Now run the application and you will see the output as expected which is coming from both the middleware components.

Understanding the Use extension method:
The Use extension method adds a middleware delegate defined in-line to the application’s request pipeline. Following is the definition of the Use extension method:
Use the Extension method in ASP.NET Core

This method is also implemented as an extension method on the IApplicationBuilder interface. This is the reason why we are able to invoke this method using the IApplicationBuilder instance. As you can see from the above definition, this method takes two input parameters. The first parameter is the HttpContext context object through which it can access both the HTTP request and response. The second parameter is the Func type i.e. it is a generic delegate that can handle the request or call the next middleware component in the request pipeline.

That’s it for today. In the next article, I am going to discuss the ASP.NET Core request processing pipeline with an example. Here, in this article, I try to explain how to Configuring Middleware Components in the ASP.NET Core application to handle the request processing pipeline with an example.

Summary:
I hope this post will be helpful to understand the concept of Configuring Middleware Components in ASP.NET Core
Please share this post with your friends and colleagues.
For any queries please post a comment below.
Happy Coding 😉
Read More
  • Share This:  
  •  Facebook
  •  Twitter
  •  Google+
  •  Stumble
  •  Digg

ASP.NET Core Middleware Components

 Admin     August 18, 2020     .Net, .Net Core, Asp.Net, C#     No comments   

In this article, I am going to discuss the ASP.NET Core Middleware Components in detail. Please read our previous article before proceeding to this article where we discussed the ASP.NET Core appsettings.json file. As part of this article, we are going to discuss the following concepts related to the ASP.NET Core Middleware Components in detail.
  1. What are the ASP.NET Core Middleware Components?
  2. Where we use the Middleware Components in the ASP.NET Core application?
  3. How to Configure Middleware Components in ASP.NET Core application?
  4. Examples of using Middleware Components?
  5. What is the Execution Order of Middleware Components in ASP.NET Core?
What are the ASP.NET Core Middleware Components?
The ASP.NET Core Middleware Components are the software components (C# Classes) that are assembled into the application pipeline to handle the HTTP Requests and Responses. Each middleware component in ASP.NET Core Application performs the following tasks.
  1. Chooses whether to pass the HTTP Request to the next component in the pipeline.
  2. Can perform work before and after the next component in the pipeline.
In ASP.NET Core there are so many built-in Middleware components are already available that you can directly use. If you want then you can also create your own Middleware components. The most important point that you need to remember is, in ASP.NET Core a given Middleware component should only have a specific purpose.

Where we use Middleware Components in the ASP.NET Core application?
Some of the examples of using Middleware components in the ASP.NET Core application are as follows
  1. We may have a Middleware component for authenticating the user
  2. Another Middleware component may be used to log the request and response
  3. Similarly, we may have a Middleware component that is used to handle the errors
  4. We may have a Middleware component that is used to handle the static files such as images, Javascript or CSS files, etc.
  5. Another Middleware component may be used to Authorize the users while accessing a specific resource
The Middleware components are the components that we use to set up the request processing pipeline in the ASP.NET Core application. If you have worked with previous versions of ASP.NET then you may know, we use HTTP Handlers and HTTP Modules to set up the request processing pipeline. It is this pipeline which will determine how the HTTP request and response is going to be processed.

How to Configure Middleware Components in ASP.NET Core application?
In ASP.NET Core application, you need to configure the Middleware components within the Configure() method of the Startup class which is present within the Startup.cs file. This is the class that is going to run when the application starts. When we create an ASP.NET Core application with Empty Template, then by default the Startup class is created with the Configure() method as shown in the below image.
ASP.NET Core Middleware Components Configure Method

So, whenever you want to configure any middleware components, then you need to configure it within the Configure() method of the Startup class by calling the Use* methods on the IApplicationBuilder object. As you can see from the above image, the configuration() method sets up the request processing pipeline with just two middleware components are as follows
  1. UseDeveloperExceptionPage() Middleware component
  2. Run() Middleware component
In our next article, we will discuss these two Middleware components in detail. For now, let us understand what are Middleware components and how exactly these Middleware components are going to work in the ASP.NET Core application.

Understanding the Middleware Components in ASP.NET Core:
The below diagram explains what the middleware components are and how they used in the request processing pipeline of an ASP.NET Core application.
ASP.NET Core Middleware Components

In ASP.NET Core application, the Middleware component can have access to both the incoming HTTP Request and outgoing HTTP Response. So a Middleware component in ASP.NET Core can
  1. Handle the incoming HTTP request by generating an HTTP response.
  2. Process the incoming HTTP request, modify it, and then pass it to the next middleware component
  3. Process the outgoing HTTP response, modify it, and then pass it on to either the next middleware component or to the ASP.NET Core web server.
Examples:
As shown in the above image, we have a logging middleware component. This component simply logs the request time and then passes the request to the next middleware component i.e. Static Files Middleware component in the request pipeline for further processing.

A middleware component in ASP.NET Core may also handle the HTTP Request by generating an HTTP Response. The ASP.NET Core Middleware component may also decide not to call the next middleware component in the request pipeline. This concept is called short-circuiting the request pipeline.

For example, we have a static file middleware component. And if the incoming HTTP request comes for some static files such as images, CSS files, etc. then this Static Files Middleware component can handle the request and then short-circuit the request pipeline by not calling to the next component in pipeline i.e. the MVC Middleware component.

As we already discussed the ASP.NET Core middleware components can have access to both the HTTP request and response in the pipeline. So a middleware component can also process the outgoing response. For example, the logging middleware component in our case may log the time when the response is sent back to the client.

What is the Execution Order Middleware Components in ASP.NET Core Application?
It is very important to understand the execution order of Middleware components. The ASP.NET Core middleware components are executed in the same order as they are added to the pipeline. So we need to take care when adding the middleware components to the request processing pipeline.

As per your application’s business requirements, you may add any number of Middleware components. For example, if you are developing a static web application with some static HTML pages and images, then you may require only “StaticFiles” middleware components in the request processing pipeline.

But, if you are developing a secure dynamic data-driven web application then you may require several middleware components such as Logging Middleware, Authentication middleware, Authorization middleware, MVC middleware, etc.

In our next article, we are going to discuss how to configure middleware components in an ASP.NET Core application to handle the request processing pipeline. Here, In this article, I try to explain the ASP.NET Core Middleware Components in detail. I hope this article will help you to understand the Middleware Components in ASP.NET Core Web Application.

Summary:
I hope this post will be helpful to understand the concept of ASP.NET Core Middleware Components
Please share this post with your friends and colleagues.
For any queries please post a comment below.
Happy Coding 😉
Read More
  • Share This:  
  •  Facebook
  •  Twitter
  •  Google+
  •  Stumble
  •  Digg

ASP.NET Core appsettings.json file

 Admin     August 18, 2020     .Net, .Net Core, Asp.Net, C#     No comments   

In this article, I am going to discuss the use and importance of ASP.NET Core appsettings.json file in detail. Please read our previous article before proceeding to this article where we discussed the use and importance of ASP.NET Core launchSettings.json file. As part of this article, we are going to discuss the following pointers in detail.
  1. What are the different Configuration Sources available in the ASP.NET Core application?
  2. What is the ASP.NET Core appsettings.json file?
  3. How to access the configuration information in ASP.NET Core Application?
  4. What is the Configuration Execution Order in ASP.NET Core Application?
  5. What is the Default Orders of reading the configuration sources?
  6. How to Pass Config value from Command Line in ASP.NET Core Application?
What are the different Configuration Sources available in the ASP.NET Core application?
If you have worked with the previous versions of the ASP.NET application, then you make know the importance of the web.config file. In previous versions of ASP.NET application, we generally used to store the application configuration settings such as database connection strings, any application scope global variables, and many more within the web.config file.

But in ASP.NET Core, the application configuration settings can come from different configurations sources such as
  1. Files (appsettings.json, appsettings.{Environment}.json, where the {Environment} is the nothing but the applications current hosting environments such as Development, Staging or Production)
  2. User secrets
  3. Environment variables
  4. Command-line arguments
What is ASP.NET Core appsettings.json File?
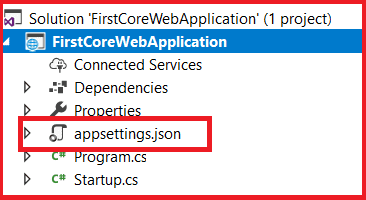
When we create an asp.net core web application with an Empty project template, then the visual studio automatically creates the appsettings.json file for us as shown in the below image.
ASP.NET Core appsettings.json file

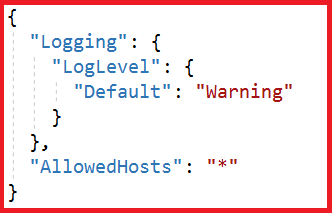
If you open the appsettings.json file, then you see the following code.
ASP.NET Core appsettings.json file

Now I am going to add a key with the name MyCustomKey within this file. To do so, please modify the appsettings.json file as shown below.
{
  "Logging": {
    "LogLevel": {
      "Default": "Warning"
    }
  },
  "AllowedHosts": "*",
  "MyCustomKey": "MyCustomKey Value coming from appsettings.json"
}
As it is a JSON file, you need to store the value in the form of key-value pair.

How to access the configuration information in the ASP.NET Core application?
To access the configuration information within the Startup class, you need to use the IConfiguration service which is provided by the ASP.NET Core Framework. So what you need to do is just inject the IConfiguration service through the constructor of the Startup class. To do so modify the Startup class which is present in the Startup.cs file as shown below.
using Microsoft.AspNetCore.Builder;
using Microsoft.AspNetCore.Hosting;
using Microsoft.AspNetCore.Http;
using Microsoft.Extensions.Configuration;
using Microsoft.Extensions.DependencyInjection;
namespace FirstCoreWebApplication
{
    public class Startup
    {
        private IConfiguration _config;
        // Here we are using Dependency Injection to inject the Configuration object
        public Startup(IConfiguration config)
        {
            _config = config;
        }
        
        public void ConfigureServices(IServiceCollection services)
        {
        }
        
        public void Configure(IApplicationBuilder app, IHostingEnvironment env)
        {
            if (env.IsDevelopment())
            {
                app.UseDeveloperExceptionPage();
            }
            app.Run(async (context) =>
            {
                await context.Response.WriteAsync(_config["MyCustomKey"]);
            });
        }
    }
}
Explanation of the above code:
First, we created a private variable of type IConfiguration. Then through constructor dependency injection we inject the IConfiguration object and store it within the private variable. The following code exactly does this.
Creating the Configuration object

Then we access the configuration variable i.e. MyCustomKey using the IConfiguration service instance. The following piece of code exactly does the same thing.
Accessing the configuration value in asp.net core application

Set the AspNetCoreHostingModel value to InProcess in the application’s project file as shown below.
InProcess
Now run the application and you see the value as expected in the browser window as shown in the below image.
Config Key Output

Dependency Injection Design Pattern
In our previous versions of ASP.NET applications, the Dependency Injection design pattern was optional. But if you want to configure it in your application, then you need to use some of the frameworks like Ninject, StructureMap, IUnity container, etc.

But in ASP.NET Core application Dependency Injection is an integral part and the framework provides the inbuilt support for dependency injection. The Dependency Injection Design Pattern allows us to develop loosely coupled systems that are extensible and also easy to testable. If this is not clear at the moment don’t worry, we will discuss the Dependency Injection design pattern in great detail in our upcoming articles with asp.net core application. If you want to know how the dependency injection design pattern is used with the previous versions of ASP.NET application, then read the following article.

https://csharptechtics.blogspot.com/2020/08/dependency-injection-design-pattern-csharp.html

What is the Configuration Execution Order in ASP.NET Core Application?
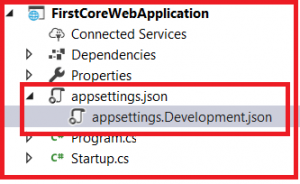
Before understanding the execution order, let’s have a look at the appsettings.Development.json file. You can find this file within the appsettings.json file as shown below.
appsettings.Development.json file

Let us modify the appsettings.Development.json as shown below.
{
  "Logging": {
    "LogLevel": {
      "Default": "Debug",
      "System": "Information",
      "Microsoft": "Information"
    }
  },
  "MyCustomKey": "MyCustomKey Value coming from appsettings.Development.json"
}
As you can see we are using the same key as we use in the appsettings.json file. Now run the application and see the output as shown below.
appsetting.development.output

As you see from the above output, it fetches the MyCustomValue from the appsettings.Development.json file.

The point that I need to make you clear, if you have a configuration setting in multiple configuration sources with the same configuration key, then the later configuration sources will override the earlier configuration sources.

What is the Default Orders of reading the configuration sources?
The default orders in which the various configuration sources are read for the same key are as follows
  1. appsettings.json,
  2. appsettings.{Environment}.json here we use appsettings.development.json
  3. User secrets
  4. Environment variables
  5. Command-line arguments
Now we already have MyCustomKey in two places i.e. appsettings.json and appsettings.development.json. Now add the same key as “MyCustomKey”: “MyCustomKey Value coming from Environment Variable of launchsSettings.json” in the IIS Express profile section of the launchSettings.json file as shown below.
Adding Environment Variable

With this change now run the application and it should display the value coming from the environment variable.
The value coming From the Environment Variable

How to Pass Config value from Command Line in ASP.NET Core Application?
Command Line Argument Values

Now open the browser window and type the following URL
The value coming From CLI

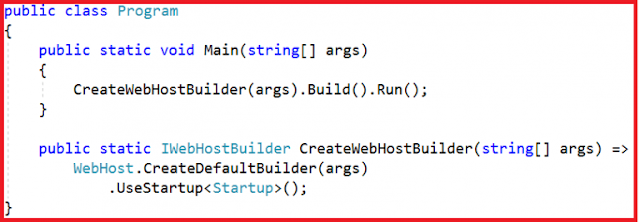
The following is the auto-generated program class.
Program Class Main Method

As you can see the Main() method of the Program class calls the CreateWebHostBuilder() method. Then the CreateWebHostBuilder() method calls the CreateDefaultBuilder() method of the WebHost class. This CreateDefaultBuilder() method is the method that sets the default order in which all the configuration sources are read. As asp.net core is open source so you can find the code of this WebHost class in the following GitHub link.

https://github.com/aspnet/MetaPackages/blob/release/2.2/src/Microsoft.AspNetCore/WebHost.cs

If you want then you can also change this default order or even if you want then you can add your own custom configuration sources along with the existing configuration sources. In our upcoming articles, we will discuss setting up a custom configuration source.

In the next article, we are going to discuss one more important concept i.e. Middleware in ASP.NET Core application. Here, in this article, I try to explain the ASP.NET Core appsettings.json file in detail. I hope this article will help you to understand the need and use of the ASP.NET Core appsettings.json file.

Summary:
I hope this post will be helpful to understand the concept of ASP.NET Core appsettings.json file
Please share this post with your friends and colleagues.
For any queries please post a comment below.
Happy Coding 😉
Read More
  • Share This:  
  •  Facebook
  •  Twitter
  •  Google+
  •  Stumble
  •  Digg

ASP.NET Core launchSettings.json file

 Admin     August 18, 2020     .Net, .Net Core, Asp.Net, C#     No comments   

In this article, I am going to discuss the use and importance of ASP.NET Core launchSettings.json file in detail. Please read our previous article where we discussed the OutOfProcess Hosting Model in ASP.NET Core Web Application.

In order to understand ASP.NET Core launchSettings.json file, let us first create a new ASP.NET Core application with an empty template.

Creating a new ASP.NET Core Web Application
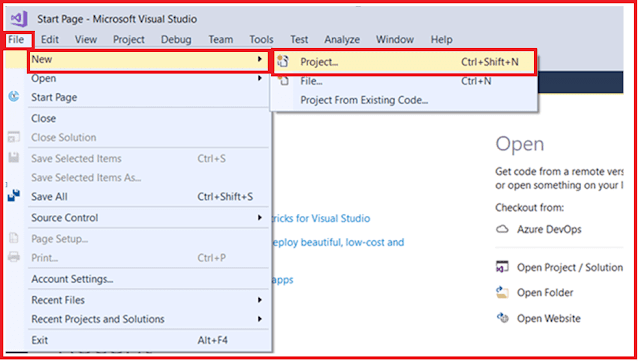
First, open Visual Studio 2017. Then you need to select the File => New => Project option as shown in the below image.
ASP.NET Core launchSettings.json file

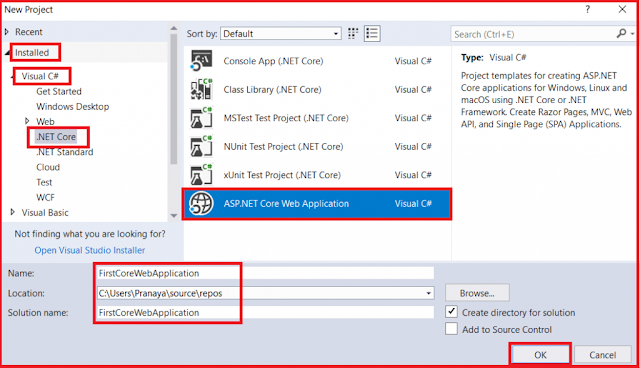
From the “New Project” window, expand the “Installed” template section. Then you need to expand the “Visual C#” section and select .NET Core. From the middle pane, you need to select ASP.NET Core Web Application. Provide the application name as “FirstCoreWebApplication” and then select the location where you want to store the Project. Then click on the OK button as shown below.
ASP.NET Core launchSettings.json file

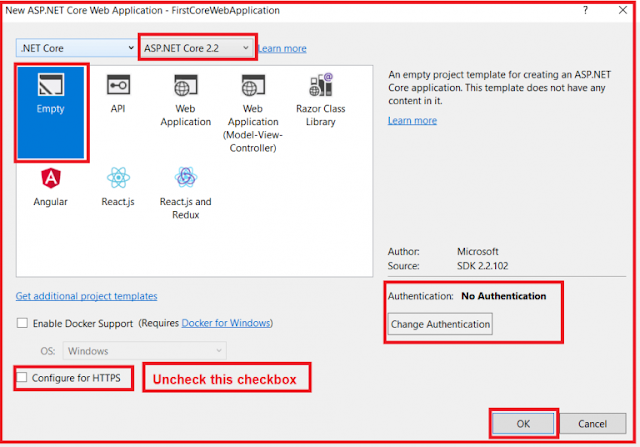
Once you click on the OK button, then it will open the following window. From this window select the version ASP.NET Core 2.2 and template type is Empty. Then you need to uncheck the Configure for HTTPS checkbox and click on the OK button as shown in the below image.
Selecting Project Template ASP.NET Core launchSettings.json file

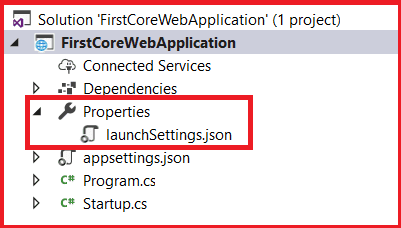
Once you click on the OK button, then it will create the ASP.NET Core with an Empty project for us with the following structure.
lunchsetting.json file in ASP.NET Core

As you can see from the above image we have a file called launchSettings.json within the Properties file. So let us discuss the importance of this file in the ASP.NET Core application.

LaunchSettings.json file
The settings that are present within this file are going to be used when we run the .NET core application either from Visual Studio or by using .NET Core CLI.

The most important point that you need to keep in mind is this launchSettings.json file is only used within the local development machine. That means this file is not required when we publishing the asp.net core application to the production server.

If you have certain settings and you want your application to use such settings when you publish and deploy your application to a production server, then you need to store such settings in an appsettings.json file. Generally, in the ASP.NET Core application, the configuration settings are going to be stored in the appsettings.json file. In our next article, we will discuss the appsettings.json file in detail.

Profile settings in the launchSettings.json file:
If you open the launchSettings.json file, then you will find the following code or settings within that file at the moment.
{
  "iisSettings": {
    "windowsAuthentication": false, 
    "anonymousAuthentication": true, 
    "iisExpress": {
      "applicationUrl": "http://localhost:59119",
      "sslPort": 0
    }
  },
  "profiles": {
    "IIS Express": {
      "commandName": "IISExpress",
      "launchBrowser": true,
      "environmentVariables": {
        "ASPNETCORE_ENVIRONMENT": "Development"
      }
    },
    "FirstCoreWebApplication": {
      "commandName": "Project",
      "launchBrowser": true,
      "applicationUrl": "http://localhost:5000",
      "environmentVariables": {
        "ASPNETCORE_ENVIRONMENT": "Development"
      }
    }
  }
}
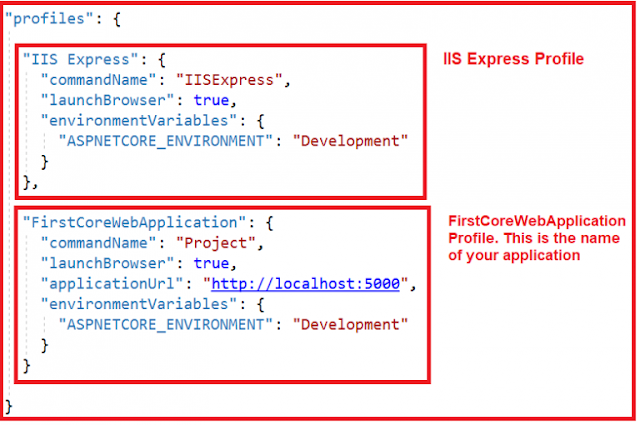
As shown in the above launchSettings.json file, within the profiles we have two sections i.e. IIS Express and FirstCoreWebApplication as shown in the below image.
Profiles in ASP.NET Core

The point that you need to remember is when you run the application from Visual Studio either by pressing CTRL + F5 or just F5 then by default the profile with “commandName”: “IISExpress” is going to be used. On the other hand, if you run the ASP.NET Core application using .NET Core CLI (i.e. dotnet run command), then the profile with the “commandName”: “Project” is going to be used.

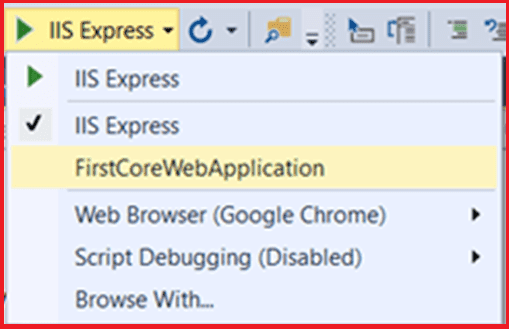
However, if you want then you can choose which profile to use when you run the application by pressing CTRL + F5 or just F5, by clicking on the drop-down list in Visual Studio as shown below
Change Profile setting

The value of the commandName property of the launchSettings.json file can be any one of the following.
  1. IISExpress
  2. IIS
  3. Project
The CommandName property value of the launchSettings.json file along with the AspNetCoreHostingModel element value from the application’s project file will determine the internal and external web server (reverse proxy server). Please have a look at the below table.
Internal and External Web Server

Modifying the Configure method of Startup class
Modify the Configure method of the Startup class file as shown below to display the Name of worker process in the browser window.
public void Configure(IApplicationBuilder app, IHostingEnvironment env)
{
    if (env.IsDevelopment())
    {
        app.UseDeveloperExceptionPage();
    }
    app.Run(async (context) =>
    {
        await context.Response.WriteAsync("Worker Process Name : "
            + System.Diagnostics.Process.GetCurrentProcess().ProcessName);
    });
}
Case1:
When we use the CommandName as Project, then ASP.NET Core is going to ignore the AspNetCoreHostingModel value. The Kestrel is the only server that is going to host the application and handle the incoming request. Let’s prove this. Now, we need to set the launch Profile as FirstCoreWebApplication as shown below.
Setting Launch Profile

If you look at the launchSettings.json file, then you will see that the FirstCoreWebApplication profile uses the “CommandName”: ”Project” value and also keeps the focus on the application URL as shown below.
Project Command

Now change the AspNetCoreHostingModel element value to InProcess in the application’s project file as shown below.
InProcess
Now, if you run the project either by pressing CTRL + F5 or just F5, then it will display the value as dotnet for the worker process name. This is because when the CommandName value is Project then it ignores the AspNetCoreHostingModel value and Kestrel is the only server that is going to host and process the incoming requests.

Case2:
If we use the CommandName as IISExpress and the AspNetCoreHostingModel value as InProcess then IIS Express is the only server that is going to host and handle the incoming request. Let us prove this.

First, use IIS Express as the lunch profile by selecting IIS Express from the drop-down list as shown below.
Hosting profile selection in Asp.net Core

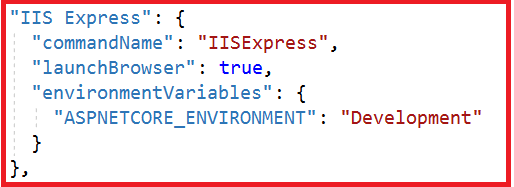
Now, if you look at the launchSettings.json file, then you will see that IIS Express profile use the “CommandName”: ”IISExpress” value and also keep the focus on the application URL as shown below
IIS Express Profile

Then change the AspNetCoreHostingModel element value to InProcess.

Now, when you run the application either by pressing CTRL + F5 or just F5, then it will display the value as iisexpress for the worker process name. This proves that IIS Express is the webserver that is going to host the application as well as handles the incoming HTTP Requests.

Case3:
If we use the CommandName as IISExpress and the AspNetCoreHostingModel value as OutOfProcess then ASP.NET Core uses IIS Express as the external web server and Kestrel is the internal webserver. The external web server will receive the incoming HTTP Requests and then forward the request to the internal webserver which is going to process the request. So let us prove this.

As we already set the launch profile as IIS Express, we just need to change the AspNetCoreHostingModel element value to OutOfProcess in the application’s project file as shown below.
OutOfProcess
That’s it. Run the application and it should display dotnet as the worker process name. The rest two cases we will discuss in a later article when we host the application using IIS.

If you want then you can also change the settings of launchSettings.json using the Graphical User Interface (GUI) provided by Visual Studio.

How to access the Graphical User Interface (GUI) in Visual Studio?
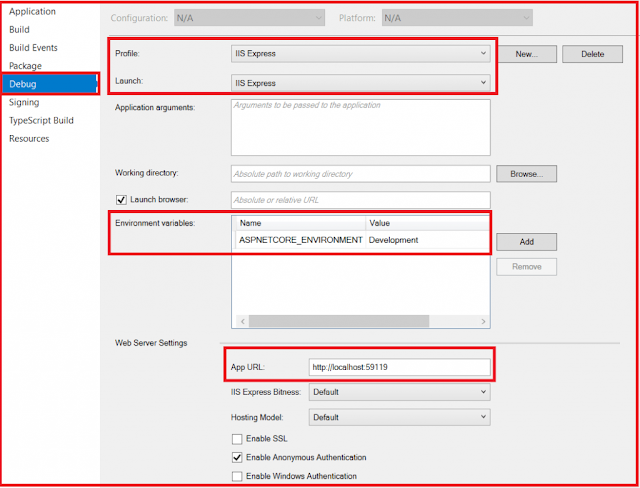
Right-click on the project name in Solution Explorer and then select the “Properties” option from the context menu. Click on the “Debug” tab on the project “Properties” window as shown below.
Graphical User Interface

Using the Graphical User Interface, we can also change the settings of the launchSettings.json file. Now here you can see that the Environment Variable “ASPNETCORE_ENVIRONMENT” is set to “Development”. You can change this Environment Variable value to Staging or Production depending on where you are running your application.

If you want, then you can also add new environment Variables. These environment variables are available throughout your application. And if you want then you can also execute some code conditionally depending on the environment variables value.

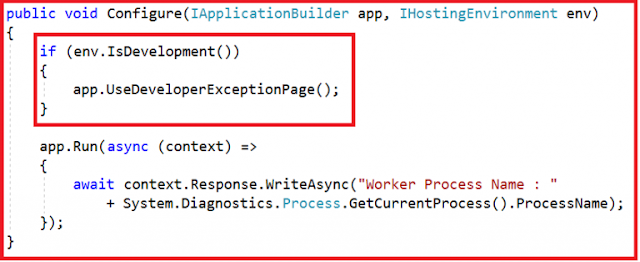
For example, consider the following Configure() method of Startup.cs file
Configure Method of Startup class

It checks if the environment is Development, then it is going to display the Developer Exception Page. In our upcoming articles, we are going to discuss more these environment variables.

In the next article, I am going to discuss the ASP.NET Core appsettings.json file in detail. Here, in this article, I try to explain the ASP.NET Core launchSettings.json file in detail. I hope this article will help you to understand the need and use of ASP.NET Core launchSettings.json file.

Summary:
I hope this post will be helpful to understand the concept of ASP.NET Core launchSettings.json file
Please share this post with your friends and colleagues.
For any queries please post a comment below.
Happy Coding 😉
Read More
  • Share This:  
  •  Facebook
  •  Twitter
  •  Google+
  •  Stumble
  •  Digg

ASP.NET Core OutOfProcess Hosting

 Admin     August 18, 2020     .Net, .Net Core, Asp.Net, C#     No comments   

In this article, I am going to discuss ASP.NET Core OutOfProcess Hosting Model in detail. I strongly recommended you to read ASP.NET Core InProcess Hosting and The Kestrel Web Server in ASP.NET Core Application articles before proceeding to this article. As part of this article, we are going to discuss the following pointers in detail.
  1. How to Configure OutOfProcess Hosting in ASP.NET Core?
  2. What is ASP.NET OutOfProcess Hosting?
  3. How does the OutOfProcess Hosting works in ASP.NET Core?
  4. Can we run an asp.net core application without using the built-in kestrel web server?
  5. If Kestrel can be used by itself as a web server which can directly handle and process the incoming HTTP Request, then why do we need a reverse proxy server?
Before understanding the OutOfProcess hosting, let us first have a look at the InProcess hosting model.

ASP.NET Core InProcess Hosting
Let first have a look on in Process Hosting before proceeding to Out Of Process Hosting

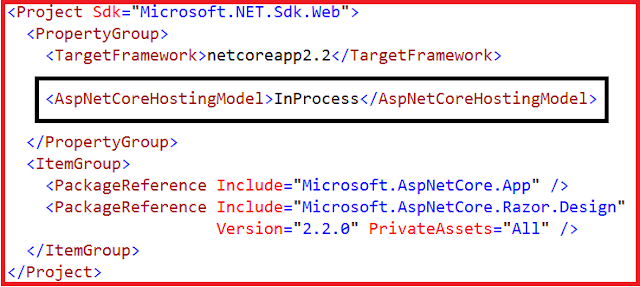
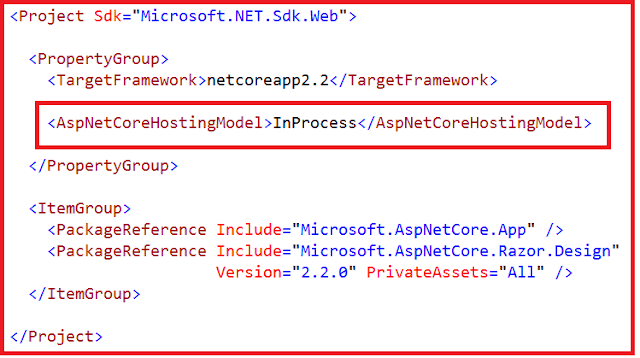
As we already discussed, to configure the InProcess hosting in ASP.NET Core application, you need to add the element to the application’s project file with a value of InProcess as shown below
ASP.NET Core Out Of Process Hosting Project File

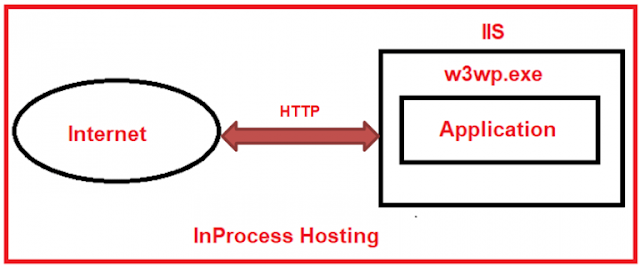
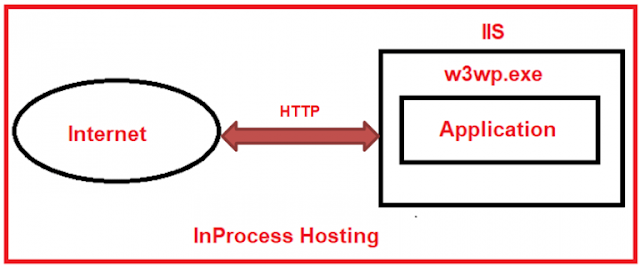
In ASP.NET Core, with InProcess Hosting Model our application is going to be hosted in the IIS worker process (i.e. w3wp.exe in case of IIS server or iisexpress.exe if the hosting server is IISExpress). The most important point that you need to remember is we have only one web server i.e. IIS Server in case of InProcess hosting which is going to host our application as shown in the below image.
InProcess Hosting in ASP.NET Core

How to Configure the OutofProcess Hosting in ASP.NET Core Application?
We can configure the Out Of Process Hosting in two ways in ASP.NET Core.

Way1:
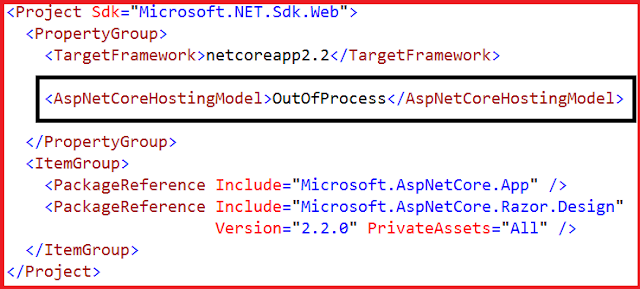
In this case, you just need to add the element to the applications project file with a value of OutOfProcess as shown below.
OutofProcess Hosting in ASP.NET Core

Way2:
The default hosting in ASP.NET Core is OutOfProcess Hosting. That means if you remove the  element from the application’s project file, then by default OutOfProcess hosting will be used.

What is Out of Process Hosting in ASP.NET Core?
In the case of the ASP.NET Core OutOfProcess Hosting Model, there are two web servers.
  1. An internal webserver which is the Kestrel web Server
  2. And an external web server which can be IIS, Apache, and Nginx.
The most important point that you need to keep in mind is depending on how you are running your application with the OutOfProcess hosting model, the external web server may or may not be used.

As we already discussed that the Kestrel web server is a cross-platform web server that is already embedded with your ASP.NET Core application. So if you are using the Out of Process Hosting model for your asp.net core application, then the Kestrel web server can be used in one of the following ways.

Way1:
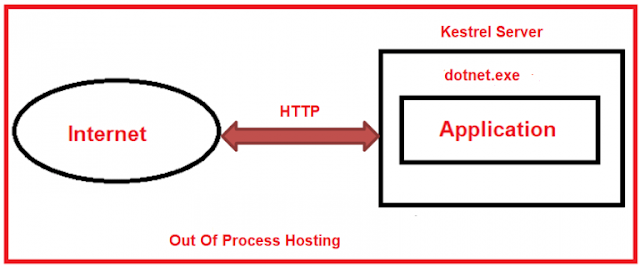
We can use the Kestrel Web Server as the internet-facing web server which will directly process the incoming HTTP requests. In this scenario, only the Kestrel Server is used and the other one i.e. external web server is not going to be used. So when we run the application using the .NET core CLI then Kestrel is the only web server that is going to be used to handle and process the incoming HTTP request as shown in the below image.
Kestrel Server Out Of Process Hosting

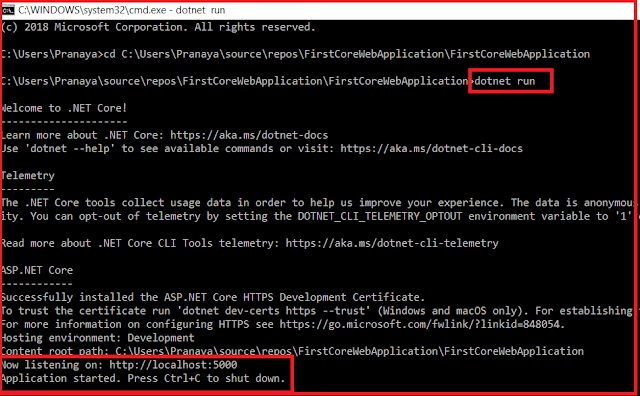
To confirm this, open command prompt and run the application as shown in the below image
running dotnet core application using .net core cli

Now open the browser window and navigate to the following URL

http://localhost:5000

And here you will see the worker process name as dotnet as shown below
Kestrel worker process name

So, in this case, Kestrel is the only server that will handle and process the incoming HTTP Request. The following code of the Startup class displays the worker process name.
Worker Process name

Way2:
The Kestrel Web Server can also be used with the combination of a reverse proxy server such as IIS, Apache or Nginx. Now the question that comes to your mind is

If Kestrel can be used by itself as a web server which can directly handle and process the incoming HTTP Request, then why do we need a reverse proxy server?

This is because the reverse proxy server provides an additional layer of configuration and security which is not available with the Kestrel Server. It also maintains the load balancing. So it is a good choice to use Kestrel Server along with a reverse proxy server.

So when we use Kestrel Server along with a reverse proxy server, then the reverse proxy server will receive the incoming HTTP requests from the client and then forwards that request to the Kestrel server for processing. Once the Kestrel Server process that request, then it sends the response back to the reverse proxy server which then sends the response back to the requested client over the internet as shown in the below image.
External Proxy Server with Internal Kestrel Server

In our upcoming articles, we will discuss how to deploy an ASP.NET Core application to IIS and how we can use IIS as a reverse proxy server.

When we run the application directly from Visual Studio, then by default Visual Studio uses IIS Express. Now change the AspNetCoreHostingModel element value as shown below in the application’s project file.
OutOfProcess
As we have configured Out of Process hosting model, now the IIS Express acts as a reverse proxy server and Kestrel acts as the internal webserver.

Now, the IIS Express receives the incoming HTTP request and then forwards it to the Kestrel Web Server for processing. The Kestrel Web Server processes the request and sends the response back to the IIS Express which in turn sends the response back to the client i.e. to the browser.

Now run the application, and you will see the worker process as dotnet. So when you are using Out of Process Hosting model, then the Kestrel Web Server is going to hosts the application and process the request irrespective of whether you are using a reverse proxy server or not.

One more thing that you need to keep in mind is, when you are running your application using the .NET Core CLI, then by default, it ignores the hosting setting that you specified in the application’s project file i.e. csproj file. So, in that case, the value of the AspNetCoreHostingModel element is going to be ignored.

The .NET Core CLI always uses OutOfProcess Hosting Model and Kestrel is the webserver that will host the ASP.NET Core application and also handles the HTTP requests.

Can we run an asp.net core application without using the built-in kestrel web server?
YES. When we use the InProcess Hosting model, then the application is hosted inside the IIS worker process i.e. w3wp.exe in the case of IIS and iisexpress.exe in the case of IIS Express. That means the Kestrel Web Server is not used with the InProcess hosting model.

In the next article, we will discuss the launchSettings.json file in the ASP.NET Core application. Here, in this article, I try to explain the ASP.NET Core OutOfProcess Hosting model in detail. I hope this article will help you to understand the OutOfProcess Hosting model in ASP.NET Core Application.

Summary:
I hope this post will be helpful to understand the concept of ASP.NET Core OutOfProcess Hosting
Please share this post with your friends and colleagues.
For any queries please post a comment below.
Happy Coding 😉
Read More
  • Share This:  
  •  Facebook
  •  Twitter
  •  Google+
  •  Stumble
  •  Digg

Kestrel Web Server in ASP.NET Core

 Admin     August 18, 2020     .Net, .Net Core, Asp.Net, C#     No comments   

In this article, I am going to discuss the Kestrel Web Server in ASP.NET Core Application. Please read our previous article before proceeding to this article where we discussed ASP.NET Core InProcess hosting in detail. In our previous article, we discussed that with the OutOfProcess hosting model, there are 2 web servers i.e. one internal web server and one external web server. The internal web server is called as Kestrel and the external web server can be IIS, Apache or Nginx. As part of this article, we are going to discuss the following two important concepts in detail.
  1. What is a Kestrel Web Server?
  2. How to run a .NET Core application using .NET Core CLI?
What is a Kestrel Web Server?
As we already discussed the ASP.NET Core is a cross-platform framework. It means it supports developed and run applications on different types of operating systems such as Windows, Linux, or Mac.

The Kestrel is the cross-platform web server for the ASP.NET Core application. That means this Server supports all the platforms and versions that the ASP.NET Core supports. By default, it is included as the internal web server in the .NET Core application.

The Kestrel Web Server generally used as an edge server i.e. the internet-facing web server which directly processes the incoming HTTP request from the client. In the case of the Kestrel web server, the process name that is used to host and run the ASP.NET Core application is dotnet.exe.

As of now, we are using visual studio to run the ASP.NET Core application. By default, the visual studio uses IIS Express to host and run the ASP.NET Core application. So the process name is IIS Express that we already discussed in our previous article. We can also run the ASP.NET Core application from the command line using the .NET Core CLI. The CLI stands for Command Line Interface.

How to run .NET Core application using .NET Core CLI?
When we run an ASP.NET Core application using the .NET Core CLI, then the .NET Core runtime uses Kestrel as the webserver. The .NET Core CLI (Command Line Interface) is a cross-platform tool that is used for developing ASP.NET core applications on cross-platform such as windows, macs, or Linux.

Open command prompt and type “dotnet —” and press enter as shown below.
Kestrel Web Server in ASP.NET Core application Command Prompt

Once you type the “dotnet —” and click on the enter button then you will find lots of commands as shown below.
.NET Core CLI Commands

Using the CLI (above commands)
  1. You can create a new project using the new command, you can also build the project using the build command, or you can publish the project using the publish command.
  2. It is possible to restore the dependencies and tools which are required for a .net core project using the CLI
Running .NET Core application using .NET Core CLI
We can do a variety of things using the .NET Core CLI. So let’s see how to run a .NET Core application using CLI. To do so please follow the below steps

First, open the Windows Command Prompt. To do so, open the run window and then type cmd and click on the enter button which will open the command prompt

Then you need to change the directory to the folder which contains your asp.net core application. My project is present in “C:\Users\Pranaya\source\repos\FirstCoreWebApplication\FirstCoreWebApplication” folder so I type as shown below to change the directory.
Changing Directory in Command Prompt

Once you change the directory then execute the “dotnet run” command as shown in the below image.
Run the ASP.NET Core application using .NET Core CLI

Once you click on the enter button, then the .NET Core CLI builds and runs the application. It also shows the URL and you can use this URL to access the application. Here, in my case, the application is available at http://localhost:5000

Now open the browser and navigate to the http://localhost:5000 URL and It should display the worker process name as dotnet as shown below.
Kestrel web server worker process name

So this proves that, in the case of the Kestrel web server, the process that is used to host and run the application is dotnet.exe.

In the next article, we will discuss the OutOfProcess hosting in the ASP.NET Core application. Here, in this article, I try to explain the Kestrel Web Server in ASP.NET Core application in detail. I hope this article will help you to understand the Kestrel Web Server in ASP.NET Core Application.

Summary:
I hope this post will be helpful to understand the concept of Kestrel Web Server in ASP.NET Core
Please share this post with your friends and colleagues.
For any queries please post a comment below.
Happy Coding 😉
Read More
  • Share This:  
  •  Facebook
  •  Twitter
  •  Google+
  •  Stumble
  •  Digg

ASP.NET Core InProcess Hosting

 Admin     August 18, 2020     .Net, .Net Core, Asp.Net, C#     No comments   

In this article, I am going to discuss the ASP.NET Core InProcess Hosting in detail. Please read our previous article before proceeding to this article where we discussed the ASP.NET Core Main method in detail. As part of this article, we are going to discuss the following pointers in detail.
  1. What are the Tasks performed by CreateDefaultBuilder() method?
  2. What is InProcess hosting in ASP.NET Core?
  3. How to host ASP.NET Core Application using InProcess hosting Model?
  4. How does the InProcess hosting work in ASP.NET Core?
We are going to work with the same application that we created in our previous article. As we already discussed when we create an ASP.NET Core web application, then the ASP.NET Core framework creates the following Program class with the Main method for us.
ASP.NET Core InProcess Hosting Main Method

When we execute an ASP.NET core application then the .NET runtime looks for the Main() method. The Main() method is the entry point for the .net core application to execute.

As you can see from the above image the Main() method of the Program class calls the static CreateWebHostBuilder() method. Then the CreateWebHostBuilder() method calls the static CreateDefaultBuilder() method of the WebHost class. The CreateDefaultBuilder() method sets the web host which will host our application with default preconfigured configurations.

What are the Tasks performed by CreateDefaultBuilder() method?
As part of setting the web host, the CreateDefaultBuilder() method does several things. Some of them are as follows
  1. Setting up the webserver (will discuss in this article)
  2. Loading the host and application configuration from various configuration sources (will discuss in our upcoming articles)
  3. Configuring logging (will discuss in our upcoming articles)
Let us discuss what exactly the CreateDefaultBuilder() method does to configure and set up the webserver. From a hosting point of view, an ASP.NET core Web application can be hosted in two ways i.e. InProcess hosting or OutOfProcess hosting.

Here in this article, we are going to discuss InProcess hosting and in a later article, we will discuss the OutOfProcess hosting.

How to Configure InProcess hosting in ASP.NET Core?
To configure the InProcess hosting for ASP.NET Core Web application there is only one simple setting, just add the element to the application project file with a value of InProcess as shown in the below image. To find the application project file, just right click on your application from the solution explorer and click on the “edit yourapplication.csproj” option.
ASP.NET Core InProcess Hosting Application Project File

When we create a new ASP.NET Core Web application by using any template, by default the project file is created with InProcess hosting which is used for hosting the application in IIS or IIS Express scenarios.

In case of InProcess hosting (i.e. when the CreateDefaultBuilder() sees the value as InProcess for the AspNetCoreHostingModel element in the project file), behind the scene the CreateDefaultBuilder() method internally calls the UseIIS() method. Then host the application inside the IIS worker process (i.e. w3wp.exe for IIS and iisexpress.exe for IISExpress).

From the performance point of view, the InProcess hosting model delivers significantly higher request throughput than the OutOfProcess hosting model. Why we will discuss this at the end of this article.

The process name that will be used to execute the application is w3wp in the case of IIS. Similarly, if it is IIS Express then the process name will be iisexpress.

Let’s Confirm this:
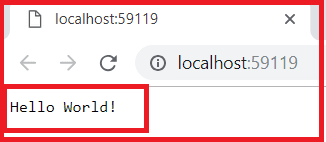
Now if you will run the application, then you see the following hello world message in the browser.
ASP.NET Core InProcess Hosting

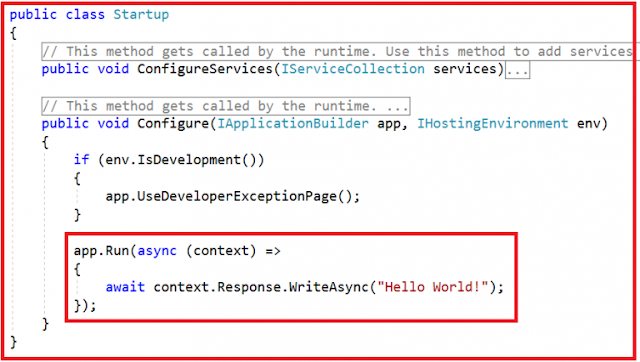
You are getting the above message from the following Startup class
ASP.NET Core InProcess Hosting Startup Class

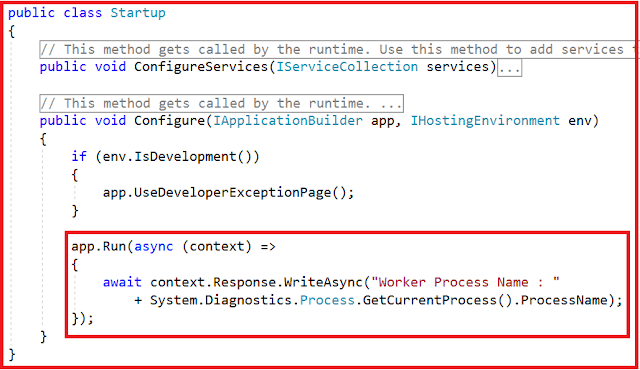
To display the process name in the browser you need to use the System.Diagnostics.Process.GetCurrentProcess().ProcessName within the Startup as shown below.
ASP.NET Core InProcess Hosting Startup Class to display Hosting Name

Now when we run the application from visual studio it displays the message in the browser as shown below.
ASP.NET Core InProcess Hosting displaying Hosting Name

This is because by default the Visual Studio uses IISExpress when we run an application as shown in the below image.
ASP.NET Core InProcess Hosting IIS Express in Visual Studio

The IIS Express is a lightweight, self-contained version of IIS. It is optimized for web application development. The most important point is that we use it only in development, not for production. In production we generally use IIS. In a later article, we will discuss how to deploy an ASP.NET Core application on IIS.

The OutOfProcess hosting
In the case of OutOfProcess hosting, there are 2 web servers
  1. An internal web server and
  2. One external web server.
The internal web server is called as Kestrel and the external web server can be IIS, Nginx or Apache.

With the InProcess hosting model, there is only one web server i.e. the IIS. So, in the case of the InProcess hosting model, we do not have the performance penalty for navigating the requests between the internal and external web servers. This is the reason why the InProcess hosting model delivers significantly higher request throughput than the OutOfProcess hosting model.
ASP.NET Core InProcess Hosting

In the next article, we will discuss the Kestrel Web Server in ASP.NET Core application in detail. Here, in this article, I try to explain the ASP.NET Core InProcess Hosting in detail. I hope this article will help you to understand the ASP.NET Core InProcess Hosting.

Summary:
I hope this post will be helpful to understand the concept of the ASP.NET Core InProcess Hosting
Please share this post with your friends and colleagues.
For any queries please post a comment below.
Happy Coding 😉
Read More
  • Share This:  
  •  Facebook
  •  Twitter
  •  Google+
  •  Stumble
  •  Digg
Newer Posts Older Posts

Join us on Telegram

Loved Our Blog Posts? Subscribe To Get Updates Directly To Your Inbox

Like us on Facebook

Popular Posts

  • What is Dependency Injection(DI)
    Hi friends! Today we are going to learn about Dependency Injection and in our last session we have come across Static classes and where it s...
  • ASP.NET State Management
    State management is a technique or way to maintain / store the state of an Asp.Net controls, web page information, object/data, and user in ...
  • What is Abstract Class and When we should use Abstract Class
    Hi friends! In our previous sessions we have seen  Difference Between Class and Struct . And in our last session  we learnt Usability of Sec...
  • Static Files Middleware in ASP.NET Core
    In this article, I am going to discuss how to serve static files using Static Files Middleware in ASP.NET Core Application. Please read ou...
  • HTTP Client Message Handler in Web API
    In this article, I am going to discuss HTTP Client Message Handler in Web API with real-time examples. As we already discussed in HTTP Mes...
  • ASP.NET Web API Basic Authentication
    In this article, I am going to discuss how to implement the ASP.NET Web API Basic Authentication step by step with an example. Please read...
  • Kestrel Web Server in ASP.NET Core
    In this article, I am going to discuss the Kestrel Web Server in ASP.NET Core Application. Please read our previous article before proceed...

Blog Archive

Contact Form

Name

Email *

Message *

Tags

.Net .Net Core .Net Core MVC Algorithm Angular Anonymous Types Asp.Net Asp.Net MVC Blazor C# Data Structure Database Design Patterns Entity Framework Entity Framework Core Filters Interview Question Management Studio Programming Programs SQL Server SSMS Web API

Copyright © C# Techtics | All Right Reserved.

Protected by Copyscape