• Home
  • About
  • Contact
  • ado.net
  • angular
  • c#.net
  • design patterns
  • linq
  • mvc
  • .net core
    • .Net Core MVC
    • Blazor Tutorials
  • sql
  • web api
  • dotnet
    • SOLID Principles
    • Entity Framework
    • C#.NET Programs and Algorithms
  • Others
    • C# Interview Questions
    • SQL Server Questions
    • ASP.NET Questions
    • MVC Questions
    • Web API Questions
    • .Net Core Questions
    • Data Structures and Algorithms

Sunday, August 23, 2020

DbContext in Entity Framework Core

 Admin     August 23, 2020     .Net, .Net Core, C#, Entity Framework, Entity Framework Core     No comments   

In this article, I am going to discuss DbContext in Entity Framework Core in detail. Please read our previous article where we discussed how to install entity framework core in visual studio step by step. DbContext class is one of the important classes in entity framework core and at the end of this article, you will understand the significance of the DbContext class in Entity Framework Core. As part of this, we will discuss the following pointers.
  1. What is a DbContext class?
  2. How to create and use the DbContext class?
  3. DbContextOptions class in Entity Framework Core
  4. Entity Framework Core DbSet
What is a DbContext class?
The DBContext class is basically used by our application to interact with the underlying database. That means this class is used to manage the database connection as well as also used to perform CRUD operation with the underlying database.

How to create and use the DbContext class in Entity Framework Core?
In order to use the DbContext class in your application, you need to create a class derives from the DbContext class. The DbContext class present is in Microsoft.EntityFrameworkCore namespace.

So, within the models’ folder create a class file with the name StudentDbContext and then inherit from the class from DbContext class as shown in the below image. You can provide any name for your DbContext class, as I am going to develop an application to manage the students, so I gave the name as StudentDbContext.
How to create and use the DbContext class in Entity Framework Core

DbContextOptions class in Entity Framework Core:
In order to perform any useful task by the DbContext class, we need an instance of the DbContextOptions class. The instance of the DbContextOptions carries all the required configuration information such as the connection string, database provider, etc.

To pass the DbContextOptions instance we need to use the constructor of StudentDbContext class as shown in the image below.
DbContextOptions class in Entity Framework Core

In our next article, we will discuss the DbContextOptions class in detail.

Entity Framework Core DbSet:
The entity framework code DbContext class includes a property i.e. DbSet for each entity in your application. Let us understand this with an example. Create three entities such as Student, Branch, and Address within the Models folder as shown below.
namespace FirstCoreMVCApplication.Models
{
    public class Student
    {
        public int Id { get; set; }
        public string Name { get; set; }
        public string Email { get; set; }
        public int BranchId { get; set; }
    }
    public class Branch
    {
        public int Id { get; set; }
        public string Name { get; set; }
    }
    public class Address
    {
        public int Id { get; set; }
        public int StudentId { get; set; }
        public string City { get; set; }
        public string State { get; set; }
        public string Country { get; set; }
        public string Pin { get; set; }
    }
}
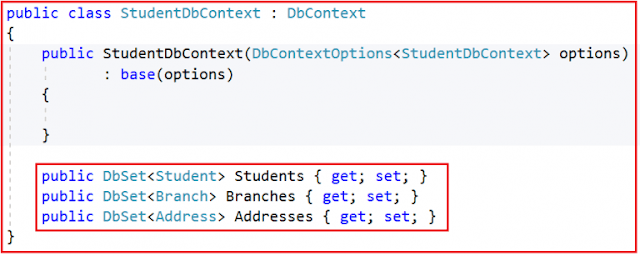
As our application contains three entities, so in our StudentDbContext class, we need to have three DbSet Properties as shown below.
Entity Framework Core DbSet

We will use the above DbSet properties such as Students, Branches, and Addresses to perform CRUD Operations.

So, the complete code of the StudentDbContext class is given below.
using Microsoft.EntityFrameworkCore;
namespace FirstCoreMVCApplication.Models
{
    public class StudentDbContext : DbContext
    {
        public StudentDbContext(DbContextOptions<studentdbcontext> options)
               : base(options)
        {
        }
        public DbSet<student> Students { get; set; }
        public DbSet<branch> Branches { get; set; }
        public DbSet<address> Addresses { get; set; }
    }
}
So, in Short,
The DbContext in Entity Framework Core perform the following tasks:
  1. Manage database connection
  2. Configure model & relationship
  3. Querying database
  4. Saving data to the database
  5. Configure change tracking
  6. Caching
  7. Transaction management
In order to connect to a database, we need the database connection string. So, in the next article, I am going to discuss, where to define the connection string and how to use it in Entity Framework Core to interact with the SQL Server Database. Here, in this article, I try to explain the need and use of the DbContext class in Entity Framework. I hope you enjoy this article.

Summary:
I hope this post will be helpful to understand the concept of DbContext in Entity Framework Core
Please share this post with your friends and colleagues.
For any queries please post a comment below.
Happy Coding 😉
Read More
  • Share This:  
  •  Facebook
  •  Twitter
  •  Google+
  •  Stumble
  •  Digg

Saturday, August 22, 2020

How to Install Entity Framework Core

 Admin     August 22, 2020     .Net, .Net Core, C#, Entity Framework, Entity Framework Core     No comments   

In this article, I am going to discuss How to Install Entity Framework Core in Visual Studio step by step in different types of applications. Please read our previous article where we discussed the introduction part of Entity Framework Core.

Note: The Entity Framework Core can be used with .NET Core applications as well as .NET 4.6 based applications. Here, in this article, I will show you how to install EF Core in .NET Core applications using Visual Studio 2017.

The Entity Framework Core is not a part of .NET Core and standard .NET framework. It is available as a NuGet package. Depending on how you have set your project, you may have already installed the Entity Framework Core.

Depending on the project complexity or requirement, you can develop a web application as:
  1. Single Layer Web Application
  2. Multi-Layer Web Application
Single Layer Web Application
When you develop a small project, then you may have the presentation, business, and data access layer all in one project. So when we created a web application project using ASP.NET Core 2.1 or higher, then by default the Entity Framework Core already installed.

Entity Framework Core in ASP.NET Core Web Application Project
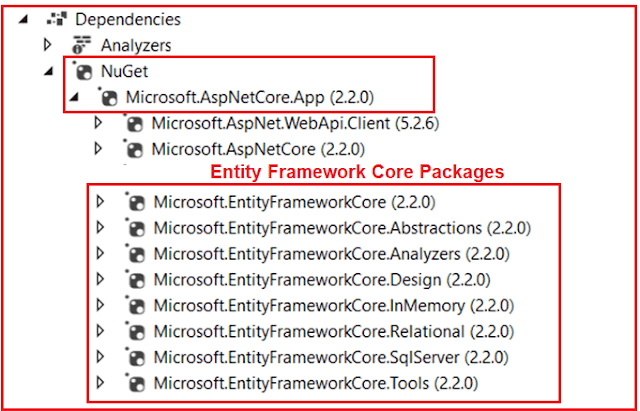
When we create an ASP.NET Core Web application using ASP.NET Core 2.1 or higher version, then by default the following NuGet package installed.

Microsoft.AspNetCore.App

The above package is called a Meta package. A Meta package does not hold any content of its own rather it holds a list of other packages. You can find this Meta package, in the Solution Explorer under the NuGet section. When you expand the Meta package, then you can find all the dependencies i.e. other packages. In the dependencies, once you scrolled down then you will find the Entity Framework Core NuGet packages already installed as shown in the below image.
Entity Framework Core Nuget Packages in ASP.NET Core Web Application

So the point that you need to remember is, when you create an ASP.Net Core web application using ASP.NET Core Version 2.1 or later, then by default you will have Entity Framework Core installed as part of the meta-package.

Multi-Layer Web Application:
When we want to develop a large application, we usually have at least the following 3 layers
  1. Presentation Layer
  2. Business Logic Layer
  3. Data Access Layer
These layers are implemented as separate projects. And the Entity Framework Core is usually required in the Data Access Layer project as this layer is going to interact with the database. The Data Access Layer project is usually a class library project and a class library project by default does not usually have the meta-package referenced. As it does not have the meta-package installed, so this means, the Entity Framework Core is not installed for the Data Access Layer project.

In order to install the Entity Framework Core to interact with the SQL server database, you need to install the following NuGet packages.
How to Install Entity Framework Core in Visual Studio

  1. Microsoft.EntityFrameworkCore.SqlServer has a dependency on Microsoft.EntityFrameworkCore.Relational package.
  2. Similarly, Microsoft.EntityFrameworkCore.Relational package has a dependency on Microsoft.EntityFrameworkCore package.
  3. Microsoft.EntityFrameworkCore package has a dependency on several other packages.

Entity Framework Core Packages Dependency

Note: When you install Microsoft.EntityFrameworkCore.SqlServer package, then it also automatically installs all the other dependency NuGet packages.

Installing Entity Framework Core in the Class Library Project:
Create a class library Project. Once you create the class library project expand the dependencies node as shown below.
Installing Entity Framework Core in the Class Library Project

As you can see in the above image, we don’t have the meta-package installed and hence we don’t have the entity framework core installed in our application.

In order to install entity framework core, Right-click on the “Dependencies“ node in Solution Explorer and then select “Manage NuGet Packages“ from the context menu as shown in the below image.
Installing Entity Framework Core

This will open the NuGet Package Manager interface. Click on the Browse tab and search for Microsoft.EntityFrameworkCore.SqlServer in the search box at the top left corner as shown in the below image. Based on the asp.net core version installed the entity framework core version compatibility with your .net core framework.
Installed Entity Framework Core

Note: We want to install Entity Framework Core to interact with the SQL Server database, so we installed the Microsoft.EntityFrameworkCore.SqlServer package. This package is usually called the Database provider package.

If you are using a different database other than SQL server, then you need to install that database provider-specific NuGet package. For example, if you want to use MySQL as your database, then install Pomelo.EntityFrameworkCore.MySql database provider package. Along the same lines, if you want to use PostgreSQL as your database, then use Npgsql.EntityFrameworkCore.PostgreSQL database provider package.

You can find all provider-specific NuGet packages on the following MSDN page.

https://docs.microsoft.com/en-us/ef/core/providers/

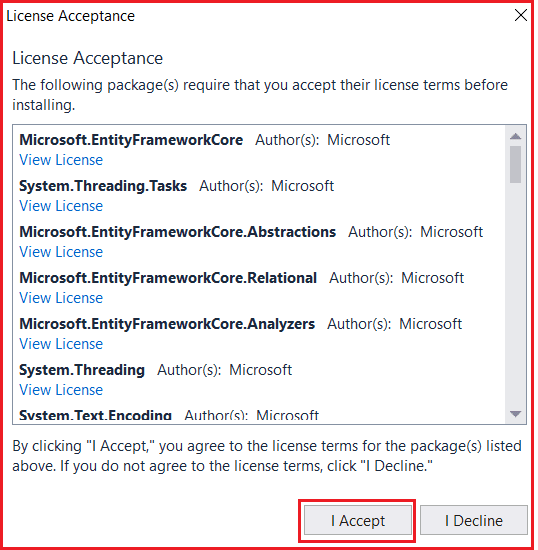
When you are installing the entity framework it will ask you to accept the license terms associated with the packages that are going to be installed as shown in the image below. Accept the license.
Accepting Terms in Entity Framework Core

Once the entity framework core installed, you will find the packages in the Meta package as shown in the below image.
Entity Framework Core Meta packages

Alternatively, you can also use the Package Manager Console to install the Entity Framework Core package. Go to Tools -> NuGet Package Manager -> Package Manager Console and execute the following command to install the SQL Server provider package.

PM> Install-Package Microsoft.EntityFrameworkCore.SqlServer

In the next article, I am going to discuss the DbContext class in Entity Framework Core. Here, in this article, I try to explain how to install the entity framework core.

Summary:
I hope this post will be helpful to understand How to Install Entity Framework Core
Please share this post with your friends and colleagues.
For any queries please post a comment below.
Happy Coding 😉
Read More
  • Share This:  
  •  Facebook
  •  Twitter
  •  Google+
  •  Stumble
  •  Digg

Introduction to Entity Framework Core

 Admin     August 22, 2020     .Net, .Net Core, C#, Entity Framework, Entity Framework Core     No comments   

In this article, I am going to give you an overview of Entity Framework Core. The Entity Framework Core which is also known as EF Core is the latest version of Entity Framework and completely rewrites from the ground up. As part of this article, we are going to discuss the following pointers.
  1. What is Entity Framework Core?
  2. What is ORM?
  3. Why do we need to use an ORM?
  4. EF Core Development Approaches.
  5. EF Core Code First Approach
  6. Entity Framework Core Database-First Approach
  7. EF Core Database Providers
  8. Why need to use Entity Framework Core over EF 6.x?
What is Entity Framework Core?
Entity Framework (EF) Core is an ORM (Object-Relational Mapper) Framework for data access in .Net. It was released along with .NET Core and is an extensible, lightweight, Open Source, and cross-platform version of Entity Framework data access technology. It works on multiple operating systems like Windows, Mac, and Linus.

What is ORM?
The term ORM stands for Object-Relational Mapper and it automatically creates classes based on database tables and the vice versa is also true. That is, it can also generate the necessary SQL to create the database based on the classes.

As a developer, we mostly work with the application business objects and the ORM Framework generates the necessary SQL (to perform the CRUD operation) that the underlying database can understand. So, in simple words, we can say that the ORM Framework eliminates the need for most of the data access code that as a developer we generally write.

Why do we need to use an ORM?
Let us understand why we need to use the ORM Framework with an example.

Suppose we want to develop an application to manage the students of a college. In order to do this, we may need to create classes such as Student, Department, Address, etc. Technically we called these classes as Domain classes.

Without using ORM Framework like Entity Framework or EF Core, we have to write lots of data access code to perform the CRUD operations i.e. store and retrieve the Student, Department and Address data from the underlying database tables.

For example, in order to perform CRUD operations i.e. read, insert, update or delete from a database table, we generally need to write custom code in our application to generate the required SQL statements which can be understood by the underlying database. Again, when we want to read the data from the database into our application, then also we have to write some custom code to map the database data to our model classes like Student, Department, Address, etc. This is a very common task as a developer for us that we do almost in every application.

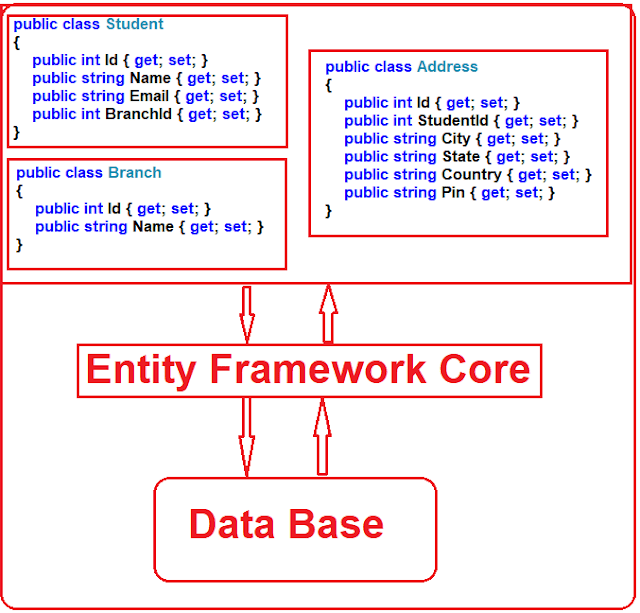
An ORM Framework like Entity framework or EF Core can do all of the above for us and saves a lot of time if we provide the necessary required information to the ORM Framework. The ORM Framework sits between our application code and the Database. It eliminates the need for most of the custom data-access code that we usually write without an ORM.
Why do we need to use an ORM

EF Core Development Approaches:
Entity Framework Core supports two development approaches. They are as follows:
  1. Code-First Approach
  2. Database-First Approach
EF Core mainly targets the code-first approach and provides little support for the database-first approach at the moment.

EF Core Code First Approach:
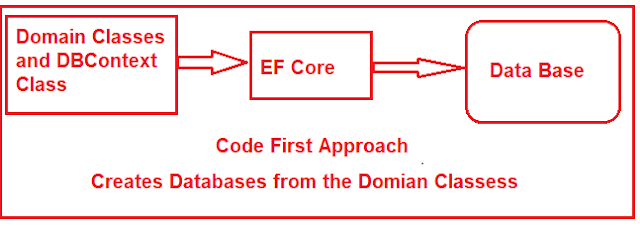
In the EF Core Code First Approach, first, we need to create our application domain classes such as Student, Branch, Address, etc. and a special class that derives from Entity Framework DbContext class. Then based on the application domain classes and DBContext class, the EF Core creates the database and related tables.
Entity Framework Core Code First Approach

Out of the box, in the code-first approach, the EF Core API creates the database and tables using migration based on the default conventions and configuration. If you want then you can also change the default conventions used to create the database and its related tables. This approach is useful in Domain-Driven Design (DDD).

EF Core Database First Approach:
If you have an existing database and database tables are already there, then you need to use the EF Core Database First Approach. In the database-first approach, the EF Core creates the DBContext and Domain classes based on the existing database schema using EF Core Command.
Entity Framework Core Database First Approach

EF Core Database Providers:
The EF Core supports both relational and non-relational databases and this is possible due to database providers. The database providers are available as NuGet packages. The Database Provider sits between the EF Core and the database it supports.
Entity Framework Core Database Provider

The EF Core database provider usually contains the functionality specific to the database it supports.
  1. Functionality that is common to all the databases is in the EF Core component.
  2. Functionality that is specific to a database, for example, Microsoft SQL Server-specific functionality is with-in the SQL Server provider for EF Core.
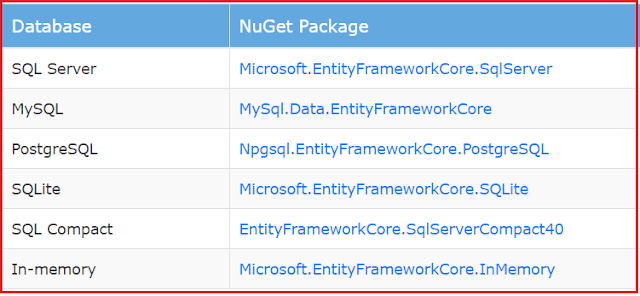
The following image shows the database providers and the NuGet packages for EF Core.
NuGet Package References For Database Providers

For the complete list of EF Core Database Providers, please visit the following URL.

https://docs.microsoft.com/en-us/ef/core/providers/

We will discuss Database providers in detail in our upcoming articles.

Why need to use Entity Framework Core over EF 6.x?
The EF 6.x is a stable and fully tested ORM technology and used in many applications. EF Core also provides an experience similar to EF 6.x. However, it is built upon a new set of components. The application targets to .NET Core e.g. ASP.NET Core applications. Universal Windows Platform (UWP) Applications cannot use EF 6.x as this requires the complete .NET Framework. EF Core is more suitable for such applications. Although both of these releases provide similar features, EF Core does not have the following features:
  1. Spatial Type
  2. Complex/value types
  3. EDMX Model format
  4. Lazy loading
  5. Stored Procedures
The complete list of features not available in EF Core and a side-by-side comparison with EF 6.x can be found at Feature Comparison. The EF Core does not support all the features provided by Entity Framework 6.x. However, following are some reasons to use EF Core:
  1. Simple to get started
  2. It supports NoSQL Databases along with relational databases
  3. It fits nicely in ASP.NET MVC Core setup
  4. Integrates well with LINQ
  5. Possible to use on Linux and Mac since it is based on .NET Core along with Windows.
In the next article, I am going to discuss how to install the entity framework core in visual studio. Here, in this article, I gave a brief introduction to Entity Framework Core.

Summary:
I hope this post will be helpful to understand the Introduction of Entity Framework Core
Please share this post with your friends and colleagues.
For any queries please post a comment below.
Happy Coding 😉
Read More
  • Share This:  
  •  Facebook
  •  Twitter
  •  Google+
  •  Stumble
  •  Digg

Thursday, August 20, 2020

Dependency Injection in C#

 Admin     August 20, 2020     .Net, C#, Design Patterns, Interview Question     No comments   

In this article, I am going to discuss the Dependency Injection in C# with examples. Please read our previous article where we discussed the Singleton Design Pattern in C# with some examples. Nowadays, the dependency injection design pattern is one of the most frequently used design patterns in real-time applications. So, as a developer, you should know why and how to use Dependency Injection Design Pattern in C#. We divided the dependency injection design pattern into three parts. As part of this article, we are going to discuss the following pointers in detail.
  1. Why Do We Need Dependency Injection in C#?
  2. What is Tight Coupling and Loose Coupling in Software Design?
  3. What is Dependency Injection Design Pattern in C#?
  4. Types of Dependency Injection Design Pattern in C#.
    Constructor Injection
    Property Injection
    Method Injection
  5. Example using Constructor Dependency Injection
What are the Advantages of Constructor Dependency Injection?
In part 2, we are going to discuss Property and Method Dependency Injection with examples. And in part 3, we are going to discuss the Unity Container in C# with an example.

Why do we need the Dependency Injection in C#?
The Dependency Injection is a design pattern that allows us to develop loosely coupled software components. In other words, we can say that this design pattern is used to reduce the tight coupling between the software components. As a result, we can easily manage future changes and other complexity in our application.

Before understanding the Dependency Injection Design Pattern using C#, first, we need to understand what is tight coupling and what is loose coupling in software development. So let’s understand these two concepts first.

What is Tight Coupling in Software Design?
Tight coupling means classes and objects are dependent on each other. That means when a class is dependent on another concrete class, then it is said to be a tight coupling between these two classes. In that case, if we change the dependent object, then we also need to change the classes where this dependent object is used. If your application is a small one, then it is not that difficult to handle but if you have a big enterprise-level application, then its really very difficult to handle to make these changes.

What is Loose Coupling in Software Design?
Loosely coupling means two objects are independent of each other. That means if we change one object then it will not affect another object. The loosely coupled nature of software development allows us to manage future changes easily and also allows us to manage the complexity of the application.

What is Dependency Injection Design Pattern in C#?
The Dependency Injection Design Pattern in C# is a process in which we are injecting the object of a class into a class that depends on that object. The Dependency Injection design pattern is the most commonly used design pattern nowadays to remove the dependencies between the objects.

Different Types of Dependency Injection in C#?
We can implement the Dependency Injection in C# in three different ways. They are as follows.

Constructor Injection: When we supply the dependency object through the client class constructor, then it is called as Constructor Injection.

Property Injection: When we supply the dependency object through the public property of the client class, then it is called as Property Injection.

Method Injection: When we supply the dependency object through a public method of the client class, then it is called as Method Injection.

Here, in this article, I will discuss how to inject the dependency object through the constructor. In the next article, I am going to discuss the Method and Property Dependency injection in C# with examples.

Constructor Dependency Injection in C#:
Let us understand the Constructor Dependency Injection in C# with an example. Let’s create a console application. to do so select, File => New => Project and then select the console application as shown below.
Dependency Injection Design Pattern in C#

Now create 3 classes Employee.cs, EmployeeDAL.cs and EmployeeBL.cs as shown below

Employee.cs
namespace DependencyInjectionExample
{
    public class Employee
    {
        public int ID { get; set; }
        public string Name { get; set; }
        public string Department { get; set; }
    }
}
EmployeeDAL.cs
namespace DependencyInjectionExample
{
    public class EmployeeDAL
    {
        public List<Employee> SelectAllEmployees()
        {
            List<Employee> ListEmployees = new List<Employee>();
            //Get the Employees from the Database
            //for now we are hard coded the employees
            ListEmployees.Add(new Employee() { ID = 1, Name = "Pranaya", Department = "IT" });
            ListEmployees.Add(new Employee() { ID = 2, Name = "Kumar", Department = "HR" });
            ListEmployees.Add(new Employee() { ID = 3, Name = "Rout", Department = "Payroll" });
            return ListEmployees;
        }
    }
}
EmployeeBL.cs
namespace DependencyInjectionExample
{
    public class EmployeeBL
    {
        public EmployeeDAL employeeDAL;
        public List<Employee> GetAllEmployees()
        {
            employeeDAL = new EmployeeDAL();
            return employeeDAL.SelectAllEmployees();
        }
    }
}
In the above example, in order to get the data, the EmployeeBL class depends on the EmployeeDAL class. In the GetAllEmployees() method of the EmployeeBL class, we create an instance of the EmployeeDAL (Employee Data Access Layer) class and then invoke the SelectAllEmployees() method. This is tight coupling because the EmployeeDAL is tightly coupled with the EmployeeBL class. Every time the EmployeeDAL class changes, the EmployeeBL class also needs to change.

Let us see how to use the constructor injection to make these classes loosely coupled.

Modify the EmployeeDAL.cs file as shown below
namespace DependencyInjectionExample
{
    public interface IEmployeeDAL
    {
        List<Employee> SelectAllEmployees();
    }
    public class EmployeeDAL : IEmployeeDAL
    {
        public List<Employee> SelectAllEmployees()
        {
            List<Employee> ListEmployees = new List<Employee>();
            //Get the Employees from the Database
            //for now we are hard coded the employees
            ListEmployees.Add(new Employee() { ID = 1, Name = "Pranaya", Department = "IT" });
            ListEmployees.Add(new Employee() { ID = 2, Name = "Kumar", Department = "HR" });
            ListEmployees.Add(new Employee() { ID = 3, Name = "Rout", Department = "Payroll" });
            return ListEmployees;
        }
    }
}
As you can see, first we create one interface i.e IEmployeeDAL with the one method. Then that interface is implemented by the EmployeeDAL class. So the point that I need to keep focus is when you are going to use the dependency injection design pattern in c#, then the dependency object should be interface based. In our example, the EmployeeDAL is the dependency object as this object is going to be used by the EmplyeeBL class. So we created the interface and then implement that interface.

Modify the EmployeeBL.cs file as shown below
namespace DependencyInjectionExample
{
    public class EmployeeBL
    {
        public IEmployeeDAL employeeDAL;
        public EmployeeBL(IEmployeeDAL employeeDAL)
        {
            this.employeeDAL = employeeDAL;
        }
        public List<Employee> GetAllEmployees()
        {
            Return employeeDAL.SelectAllEmployees();
        }
    }
}
In the above example, we created one constructor which accepts one parameter of the dependency object type. The point that you need to keep focus is, the parameter of the constructor is of the type interface, not the concrete class. Now, this parameter can accept any concrete class object which implements this interface.

So here in the EmployeeBL class, we are not creating the object of the EmployeeDAL class. Instead, we are passing it as a parameter to the constructor of the EmployeeBL class. As we are injecting the dependency object through the constructor, it is called as constructor dependency injection in C#.

Let’s us see how to use EmployeeBL class in our Main method of Program class:
namespace DependencyInjectionExample
{
    class Program
    {
        static void Main(string[] args)
        {
            EmployeeBL employeeBL = new EmployeeBL(new EmployeeDAL());
            List<Employee> ListEmployee = employeeBL.GetAllEmployees();
            foreach(Employee emp in ListEmployee)
            {
                Console.WriteLine("ID = {0}, Name = {1}, Department = {2}", emp.ID, emp.Name, emp.Department);
            }
            Console.ReadKey();
        }
    }
}
Now run the application and you will see the output as expected as shown below.
Dependency Injection in C#

Advantages of Constructor Dependency Injection
  1. The Constructor Dependency Injection Design Pattern makes a strong dependency contract
  2. This design pattern support testing as the dependencies are passed through the constructor.
In the next article, I am going to discuss the Property and Method dependency injection with some real-time examples. Here, in this article, I try to explain the Dependency Injection Design Pattern in C# steps by step with an example. I hope you understood the need and use of the Dependency Injection Design Pattern.

Summary:
I hope this post will be helpful to understand the concept of Dependency Injection in C#
Please share this post with your friends and colleagues.
For any queries please post a comment below.
Happy Coding 😉
Read More
  • Share This:  
  •  Facebook
  •  Twitter
  •  Google+
  •  Stumble
  •  Digg

Developer Exception Page Middleware in ASP.NET Core

 Admin     August 20, 2020     .Net, .Net Core, Asp.Net, C#     No comments   

In this article, I am going to discuss how to handle an unhandled exception using Developer Exception Page Middleware in ASP.NET Core application. Please read our previous article where we discussed how to serve static files using Static Files Middleware in ASP.NET Core Web Application. The exception handling is one of the key features of any application. We can handle the exception in many different ways. But in this article, we are going to discuss how we can use the Developer Exception Page Middleware to handle the unhandled exception. As part of this article, we are going to discuss the following concepts.
  1. What is Developer Exception Page Middleware?
  2. How to use Developer Exception Page Middleware in ASP.NET Core Application?
  3. How to Customize the UseDeveloperExceptionPage Middleware in ASP.NET Core?
  4. Where do we need to configure the UseDeveloperExceptionPage Middleware?
Understanding Developer Exception Page Middleware:
By default, the ASP.NET Core application simply returns a status code for an exception that is not handled by the application. Let us understand this with an example. Please modify the Configure() method of the startup class as shown below where we throw an exception.
public void Configure(IApplicationBuilder app, IHostingEnvironment env)
{
    app.Run(async (context) =>
    {
        throw new Exception("Error Occurred while processing your request");
        await context.Response.WriteAsync("Request handled and response generated");
    });
}
When you run the application you will get the following output.
Developer Exception Page Middleware in ASP.NET Core application Error Status Code

As you can see in the above image it gives you the status code as 500 which means Internal Server Error. But as a developer when you are developing the application, you should have to know the detailed information about the exception on the page so that you can take necessary actions to fix the error.

How to use DeveloperExceptionPage Middleware in ASP.NET Core Application?
If you want your application to display a page that shows the detailed information about the unhandled exception, then you need to use the Developer Exception Page middleware. Let us modify the Configure() method as shown below to add the Developer Exception Page middleware which will handle the unhandled exception that occurred in our application.
public void Configure(IApplicationBuilder app, IHostingEnvironment env)
{
    if (env.IsDevelopment())
    {
        app.UseDeveloperExceptionPage();
    }
    app.Run(async (context) =>
    {
        throw new Exception("Error Occurred while processing your request");
        await context.Response.WriteAsync("Request handled and response generated");
    });
}
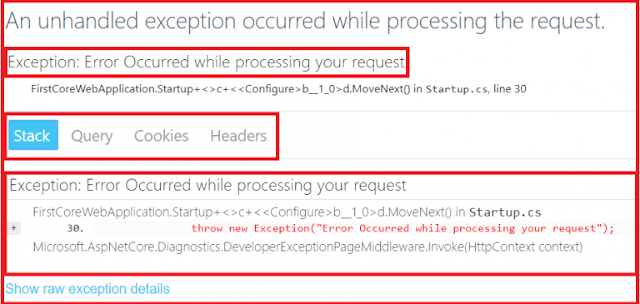
With the above change, now run the application and it will display the following page with the detailed information about the unhandled exception.
Developer Exception Page Middleware in ASP.NET Core application

As you can see in the above image, the Developer Exception Page contains four tabs such as Stack, Queue, Cookies, and Headers. The Stack tab gives the information of stack trace which indicated where exactly the exception occurred, the file name and the line number that causes the exception. Query tab gives information about the query strings. The Cookies tab displays the information about the cookies set by the request and the Header tab gives the information about the headers which is sent by the client when makes the request.

Now if you verify the Query tab and Cookies tab, then you will not see any information as you are not passing any query string value in URL or you are not setting the cookies in the request. In our upcoming articles, we will discuss the Query string and Cookies in detail.

Note: Please Enable the Developer Exception Page Middleware only when the application is running in the Development environment. You don’t want to share detailed exception information when the application is running in the production environment.

How to Customize the UseDeveloperExceptionPage Middleware in ASP.NET Core?
If you want then you can also customize the UseDeveloperExceptionPage middleware. The point that you need to remember is whenever you want to customize a middleware component in ASP.NET Core then you need to use the respective Options object. For example
  1. UseDeveloperExceptionPage => to customize this middleware use DeveloperExceptionPageOptions object
  2. UseDefaultFiles => to customize this middleware use DefaultFilesOptions object
  3. UseStaticFiles => to customize this middleware use StaticFileOptions object
  4. UseFileServer => to customize this middleware use FileServerOptions object
As we are going to customize the UseDeveloperExceptionPage() middleware component, so we need to use the DeveloperExceptionPageOptions object as shown below.
public void Configure(IApplicationBuilder app, IHostingEnvironment env)
{
    if (env.IsDevelopment())
    {
        DeveloperExceptionPageOptions developerExceptionPageOptions = new DeveloperExceptionPageOptions
        {
            SourceCodeLineCount = 5
        };
        app.UseDeveloperExceptionPage();
    }
    app.Run(async (context) =>
    {
        throw new Exception("Error Occurred while processing your request");
        await context.Response.WriteAsync("Request handled and response generated");
    });
}
The SourceCodeLineCount property of the DeveloperExceptionPageOptions class specifies the number of lines of code to include before and after the line of code that caused the exception.

Where do we need to configure the UseDeveloperExceptionPage Middleware?
We need to configure the UseDeveloperExceptionPage() Middleware as early as possible in the application’s request processing pipeline so that it can handle the unhandled exception and then display the Developer Exception Page with the detailed information about the exception.

Let us see what happened when we configure the UseDeveloperExceptionPage() middleware after the middleware using is Registered using the Run() method. Please modify the Configure() method as shown below.
public void Configure(IApplicationBuilder app, IHostingEnvironment env)
{
    app.Run(async (context) =>
    {
        throw new Exception("Error Occurred while processing your request");
        await context.Response.WriteAsync("Request handled and response generated");
    });
    if (env.IsDevelopment())
    {
        DeveloperExceptionPageOptions developerExceptionPageOptions = new DeveloperExceptionPageOptions
        {
            SourceCodeLineCount = 5
        };
        app.UseDeveloperExceptionPage();
    }
}
With the above changes when we run the application, it will not display the developer’s exception page instead of simply returns the default error status code. This is the reason why we need to configure the UseDeveloperExceptionPage() middleware as early as possible to handle the unhandled exception of the application in the request processing pipeline.

From the next article onwards, I am going to discuss ASP.NET Core MVC Application. In this article, I try to explain how to handle an unhandled exception using Developer Exception Page Middleware in ASP.NET Core application. I hope this article will help you to understand the Developer Exception Page Middleware.

Summary:
I hope this post will be helpful to understand the concept of Developer Exception Page Middleware in ASP.NET Core
Please share this post with your friends and colleagues.
For any queries please post a comment below.
Happy Coding 😉
Read More
  • Share This:  
  •  Facebook
  •  Twitter
  •  Google+
  •  Stumble
  •  Digg

Static Files Middleware in ASP.NET Core

 Admin     August 20, 2020     .Net, .Net Core, Asp.Net, C#     No comments   

In this article, I am going to discuss how to serve static files using Static Files Middleware in ASP.NET Core Application. Please read our previous article before proceeding to this article where we discussed the Request Processing Pipeline in ASP.NET Core Application. As part of this article, we are going to discuss the following pointers in details.
  1. Where do we need to store the static files in ASP.NET Core?
  2. What is wwwroot folder in ASP.NET Core?
  3. How to Configure Static Files Middleware in ASP.NET Core Web Application?
  4. What is the use of the UseFileServer() Middleware component?
One of the most important features almost all web applications should have the ability to serve the static files directly from the file system. The static files such as HTML, Images, CSS, and JavaScript are the important assets of an application and ASP.NET Core can serve these files directly to the clients. But the important point that you need to keep in mind by default the ASP.NET Core cannot serve these static files. Some configuration is required in order to enable the ASP.NET Core to serve these static files directly.

Where do we need to store the static files in ASP.NET Core?
In ASP.NET Core, the default directory or location for the static files is wwwroot (webroot) folder and moreover, this folder or directory should be present in the root project folder. By default, this is the only place where the ASP.NET Core application can serve the static files directly. But we can change this default behavior by using the UseWebRoot method that we will discuss in our upcoming articles. In this article, we are going with the default behavior.

Adding the wwwroot (webroot) folder:
Right-click on the project and then select add => new folder option and then provide the folder name as wwwroot.

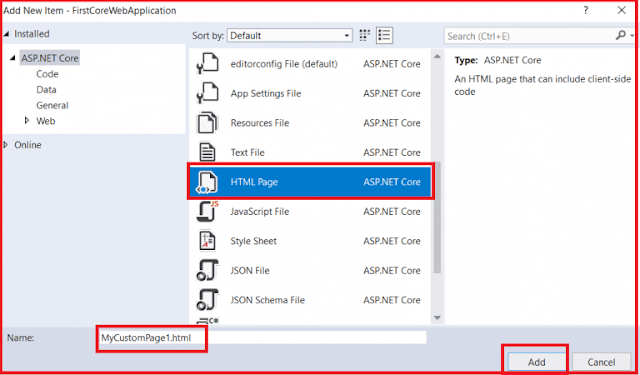
Once you created the wwwroot folder, let’s add an HTML file within that folder. To do so, right-click on the wwwroot folder and then select add => new item which will open add new item window. From that window select the HTML template, provide a name such as “MyCustomPage1” and then click on the Add button as shown in the below image.
Static Files Middleware in ASP.NET Core

Once you click on the Add button, then it will add the HTML page within the wwwroot directory. Open the HTML file and then copy and paste the following code in it.
<html>
<head>
    <meta charset="utf-8" />
    <title></title>
</head>
<body>
    <h1>Serving Static Files in ASP.NET Core</h1>
</body>
</html>
Following is the directory structure of your application:
Static Files Middleware in ASP.NET Core Directory Structure

Following is the Configure() method of the Startup class.
Static Files Middleware in ASP.NET Core Configure Method

Now run the application and navigate to the following URL. The point that you need to remember is the port number may be different in your machine.

http://localhost:59119/MyCustomPage1.html

So when you navigate to the above URL, you will not get the output as expected. Here you are getting the response from the middleware which is registered using the Run() extension method. The reason why we are not getting the output as expected because we don’t have any middleware which can serve the static files in the request processing pipeline.

Configuring Static Files Middleware:
The ASP.NET Core provides a middleware called UseStaticFiles() which can be used to serve the static files.

Let us Modify the Configure() method of the Startup class in order to add the UseStaticFiles() middleware to the request processing pipeline of the application as shown below.
public void Configure(IApplicationBuilder app, IHostingEnvironment env)
{
    if (env.IsDevelopment())
    {
        app.UseDeveloperExceptionPage();
    }
    //Adding Static Files Middleware to serve the static files
    app.UseStaticFiles();
    app.Run(async (context) =>
    {
        await context.Response.WriteAsync("Request handled and response generated");
    });
}
Now run the application and navigate to the following URL and you will see the output as expected that is coming from the static HTML file.

http://localhost:59119/MyCustomPage1.html

Setting the Default Page:
Most of the web applications have a default page such as index.htm(l) or default.htm(l) as their startup page as it is easy to remember. This is the web page that is going to be displayed when a user visits the root URL of that application. For example, if you have a page with the name index.html and you want that page to be your default page so that whenever any user visits your root URL, then that page is going to be displayed.

Let’s add a new HTML File with the name index.html within the wwwroot folder of your project. Once you add the index.html file then copy and paste the following HTML code in it.
<!DOCTYPE html>
<html>
<head>
    <meta charset="utf-8" />
    <title></title>
</head>
<body>
    <h1>This is the Default Page</h1>
</body>
</html>
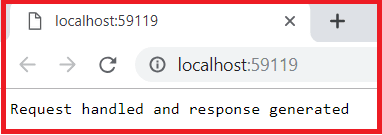
Now run the application and navigate to the root URL as shown below.

http://localhost:59119/

Output:
Serving Static Files in ASP.NET Core

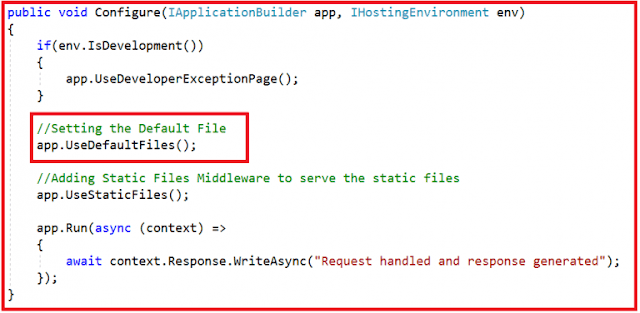
You are getting the response from the middleware which is registered using the Run() extension method. In order to serve the index.html page as the default page of your application, you need to add another middleware i.e. UseDefaultFiles() middleware into the request processing pipeline. So, modify the Configure() method of the Startup class as shown below to use the UseDefaultFiles() middleware which will set the default page for your application.
Setting Default Files in ASP.NET Core

Now run the application and you will see the output as expected.

Note: You need to add the UseDefaultFiles() middleware before the UseStaticFiles() middleware in order to serve the default file. The point that you need to remember is the UseDefaultFiles() middleware is just a URL rewriter and it never serves the static files. The job of this middleware is to simply rewrite the incoming URL to the default file which will then be served by the Static Files Middleware.

The UseDefaultFiles() middleware will search the wwwroot folder for the following files.
index.htm
index.html
default.htm
default.html 
This is the default behavior. But if you want then you can also change this default behavior. For example, if you want MyCustomPage1.html page as the default page instead of the index.html then you need to modify the Configure() method of the Startup class as follows.
public void Configure(IApplicationBuilder app, IHostingEnvironment env)
{
    if (env.IsDevelopment())
    {
        app.UseDeveloperExceptionPage();
    }
    //Specify the MyCustomPage1.html as the default page
    DefaultFilesOptions defaultFilesOptions = new DefaultFilesOptions();
    defaultFilesOptions.DefaultFileNames.Clear();
    defaultFilesOptions.DefaultFileNames.Add("MyCustomPage1.html");
    //Adding Default Files Middleware to set the default page 
    app.UseDefaultFiles();
    //Adding Static Files Middleware to serve the static files
    app.UseStaticFiles();
    app.Run(async (context) =>
    {
        await context.Response.WriteAsync("Request handled and response generated");
    });
}
Now run the application and you will see the output as expected that is coming from the MyCustomPage1.html file. If you still see the output from the index.html page then it may be sue to cache so just try to reload the page. If still, you are not getting the data from the MyCustomPage1.html file then just restart the visual studio.

What is the use of the UseFileServer() Middleware component?
The UseFileServer() middleware components combines the functionality of UseStaticFiles, UseDefaultFiles and UseDirectoryBrowser middleware. We already discussed the UseStaticFiles and UseDefaultFiles middleware. The DirectoryBrowser middleware as the name says enables the directory browsing which allows the users to see the files which are stored in a specific directory. In our example, we can replace the UseStaticFiles() and UseDefaultFiles() middlewares with the UseFileServer() Middleware as shown below.
public void Configure(IApplicationBuilder app, IHostingEnvironment env)
{
    if (env.IsDevelopment())
    {
        app.UseDeveloperExceptionPage();
    }
    // Use UseFileServer instead of UseDefaultFiles & UseStaticFiles
    FileServerOptions fileServerOptions = new FileServerOptions();
    fileServerOptions.DefaultFilesOptions.DefaultFileNames.Clear();
    fileServerOptions.DefaultFilesOptions.DefaultFileNames.Add("MyCustomPage1.html");
    app.UseFileServer(fileServerOptions);
    app.Run(async (context) =>
    {
        await context.Response.WriteAsync("Request handled and response generated");
    });
}
Now run the application and you will see the output as expected.

In the next article, we are going to discuss the Developer Exception Page Middleware in detail. Here, in this article, I try to explain how to serve static files using Static Files Middleware in the ASP.NET Core application. I would like to have your feedback about this article. Please post your feedback, question, or comments about this article.

Summary:
I hope this post will be helpful to understand the concept of Static Files Middleware in ASP.NET Core
Please share this post with your friends and colleagues.
For any queries please post a comment below.
Happy Coding 😉
Read More
  • Share This:  
  •  Facebook
  •  Twitter
  •  Google+
  •  Stumble
  •  Digg

Wednesday, August 19, 2020

ASP.NET Core Request Processing Pipeline

 Admin     August 19, 2020     .Net, .Net Core, Asp.Net, C#     No comments   

In this article, I am going to discuss the ASP.NET Core Request Processing Pipeline with an example. Please read our previous article before proceeding to this article where we discussed How to Configure Middleware Components in ASP.NET Core application. As part of this article, we are going to discuss the following pointers in detail.
  1. Understanding the ASP.NET Core Request Processing Pipeline.
  2. How to create and register multiple middleware components in ASP.NET Core?
  3. What is the execution order of middleware components in the request processing pipeline?
Understanding the ASP.NET Core Request Processing Pipeline:
In order to understand the Request Processing Pipeline in ASP.NET Core, concept, let us modify the Configure() method of the Startup class as shown below. Here we are registering three middleware components into the request processing pipeline. As you can see the first two components are registered using the Use() extension method and the last one is registered using the Run() extension method.
using Microsoft.AspNetCore.Builder;
using Microsoft.AspNetCore.Hosting;
using Microsoft.AspNetCore.Http;
using Microsoft.Extensions.DependencyInjection;
using Microsoft.Extensions.Logging;
namespace FirstCoreWebApplication
{
    public class Startup
    {
        public void ConfigureServices(IServiceCollection services)
        {
        }
        public void Configure(IApplicationBuilder app, IHostingEnvironment env,
                ILogger<Startup> logger)
        {
            app.Use(async (context, next) =>
            {
                logger.LogInformation("Middleware1: Incoming Request");
                await next();
                logger.LogInformation("Middleware1: Outgoing Response");
            });
            app.Use(async (context, next) =>
            {
                logger.LogInformation("Middleware2: Incoming Request");
                await next();
                logger.LogInformation("Middleware2: Outgoing Response");
            });
            app.Run(async (context) =>
            {
                await context.Response.WriteAsync("Middleware3: Incoming Request handled and response generated");
                logger.LogInformation("Middleware3: Incoming Request handled and response generated");
            });
        }
    }
}
Code Explanation:
First, we inject the logging middleware i.e. ILogger into the Configure() method. The CreateDefaultBuilder() method of the Program class which is called by the Main() method configures the logging. As ASP.NET Core is open source, so you can verify this by visiting the following link

https://github.com/aspnet/MetaPackages/blob/release/2.2/src/Microsoft.AspNetCore/WebHost.cs

Somewhere within the code, you will find the ConfigureLogging() method as shown below
ASP.NET Core Request Processing Pipeline ConfigureLogging

As shown in the above image, the logger is configured for Console, Debug, and EventSource. In our example, we are using the logger instance which is provided through Dependency Injection to log the information.

If you are running your application using .NET Core CLI, then you can see the logged information on the Console window whereas if you are running your application directly from Visual Studio, then you can see the logged information in the output window.

Now run the application, select the Debug option from the drop-down list of the Output window as shown below to see the logged information.
ASP.NET Core Request Processing Pipeline

Here you need to keep the focus on the order on which it logged information. It logged the information in the following order.

Middleware1: Incoming Request
Middleware2: Incoming Request
Middleware3: Incoming Request handled and response generated
Middleware2: Outgoing Response
Middleware1: Outgoing Response


Understanding the ASP.NET Core Request Processing Pipeline Execution Order:
In order to understand this, let us compare the above output with the following diagram to understand the ASP.NET Core Request Processing Pipeline.
ASP.NET Core Request Processing pipeline Order

When the incoming HTTP request comes, first it receives by the first middleware component i.e. Middleware1 which logs “Middleware1: Incoming Request” so as a result first we see this message first on the output window.

Once the first middleware logs the information, then it calls next() method which will invoke the second middleware in the request processing pipeline i.e. Middleware2.

The second middleware logs the information “Middleware2: Incoming Request” as a result, we see this log information after the first log. Then the second middleware calls the next() which will invoke the third middleware in the request pipeline which is Middleware3.

The third middleware handles the request and then produces the response. So, the third information that we see in the output window is “Middleware3: Incoming Request handled and response generated”.

This middleware component is registered using the Run() extension method, so it is a terminal component. So from this point, the request pipeline starts reversing. That means from this middleware, the control is given back to second middleware and the second middleware logs the information as “Middleware2: Outgoing Response” and then give the control back to the first middleware component and the first middleware component logs the information as “Middleware1: Outgoing Response”

Key Points to remember:
The ASP.NET Core request processing pipeline consists of a sequence of middleware components that are going to be called one after the other.

Each middleware component can perform some operations before and after invoking the next component using the next delegate. A middleware component can also decide not to call the next middleware component which is called short-circuiting the request pipeline.

The middleware component in asp.net core has access to both the incoming request and the outgoing response.

The most important point that you need to keep in mind is the order in which the middleware components are added in the Configure method of the Startup class defines the order in which these middleware components are going to be invoked on requests and the reverse order for the response. So, the order is critical for defining the security, performance, and functionality of the application.

In the next article, I am going to discuss how to handle the static files in ASP.NET Core using Static Files middleware components. Here, in this article, I try to explain the ASP.NET Core Request Processing Pipeline with an example. I hope this article will help you to understand the Request Processing Pipeline in ASP.NET Core Web Application.

Summary:
I hope this post will be helpful to understand the concept of ASP.NET Core Request Processing Pipeline
Please share this post with your friends and colleagues.
For any queries please post a comment below.
Happy Coding 😉
Read More
  • Share This:  
  •  Facebook
  •  Twitter
  •  Google+
  •  Stumble
  •  Digg
Newer Posts Older Posts

Join us on Telegram

Loved Our Blog Posts? Subscribe To Get Updates Directly To Your Inbox

Like us on Facebook

Popular Posts

  • What is Dependency Injection(DI)
    Hi friends! Today we are going to learn about Dependency Injection and in our last session we have come across Static classes and where it s...
  • ASP.NET State Management
    State management is a technique or way to maintain / store the state of an Asp.Net controls, web page information, object/data, and user in ...
  • What is Abstract Class and When we should use Abstract Class
    Hi friends! In our previous sessions we have seen  Difference Between Class and Struct . And in our last session  we learnt Usability of Sec...
  • Static Files Middleware in ASP.NET Core
    In this article, I am going to discuss how to serve static files using Static Files Middleware in ASP.NET Core Application. Please read ou...
  • HTTP Client Message Handler in Web API
    In this article, I am going to discuss HTTP Client Message Handler in Web API with real-time examples. As we already discussed in HTTP Mes...
  • ASP.NET Web API Basic Authentication
    In this article, I am going to discuss how to implement the ASP.NET Web API Basic Authentication step by step with an example. Please read...
  • Kestrel Web Server in ASP.NET Core
    In this article, I am going to discuss the Kestrel Web Server in ASP.NET Core Application. Please read our previous article before proceed...

Blog Archive

Contact Form

Name

Email *

Message *

Tags

.Net .Net Core .Net Core MVC Algorithm Angular Anonymous Types Asp.Net Asp.Net MVC Blazor C# Data Structure Database Design Patterns Entity Framework Entity Framework Core Filters Interview Question Management Studio Programming Programs SQL Server SSMS Web API

Copyright © C# Techtics | All Right Reserved.

Protected by Copyscape