• Home
  • About
  • Contact
  • ado.net
  • angular
  • c#.net
  • design patterns
  • linq
  • mvc
  • .net core
    • .Net Core MVC
    • Blazor Tutorials
  • sql
  • web api
  • dotnet
    • SOLID Principles
    • Entity Framework
    • C#.NET Programs and Algorithms
  • Others
    • C# Interview Questions
    • SQL Server Questions
    • ASP.NET Questions
    • MVC Questions
    • Web API Questions
    • .Net Core Questions
    • Data Structures and Algorithms

Sunday, August 30, 2020

Attribute Routing in ASP.NET Core MVC

 Admin     August 30, 2020     .Net, .Net Core, .Net Core MVC, Asp.Net, C#     1 comment   

In this article, I am going to discuss Attribute Routing in ASP.NET Core MVC Application with examples. Please read our previous article before proceeding to this article where we discussed the Conventional Based Custom Routing in ASP.NET Core MVC Application. As part of this article, we are going to discuss the following pointers.
  1. Need and Use of Attribute Routing in ASP.NET Core MVC Application.
  2. What is Attribute Routing in ASP.NET Core MVC?
  3. Attribute Routing with Parameters in ASP.NET Core MVC Application
  4. Attribute Routing with Optional Parameters in ASP.NET Core MVC Application
  5. Controller and Action Method Names in Attribute Routing.
  6. Attribute Routes at Controller Level
  7. How to ignore the Route Template placed at the Controller Level?
Need and Use of Attribute Routing in ASP.NET Core MVC Application
Before understanding the Attribute Routing in ASP.NET Core MVC Application, let us first do some changes to our application. First, modify the Configure() method of the Startup.cs file as shown below. If you notice in the code, here we are using the UseMvc() method without passing the default route template as a parameter.
public class Startup
{
    public void ConfigureServices(IServiceCollection services)
    {
        services.AddMvc();
    }
    public void Configure(IApplicationBuilder app, IHostingEnvironment env)
    {
        app.UseMvc();
    }
}
With the above changes in the Configure method, now our application does not have any configured routes to handle the request and response.

Now Modify the Home Controller as shown below.
public class HomeController: Controller
{
    public string Index()
    {
        return "Index() Action Method of HomeController";
    }
}
Now, when you navigate to any of the following URLs, you will get the 404 errors. This is because at the moment we don’t have any configured route in our application to handle the request.
  1. http://localhost:52190
  2. http://localhost:52190/home
  3. http://localhost:52190/home/index
Let us see how to use Attribute Routing to map the incoming URLs to the Index action method of Home Controller.

Attribute Routing in ASP.NET Core MVC:
With the help of ASP.NET Core Attribute Routing, you can use the Route attribute to define routes for your application. You can use the Route attribute either at the Controller level or at the Controller Action Methods level. When you apply the Route attribute at the Controller level, then it is applicable for all the action methods of that controller.

Let us modify the Home Controller as shown below. Here we have applied the Route Attribute at the Action method.
using Microsoft.AspNetCore.Mvc;
namespace FirstCoreMVCApplication.Controllers
{
    public class HomeController : Controller
    {
        [Route("")]
        [Route("Home")]
        [Route("Home/Index")]
        public string Index()
        {
            return "Index() Action Method of HomeController";
        }
    }   
}
If you notice, here we applied the Route() attribute 3 times on the Index() action method of Home Controller. The point that you need to remember is, with each instance of the Route attribute we specified a different route template. With the above three Route attribute, now we can access the Index() action method of the HomeController using the following 3 URLs.
  1. http://localhost:52190
  2. http://localhost:52190/home
  3. http://localhost:52190/home/index
Now run the application and navigate to the above three URLs and you will see the output as expected.

Attribute Routing with Parameters in ASP.NET Core MVC Application:
As we already discussed, with conventional based routing, we can specify the route parameters as part of the route template. We can also do the same with attribute routing. That means we can also define Route Attribute with parameters. To understand this, modify the Home Controller as shown below.
using Microsoft.AspNetCore.Mvc;
namespace FirstCoreMVCApplication.Controllers
{
    public class HomeController : Controller
    {
        [Route("")]
        [Route("Home")]
        [Route("Home/Index")]
        public string Index()
        {
            return "Index() Action Method of HomeController";
        }
        [Route("Home/Details/{id}")]
        public string Details(int id)
        {
            return "Details() Action Method of HomeController, ID Value = " + id;
        }
    }   
}
As you can see in the above code, the Details() action method has the id parameter. Notice in the route template, we also specified the id parameter. So the URL (/Home/Details/10) will execute the Details(int id) action method and maps the value “10” to the “id” parameter of the Details action method. This is done by a process called Model binding which will discuss in our upcoming articles. Now, run the application and navigate to the following URL and you will see the output as expected.

http://localhost:52190/Home/Details/10

Attribute Routing with Optional Parameters in ASP.NET Core MVC Application:
Like conventional based routing, we can also make a parameter as optional in Attribute Routing. To make the Route parameter optional, simply add a question mark “?” at the end of the parameter.

In our example, at the moment, the Details(int id) action method of the HomeController is executed only if we pass the id parameter value. If we have not passed the id parameter value in the URL, then we will get 404. For example, at the moment if we navigate to the following URL we will get a 404 error.

http://localhost:52190/Home/Details Let us modify the Route attribute of the Details action method as shown below to make the route parameter “id” as optional by adding a “?” at the end.
using Microsoft.AspNetCore.Mvc;
namespace FirstCoreMVCApplication.Controllers
{
    public class HomeController : Controller
    {
        [Route("")]
        [Route("Home")]
        [Route("Home/Index")]
        public string Index()
        {
            return "Index() Action Method of HomeController";
        }
        [Route("Home/Details/{id?}")]
        public string Details(int id)
        {
            return "Details() Action Method of HomeController, ID Value = " + id;
        }
    }   
}
Now run the application and navigate to the following URL and you will see the output as expected instead of 404 error.

http://localhost:52190/Home/Details/

Controller and Action Method Names in Attribute Routing:
With attribute routing in ASP.NET Core MVC Application, the controller name and action method names do not play any role. To understand this, modify the Home Controller as shown below.
using Microsoft.AspNetCore.Mvc;
namespace FirstCoreMVCApplication.Controllers
{
    public class HomeController : Controller
    {
        [Route("")]
        [Route("MyHome")]
        [Route("MyHome/Index")]
        public string StartPage()
        {
            return "StartPage() Action Method of HomeController";
        }
    }   
}
As you can see, we have specified the Route attribute three times StartPage() action method of the HomeController. So, this StartPage action method is going to be executed for the following 3 URLs.

/
/MyHome
/MyHome/Index


Attribute Routes at Controller Level:
In the ASP.NET Core MVC application, it is also possible to apply the Route() attribute on the Controller class as well as on individual action methods. If you want to make the attribute routing less repetitive, then you need to use the route attributes on the controller level as well as on the individual action methods level.

Let us understand this with an example. First, modify the Home Controller class as shown below.
using Microsoft.AspNetCore.Mvc;
namespace FirstCoreMVCApplication.Controllers
{
    public class HomeController : Controller
    {
        [Route("")]
        [Route("Home")]
        [Route("Home/Index")]
        public string Index()
        {
            return "Index() Action Method of HomeController";
        }
        [Route("Home/Details/{id?}")]
        public string Details(int id)
        {
            return "Details() Action Method of HomeController, ID Value = " + id;
        }
    }
}
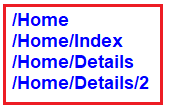
With the above code in place, we can access the Index() action method using the following 3 URLs.
/
/Home
/Home/Index

Along the same line, we can also access the Details(int? id) action method using the following 2 URLs.
/Home/Details
/Home/Details/2


If you notice, we have repeated the word Home multiple times (four times in our example). In order to make these routes less repetitive, we need to apply the Route() attribute with the word Home at the HomeController class level as shown below.
using Microsoft.AspNetCore.Mvc;
namespace FirstCoreMVCApplication.Controllers
{
    [Route("Home")]
    public class HomeController : Controller
    {
        [Route("")]       
        [Route("Index")]
        public string Index()
        {
            return "Index() Action Method of HomeController";
        }
        [Route("Details/{id?}")]
        public string Details(int id)
        {
            return "Details() Action Method of HomeController, ID Value = " + id;
        }
    }
}
Note: The Route template applied on the controller level is prepended to the route template applied to the action method level.

Now when you navigate to the following four URLs you will get the output as expected.
Attribute Routing in ASP.NET Core MVC

However, when you navigate to the root URL (http://localhost:52190) of the application, you will get a 404 error. In order to solve this, you need to include the route template that begins with “/” on the Index() action method as shown below.
Attribute Routing in ASP.NET Core MVC Application

With the above changes in place, now run the application and navigate to the root URL and you will see the output as expected.

How to ignore the Route Template placed at the Controller Level?
In order to ignore the Route Template placed at the Controller level, you need to use / or ~/ at the action method level. If the action method route template starts with / or ~/, then the controller route template is not going to be combined with the action method route template.

To understand this let us modify the Home Controller class as shown below. In the following code, the About action method starts with ~/, so this action method is not going to be combined with the controller route template.
Understanding tilde in ASP.NET Core MVC Application

Now run the application and navigate to /About URL and you will see the output as expected.

That’s it for today. In the next article, I am going to discuss Tokens in Attribute Routing in ASP.NET Core MVC Application. Here, in this article, I try to explain Attribute Routing in ASP.NET Core MVC Application. I hope you enjoy this article.

Summary:
I hope this post will be helpful to understand the concept of Attribute Routing in ASP.NET Core MVC
Please share this post with your friends and colleagues.
For any queries please post a comment below.
Happy Coding 😉
Read More
  • Share This:  
  •  Facebook
  •  Twitter
  •  Google+
  •  Stumble
  •  Digg

Custom Routing in ASP.NET Core MVC

 Admin     August 30, 2020     .Net, .Net Core, .Net Core MVC, Asp.Net, C#     No comments   

In this article, I am going to discuss Custom Routing in the ASP.NET Core MVC application. Please read our previous article before proceeding to this article where we discussed the basics of Routing as well as we also discussed the fundamentals of Conventional based routing in ASP.NET Core MVC Application. As part of this article, we are going to discuss the following pointers in detail.
  1. Creating Custom Routing in ASP.NET Core MVC Application.
  2. Understanding Route Constraints?
  3. How to define Optional Parameters in Route?
  4. Providing Default Route Values.
Note: We are going to work with the same example that we created in our previous article.

Custom Routing in ASP.NET Core MVC Application:
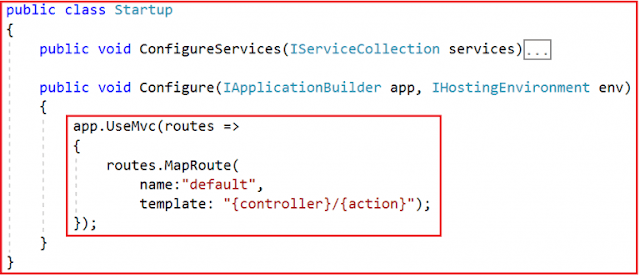
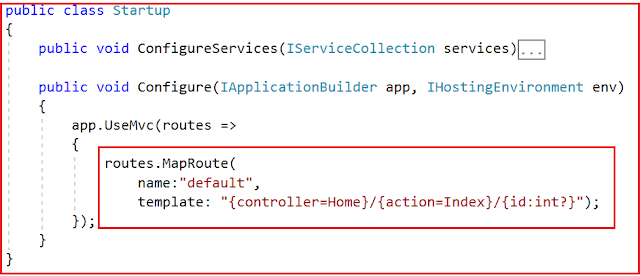
If you want to define your own route then you need to the UseMvc middleware instead of UseMvcWithDefaultRoute(). Within the Configure method of the Startup class file use the UseMVC middleware and within that middleware make a call to the MapRoute method to define your own route as shown in the below image.
Custom Routing in ASP.NET Core MVC Application

The above example is the simplest possible convention-based route for an ASP.NET Core MVC application. Now run the application and navigates to the following URLs and you will see the output as expected.

http://localhost:52190/Student/Details

http://localhost:52190/Student/Index

This is working fine. However, what if we wanted to have more specific routes? Say, something like:

http://localhost:52190/Student/Details/20

http://localhost:52190/Student/Index/10

If you want your controller action methods to match the above URLs, then you need to use a feature called Route Constraints in ASP.NET Core MVC Application.

Route Constraints in ASP.NET Core MVC Application:
Let’s say we want to create a route that will match the following URL.

http://localhost:52190/Student/Index/10

http://localhost:52190/Student/Details/20

In order to achieve this, one of the simplest ways is to define a route as shown below:
Route Constraints in ASP.NET Core MVC Application

Now modify the StudentController as shown below.
using Microsoft.AspNetCore.Mvc;
namespace FirstCoreMVCApplication.Controllers
{
    public class StudentController : Controller
    {
        public string Index(string count)
        {
            return "Index() Action Method of StudentController";
        }
        public string Details(string id)
        {
            return "Details() Action Method of StudentController";
        }
    }
}
Now run the application and navigate to the respective URLs and you will see that methods are executed as expected.

The problem with the above route is that it can accept any type of values. Here instead of an integer, if you pass string values then also it accepts and executes the action methods as shown below.

http://localhost:52190/Student/Details/ABC

If you want to restrict the id parameter value to be an integer only, then you need to use a concept called route constraint as shown below:
using Microsoft.AspNetCore.Builder;
using Microsoft.AspNetCore.Hosting;
using Microsoft.Extensions.DependencyInjection;
namespace FirstCoreMVCApplication
{
    public class Startup
    {
        public void ConfigureServices(IServiceCollection services)
        {
            services.AddMvc();
        }
        public void Configure(IApplicationBuilder app, IHostingEnvironment env)
        {
            app.UseMvc(routes =>
            {
                routes.MapRoute(
                    name:"default", 
                    template: "{controller}/{action}/{id:int}");
            });
        }
    }
}
Note: The {id: int} in the template section specifies that whatever is in this part of the URL must be an integer, otherwise the URL does not map to this route.

With the above changes, now run the application and navigate to the following URL and you will see a 404 error. This is because here we are passing the Id parameter value as ABC.

http://localhost:52190/Student/Details/ABC

http://localhost:52190/Student/index/ABC

Now pass the id parameter value as an integer and you should get the output as expected. There are many route constraints are available that you can use. Some of them are as follows.
  1. Int
  2. Bool
  3. Datetime
  4. Decimal
  5. Guid
  6. length(min,max)
  7. alpha
  8. range(min,max)
For the list of all available route constraints, please find the following MSDN Article.

https://docs.microsoft.com/en-us/aspnet/core/fundamentals/routing?view=aspnetcore-2.2#route-constraint-reference

Optional Parameters:
Before understanding the Optional Parameters, let us first change the StudentController as shown below.
using Microsoft.AspNetCore.Mvc;
namespace FirstCoreMVCApplication.Controllers
{
    public class StudentController : Controller
    {
        public string Index()
        {
            return "Index() Action Method of StudentController";
        }
        public string Details(string id)
        {
            return "Details() Action Method of StudentController";
        }
    }
}
As you can see, the Index action method does not take any parameter while the Details action method takes one parameter. Now we need to invoke the Index action method without parameter. On the other hand, we need to make the id parameter of the Details action method as optional. It means the Details action method should be invoked using the following two URLs.

http://localhost:52190/Student/Details

http://localhost:52190/Student/Details/10

In order to achieve this, we need to use optional parameters in our convention-based routes by adding a question mark “?” to the optional parameter’s constraint as shown below.
using FirstCoreMVCApplication.Models;
using Microsoft.AspNetCore.Builder;
using Microsoft.AspNetCore.Hosting;
using Microsoft.Extensions.DependencyInjection;
namespace FirstCoreMVCApplication
{
    public class Startup
    {
        public void ConfigureServices(IServiceCollection services)
        {
            services.AddMvc();
        }
        public void Configure(IApplicationBuilder app, IHostingEnvironment env)
        {
            app.UseMvc(routes =>
            {
                routes.MapRoute(
                    name:"default", 
                    template: "{controller}/{action}/{id:int?}");
            });
        }
    }
}
Note: You can define only one optional parameter per route, and that optional parameter must be the last parameter.

Providing Default Route Values in ASP.NET Core MVC Application:
Using Default values we can specify what happens if parts of the route are not provided in the URL. For example, when we navigate to the following two URLs

http://localhost:52190/

http://localhost:52190/Home

We want to map the above two URLs to the Home Controller and Index action method of the Application. In order to achieve this, we need to provide default route values while defining the routes as shown below.
Providing Default Route Values in ASP.NET Core MVC Application

Modify the Home Controller as shown below.
public class HomeController: Controller
{
    public string Index()
    {
        return "Index() Action Method of HomeController";
    }
}
Now run the application and navigate to the following URLs and you will see the output as expected.

http://localhost:52190/

http://localhost:52190/Home

You can also map the default values by using the defaults property as shown below.
public class Startup
{
    public void ConfigureServices(IServiceCollection services)
    {
        services.AddMvc();
    }
    public void Configure(IApplicationBuilder app, IHostingEnvironment env)
    {
        app.UseMvc(routes =>
        {
            routes.MapRoute(
                name: "default",
                template: "{controller}/{action}/{id:int?}",
                defaults: new { controller = "Home", action = "Index" });
        });
    }
}
In the next article, I am going to discuss Attribute Routing in ASP.NET Core MVC Application. Here, in this article, I try to explain the Custom Routing in ASP.NET Core MVC Application with an example. I hope you enjoy this article.

Summary:
I hope this post will be helpful to understand the concept of Custom Routing in ASP.NET Core MVC
Please share this post with your friends and colleagues.
For any queries please post a comment below.
Happy Coding 😉
Read More
  • Share This:  
  •  Facebook
  •  Twitter
  •  Google+
  •  Stumble
  •  Digg

Routing in ASP.NET Core MVC

 Admin     August 30, 2020     .Net, .Net Core, .Net Core MVC, Asp.Net, C#     No comments   

In this article, I am going to discuss Routing in ASP.NET Core MVC application with examples. Please read our previous article where we discussed ViewModel in ASP.NET Core MVC Application with one real-time example. As part of this article, we are going to discuss the following pointers in detail.
  1. What is Routing in ASP.NET Core MVC?
  2. What are the different types of Routing supported by ASP.NET Core MVC?
  3. How Routing is working in ASP.NET Core?
  4. Understanding Conventional based Routing.
What is Routing in ASP.NET Core MVC?
The Routing in ASP.NET Core MVC application is a mechanism in which it will inspect the incoming Requests (i.e. URLs) and then mapped that request to the controllers and their action methods. This mapping is done by the routing rules which are defined for the application. We can do this by adding the Routing Middleware to the request processing pipeline.

So, the ASP.NET Core Framework maps the incoming Requests i.e. URLs to the Controllers action methods based on the routes configured in your application. You can configure multiple routes for your application and for each route you can also set some specific configurations such as default values, constraints, message handlers, etc. If this is not clear at the moments then don’t worry we will discuss each and everything with examples.

What are the different types of Routing supported by ASP.NET Core MVC?
In the ASP.NET Core MVC application, you can define routes in two ways. They are as follows:
  1. Convention Based Routing
  2. Attribute-Based Routing.
What is Conventional Based Routing in ASP.NET Core MVC Application?
In Conventional Based Routing, the route is determined based on the conventions defined in the route templates which will map the incoming Requests (i.e. URLs) to controllers and their action methods. In the ASP.NET Core MVC application, the Convention based Routes are defined within the Configure method of the Startup.cs class file.

What is Attribute-Based Routing in ASP.NET Core MVC Application?
In Attribute-Based Routing, the route is determined based on the attributes which are configured either at the controller level or at the action method level. We can use both Conventional Based Routing and Attribute-Based Routing in a single application.

In this article, we are going to discuss the Conventional Based Routing and in our upcoming article, we will discuss the Attribute-Based Routing.

Understanding Conventional Based Routing in ASP.NET Core MVC:
In ASP.NET Core MVC application, it is the controller action method that is going to handle the incoming Requests i.e. URLs. For example, if we issue a request to the "/Home/Index” URL, then it is the Index action method of Home Controller class which is going to handle the request as shown in the below image.
Conventional Based Routing in ASP.NET Core MVC

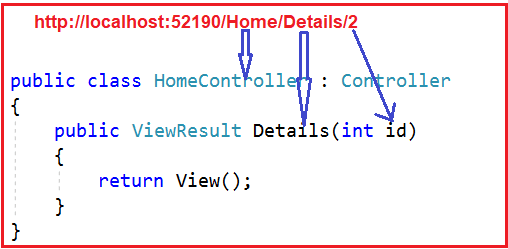
Similarly, if you issue a request to the “/Home/Details/2” URL, then it is the Details action method of the Home Controller class which is going to process that request as shown in the below image. Here the parameter value 2 is automatically mapped to the id parameter of the Details action method.
Conventional Routing in ASP.NET Core MVC

Now, the question that should come to your mind is, we have not explicitly defined any routing rules for the application, then how does this mapping is done i.e. how the “/Home/Index” URL is mapped to the Index action method and how “/Home/Details/2” URL is mapped to the Details action method of the Home Controller class.

This is actually done by the MVC Middleware which we registered in the application’s request processing pipeline.

Understanding the Default Route in ASP.NET Core MVC Application:
As we already discussed in our previous article that we can add the required MVC middleware into the request processing pipeline either by calling the UseMvcWithDefaultRoute() method or by calling the UseMvc() method within in the Configure() method of the Startup.cs class file as shown in the below image. As of now, we are using the UseMvcWithDefaultRoute() middleware.
Understanding the Default Route in ASP.NET Core MVC Application

Let us have a look at the implementation of the UseMvcWithDefaultRoute() method by visiting the following GitHub URL.

https://github.com/aspnet/Mvc/blob/release/2.2/src/Microsoft.AspNetCore.Mvc.Core/Builder/MvcApplicationBuilderExtensions.cs

The implementation is given as shown below.
UseMvcWithDefaultRoute() method Implementation

As you can see in the above implementation, this method internally calls the UseMvc() method which will add the default route into the application’s request processing pipeline. The default route is created with the following URL template:

{controller=Home}/{action=Index}/{id?}

Understanding The Route Template:
The above default route template maps most URLs that have the following pattern.

http://localhost:52190/Student/Details/2

The first segment path of the URL i.e. “/Student” is mapped to the “StudentController“. As you can see in the URL we do not have the word Controller with the first segment path of the URL. But it maps to the StudentController, this is because when ASP.NET Core MVC Framework finds the word /Student as the first segment path of URL, then it internally appends the word Controller.

The second segment path of the URL i.e. “/Details” is mapped to the “Details(int id)” action method of the HomeController class and the third segment path of the URL i.e. “2” is mapped to the “id” parameter of the Details(int id) action method.

As you can see in the default route template “{controller=Home}/{action=Index}/{id?}“, we have a question mark at the end of the id parameter which makes the parameter id is optional. That means the following two requests now map to the same Details action method of the Home Controller class.

/Home/Details/1
/Home/Details


In the default route template “{controller=Home}/{action=Index}/{id?}“, the value “Home” in {controller=Home} is the default value for the Controller. Similarly the value “Index” in {action=Index} is the default value for the action method.

That means if we navigate to the applications root URL then as shown, then that request is going to be handled by the Index action method of the Home Controller class.

http://localhost:52190

The following two URLs are also mapped to the Index action method of the HomeController class.

http://localhost:52190/Home

http://localhost:52190/Home/Indexjavascript:void(0)

For most of the ASP.NET Core MVC applications, the default route works fine. For example, create a controller with the name as StudentController and then copy and paste the following code in it.
using Microsoft.AspNetCore.Mvc;
namespace FirstCoreMVCApplication.Controllers
{
    public class StudentController : Controller
    {
        public string Index()
        {
            return "Index() Action Method of StudentController";
        }
        public string Details(string id)
        {
            return "Details() Action Method of StudentController";
        }
    }
}
Now, the URL “/student/index” is mapped to the Index() action method of the StudentController class, and the URL “/student/details” is mapped to the Details() action method of the StudentController.

In the next article, I am going to discuss how to define the custom route and Route Constraints, Optional Parameters, Default values in the ASP.NET Core MVC application. Here, in this article, I try to explain the fundamental of Routing in ASP.NET Core MVC application. I hope you enjoy this article.

Summary:
I hope this post will be helpful to understand the concept of Routing in ASP.NET Core MVC
Please share this post with your friends and colleagues.
For any queries please post a comment below.
Happy Coding 😉
Read More
  • Share This:  
  •  Facebook
  •  Twitter
  •  Google+
  •  Stumble
  •  Digg

ViewModel in ASP.NET Core MVC

 Admin     August 30, 2020     .Net, .Net Core, .Net Core MVC, Asp.Net, C#     1 comment   

In this article, I am going to discuss ViewModel in ASP.NET Core MVC application with an example. Please read our previous article before proceeding to this article where we discussed Strongly Typed View in ASP.NET Core MVC application. As part of this article, we are going to discuss the following pointers.
  1. What is a View Model in ASP.NET Core?
  2. Why do we need the View Model?
  3. How to implement the View Model in ASP.NET Core Application?
What is a ViewModel in ASP.NET Core MVC?
In real-time applications, a single model object may not contain all the data required for a view. In such situations, we need to use ViewModel in the ASP.NET Core MVC application. So in simple words, we can say that a ViewModel in ASP.NET Core MVC is a model that contains more than one model data required for a particular view. Combining multiple model objects into a single view model object provides us better optimization.

Understanding the ViewModel in ASP.NET Core MVC:
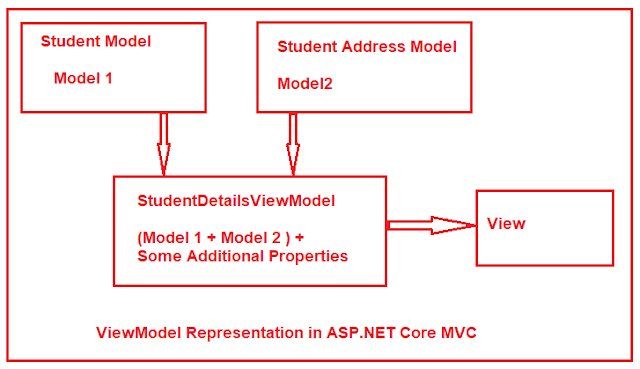
The following diagram shows the visual representation of a view model in the ASP.NET Core MVC application.
ViewModel in ASP.NET Core MVC Application

Let say we want to display the student details in a view. We have two different models to represent the student data. The Student Model is used to represent the student basic details where the Address model is used to represent the address of the student. Along with the above two models, we also required some static information like page header and page title in the view. If this is our requirement then we need to create a view model let say StudentDetailsViewModel and that view model will contain both the models (Student and Address) as well as properties to store the page title and page header.

Creating the Required Models:
First, create a class file with the name Student.cs within the Models folder of your application. This is the model that is going to represent the basic information of a student such as a name, branch, section, etc. Once you create the Student.cs class file, then copy and paste the following code in it.
namespace FirstCoreMVCApplication.Models
{
    public class Student
    {
        public int StudentId { get; set; }
        public string Name { get; set; }
        public string Branch { get; set; }
        public string Section { get; set; }
        public string Gender { get; set; }
    }
}
Next, we need to create the Address model which is going to represent the Student Address such as City, State, Country, etc. So, create a class file with the name Address.cs within the Models folder and then copy and paste the following code in it.
namespace FirstCoreMVCApplication.Models
{ 
    public class Address
    {
        public int StudentId { get; set; }
        public string City { get; set; }
        public string State { get; set; }
        public string Country { get; set; }
        public string Pin { get; set; }
    }
}
Creating the View Model:
Now we need to create the View Model which will store the required data that is required for a particular view. In our case its student’s Details view. This View Model is going to represent the Student Model + Student Address Model + Some additional data like page title and page header.

You can create the View Models anywhere in your application, but it is recommended to create all the View Models within a folder called ViewModels to keep the things organized.

So first create a folder at the root directory of your application with the name ViewModels and then create a class file with the name StudentDetailsViewModel.cs within the ViewModels folder. Once you create the StudentDetailsViewModel.cs class file, then copy and paste the following code in it.
using FirstCoreMVCApplication.Models;
namespace FirstCoreMVCApplication.ViewModels
{
    public class StudentDetailsViewModel
    {
        public Student Student { get; set; }
        public Address Address { get; set; }
        public string Title { get; set; }
        public string Header { get; set; }
    }
}
We named the ViewModel class as StudentDetailsViewModel. Here the word Student represents the Controller name, the word Details represent the action method name within the Student Controller. As it is a view model so we prefixed the word ViewModel. Although it is not mandatory to follow this naming convention, I personally prefer it to follow this naming convention to organize view models.

Creating Student Controller:
Right-click on the Controllers folder and then add a new class file with the name StudentController.cs and then copy and paste the following code in it.
using FirstCoreMVCApplication.Models;
using FirstCoreMVCApplication.ViewModels;
using Microsoft.AspNetCore.Mvc;
namespace FirstCoreMVCApplication.Controllers
{
    public class StudentController : Controller
    {
        public ViewResult Details()
        {
            //Student Basic Details
            Student student = new Student()
            {
                StudentId = 101,
                Name = "Dillip",
                Branch = "CSE",
                Section = "A",
                Gender = "Male"
            };
            //Student Address
            Address address = new Address()
            {
                StudentId = 101,
                City = "Mumbai",
                State = "Maharashtra",
                Country = "India",
                Pin = "400097"
            };
            //Creating the View model
            StudentDetailsViewModel studentDetailsViewModel = new StudentDetailsViewModel()
            {
                Student = student,
                Address = address,
                Title = "Student Details Page",
                Header = "Student Details",
            };
            //Pass the studentDetailsViewModel to the view
            return View(studentDetailsViewModel);
        }
    }
}
As you can see, now we are passing the view model as a parameter to the view. This is the view model that contains all the data required by the Details view. As you can notice, now we are not using any ViewData or ViewBag to pass the Page Title and Header to the view instead they are also part of the ViewModel which makes it a strongly typed view.

Creating the Details View:
First, add a folder with the name Student within the Views folder your project. Once you add the Student Folder, then you need to add a razor view file with the name Details.cshtml within the Student folder. Once you add the Details.cshtml view then copy and paste the following code in it.
@model FirstCoreMVCApplication.ViewModels.StudentDetailsViewModel
<html xmlns="http://www.w3.org/1999/xhtml">
<head>
    <title>@Model.Title</title>
</head>
<body>
    <h1>@Model.Header</h1>
    <div>
        StudentId : @Model.Student.StudentId
    </div>
    <div>
        Name : @Model.Student.Name
    </div>
    <div>
        Branch : @Model.Student.Branch
    </div>
    <div>
        Section : @Model.Student.Section
    </div>
    <div>
        Gender : @Model.Student.Gender
    </div>
    <h1>Student Address</h1>
    <div>
        City : @Model.Address.City
    </div>
    <div>
        State : @Model.Address.State
    </div>
    <div>
        Country : @Model.Address.Country
    </div>
    <div>
        Pin : @Model.Address.Pin
    </div>
</body>
</html>
Now, the Details view has access to the StudentDetailsViewModel object that we passed from the controller action method using the View() extension method. By using the @model directive, we set StudentDetailsViewModel as the Model for the Details view. Then we access Student, Address, Title, and Header using @Model property.

Now run the application, and navigate to the “/Student/Details” URL and you will see the output as expected on the webpage as shown in the below image.
ViewModel in ASP.NET Core MVC application

In the next article, I am going to discuss the Routing in ASP.NET Core MVC application with an example. Here, in this article, I try to explain the ViewModel in ASP.NET Core MVC application with an example. I hope you understood the need and use of ViewModel in ASP.NET Core MVC Application.

Summary:
I hope this post will be helpful to understand the concept of ViewModel in ASP.NET Core MVC
Please share this post with your friends and colleagues.
For any queries please post a comment below.
Happy Coding 😉
Read More
  • Share This:  
  •  Facebook
  •  Twitter
  •  Google+
  •  Stumble
  •  Digg

Strongly Typed View in ASP.NET Core MVC

 Admin     August 30, 2020     .Net, .Net Core, .Net Core MVC, Asp.Net, C#     No comments   

In this article, I am going to discuss how to create a Strongly Typed View in ASP.NET Core MVC application with examples. Please read our previous article before proceeding to this article where we discussed ViewBag in ASP.NET Core MVC application. As part of this article, we are going to discuss the following pointers.
  1. Why we need a Strongly Typed View in ASP.NET Core MVC?
  2. How to create a strongly typed view in ASP.NET Core?
  3. What are the advantages of using a strongly typed view?
Why do we need Strongly Typed View in ASP.NET Core MVC?
As we already discussed we can pass the model data to a view using many different ways such as ViewBag, ViewData, strongly typed model object, etc. When we passed the model data to a View using ViewBag or ViewData, then the view becomes a loosely typed view. In a loosely typed view, we will not get any intelligence as well as the compile-time error. With a strongly typed view, we will get both intelligence support as well as the compile-time error.

Implementing Strongly Typed View in ASP.NET Core MVC
In order to create a strongly-typed view, from the action method of the controller, we need to pass the model object as a parameter to the View() extension method. The Controller base class provides us the following two overloaded versions of View() extension method which we can use to pass the model object from the controller action method to a view.
Strongly Typed View in ASP.NET Core MVC Application

Here we are going to use the overloaded version which takes only the model object as an input parameter. So, modify the Details action method as shown below to pass the student object as a parameter to the View extension method.
using FirstCoreMVCApplication.Models;
using Microsoft.AspNetCore.Mvc;
namespace FirstCoreMVCApplication.Controllers
{
    public class HomeController : Controller
    {
        public ViewResult Details()
        {
            ViewBag.Title = "Student Details Page";
            ViewBag.Header = "Student Details";
            Student student = new Student()
            {
                StudentId = 101,
                Name = "James",
                Branch = "CSE",
                Section = "A",
                Gender = "Male"
            };
            
            return View(student);
        }
    }
}
Changes in Details.cshtml View:
In order to create a strongly-typed view in ASP.NET Core MVC, we need to specify the model type within the view by using the @model directive. As here, the Student class is going to be our model so we need to specify the model as shown below.

@model FirstCoreMVCApplication.Models.Student

The above statement will tell the view that we are going to use FirstCoreMVCApplication.Models.Student as the model for this view. The point that you need to remember is, here in the directive (@model), m is in lowercase and the statement should not be terminated with a semicolon.

Then in order to access the model object properties, you can simply use @Model, here the letter M is in uppercase. So, in our example, we can access the Student object properties such as Name, Gender, Branch, and Section by using @Model.Name, @Model.Gender, @Model.Branch, and @Model.Section respectively.

Modify the Details.cshtml view file as shown below to make the view as strongly typed.
@model FirstCoreMVCApplication.Models.Student
<html xmlns="http://www.w3.org/1999/xhtml">
<head>
    <title>@ViewBag.Title</title>
</head>
<body>
    <h1>@ViewBag.Header</h1>
    <div>
        StudentId : @Model.StudentId
    </div>
    <div>
        Name : @Model.Name
    </div>
    <div>
        Branch : @Model.Branch
    </div>
    <div>
        Section : @Model.Section
    </div>
    <div>
        Gender : @Model.Gender
    </div>
</body>
</html>
Now run the application and navigate to the “/Home/Details” URL and you will see the data as expected on the webpage.

Advantages of using Strongly Typed View in ASP.NET Core MVC Application:
We will get the following advantages when we use a strongly typed view in the ASP.NET Core MVC application.
  1. It will provide compile-time error checking, as a result, we will get the intelligence support.
  2. With intelligence support, the chances of mis-spelling the properties and making typographical errors are almost zero.
  3. If we misspell the property name, then it comes to know at compile time rather than at runtime.
The best and preferred approach in ASP.NET Core MVC to pass data from a controller action method to a view is by using a strongly typed model object.

In our example, we are still using ViewBag to pass the Header and Title from the Controller action method to the View. Then definitely the question that comes to your mind is how we will pass the Header and Title to a strongly typed view. Well, in such scenarios we need to use a view specific model which is called View Model.

In our next article, I am going to discuss the View Model in the ASP.NET Core MVC application with an example. Here, in this article, I try to explain the Strongly Typed View in ASP.NET Core MVC application. I hope you enjoy this article.

Summary:
I hope this post will be helpful to understand the concept of Strongly Typed View in ASP.NET Core MVC
Please share this post with your friends and colleagues.
For any queries please post a comment below.
Happy Coding 😉
Read More
  • Share This:  
  •  Facebook
  •  Twitter
  •  Google+
  •  Stumble
  •  Digg

ViewBag in ASP.NET Core MVC

 Admin     August 30, 2020     .Net, .Net Core, .Net Core MVC, Asp.Net, C#     No comments   

In this article, I am going to discuss the use of ViewBag in ASP.NET Core MVC application with examples. Please read our previous article before proceeding to this article where we discussed ViewData in ASP.NET Core MVC application. As we already discussed in the ASP.NET Core MVC application, we can pass the data from a controller to a view using ViewData, ViewBag, and strongly typed view model. As part of this article, we are going to discuss the following pointers.
  1. What is ViewBag in ASP.NET Core MVC?
  2. How to Pass and Retrieve data From ViewBag in ASP.NET Core MVC?
  3. Example to understand ViewBag in ASP.NET Core MVC
  4. Difference between ViewData and ViewBag in ASP.NET Core MVC
What is ViewBag in ASP.NET Core MVC?
The ViewBag in ASP.NET Core MVC is one of the mechanisms to pass the data from a controller action method to a view. If you go to the Controller base class, then you will find the following signature of the ViewBag property.
ViewBag in ASP.NET Core MVC

So the ViewBag is a dynamic property of the Controller base class. The dynamic type is introduced in C# 4.0. It is very much similar to the var keyword that means we can store any type of value in it but the type will be decided at run time rather than compile-time.

The ViewBag transfers the data from the controller action method to a view only, the reverse is not possible.

How to Pass and Retrieve data From ViewBag in ASP.NET Core MVC?
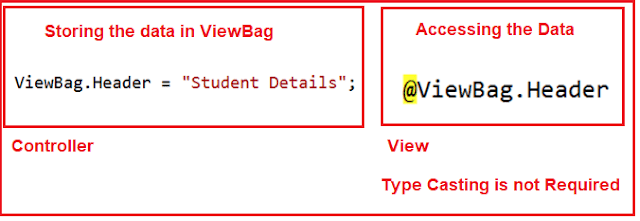
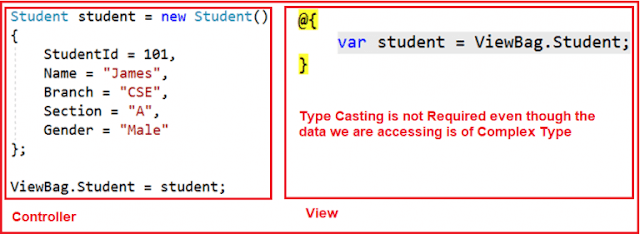
The point that you need to keep in mind is, ViewBag is operating on the dynamic data type. So we don’t require typecasting while accessing the data from a ViewBag. It does not matter whether the data that we are accessing is of type string or any complex type.

ViewBag in ASP.NET Core MVC with String Type:
ViewBag in ASP.NET Core MVC with String Type

ViewBag in ASP.NET Core MVC with Complex Type:
ViewBag in ASP.NET Core MVC with Complex Type

Example of ViewBag in ASP.NET Core MVC:
Let us see an example to understand how to use ViewBag to pass data from a controller to a view. We are going to work with the same example that we worked in our previous article with ViewData. So, modify the Details action method of HomeController class as shown below.
using FirstCoreMVCApplication.Models;
using Microsoft.AspNetCore.Mvc;
namespace FirstCoreMVCApplication.Controllers
{
    public class HomeController : Controller
    {
        public ViewResult Details()
        {
            ViewBag.Title = "Student Details Page";
            ViewBag.Header = "Student Details";
            Student student = new Student()
            {
                StudentId = 101,
                Name = "James",
                Branch = "CSE",
                Section = "A",
                Gender = "Male"
            };
            
            ViewBag.Student = student;
            
            return View();
        }
    }
}
As you can see in the above example, here we are using the dynamic properties Title, Header, and Student on the ViewBag.

Accessing the ViewBag in a View in ASP.NET Core MVC
Now we will see how to access the ViewBag data within an ASP.NET Core MVC view. So, modify the Details.cshtml view file as shown below.
<html xmlns="http://www.w3.org/1999/xhtml">
<head>
    <title>@ViewBag.Title</title>
</head>
<body>
    <h1>@ViewBag.Header</h1>
    @{
        var student = ViewBag.Student;
    }
    <div>
        StudentId : @student.StudentId
    </div>
    <div>
        Name : @student.Name
    </div>
    <div>
        Branch : @student.Branch
    </div>
    <div>
        Section : @student.Section
    </div>
    <div>
        Gender : @student.Gender
    </div>
</body>
</html>
As you can see, here we are accessing the data from the ViewBag using the same dynamic properties Title, Header, and Student. Now run the application and navigate to the “/Home/Details” URL and you will see the data as expected on the webpage as shown in the below image.
Output of ViewData

The ViewBag is a dynamic property that is resolved at runtime; as a result, here also it will not provide compile-time error checking as well as intelligence support. For example, if we miss-spell the property names of the ViewBag, then we wouldn’t get any compile-time error rather we came to know about the error at runtime.

Difference between ViewData and ViewBag in ASP.NET Core MVC
  1. In ASP.NET Core MVC, we can use both ViewData and ViewBag to pass the data from a Controller action method to a View.
  2. The ViewData is a weakly typed dictionary object whereas the ViewBag is a dynamic property. Both ViewData and ViewBag are used to create a loosely typed view in MVC.
  3. In ViewData, we use string keys to store and retrieve the data from the ViewData dictionary whereas in ViewBag we use the dynamic properties to store and retrieve data.
  4. Both the ViewData keys and ViewBag dynamic properties are resolved only at runtime. As a result, both do not provide compile-time error checking and because of this, we will not get intelligence support.
  5. So if we misspell the key names or dynamic property names then we will not get any compile-time error rather we came to know about the error only at run time. This is the reason why we rarely used ViewBag and ViewData in our application.
The best and preferred approach in MVC to pass data from a controller action method to a view is by using a strongly typed model object. When we use a strongly typed model object then only our view becomes a strongly typed view.

In the next article, I am going to discuss the Strongly Typed Views in ASP.NET Core MVC application with an example. Here, in this article, I try to explain ViewBag in ASP.NET Core MVC application. I hope this article will help you with your needs.

Summary:
I hope this post will be helpful to understand the concept of ViewBag in ASP.NET Core MVC
Please share this post with your friends and colleagues.
For any queries please post a comment below.
Happy Coding 😉
Read More
  • Share This:  
  •  Facebook
  •  Twitter
  •  Google+
  •  Stumble
  •  Digg

ViewData in ASP.NET Core MVC

 Admin     August 30, 2020     .Net, .Net Core, .Net Core MVC, Asp.Net, C#     No comments   

In this article, I am going to discuss the use of ViewData in ASP.NET Core MVC application with examples. Please read our previous article before proceeding to this article where we discussed Views in ASP.NET Core MVC application.

In ASP.NET Core MVC application, we can pass the data from a controller action method to a view in many different ways such as by using ViewBag, ViewData, TempData, and using strongly typed model. In this article, I will show you how to use ViewData to pass the data from the controller action method to a view.

What is ViewData in ASP.NET Core MVC Application?
The ViewData in MVC is a dictionary of weakly typed objects which is derived from the ViewDataDictionary class.
ViewData in ASP.NET Core MVC

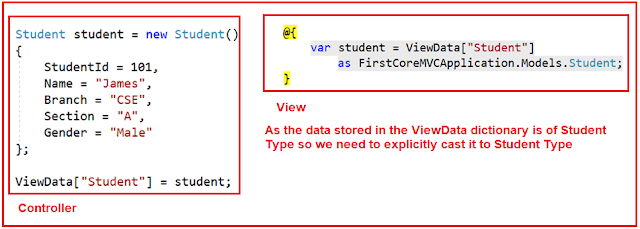
As the ViewData is a dictionary object, so it will store the data in the form of key-value pairs where each key must be a string. You can access the string data from the ViewData dictionary without casting the data to string type. But if you are accessing data other than the string type then you need to explicitly cast the data to the type you are expecting.

For Example: To access string data
Accessing String Data from ViewData in ASP.NET Core MVC

Accessing Student Data:
Accessing Student Data from ViewData in ASP.NET Core MVC

ViewData Example in ASP.NET Core MVC Application:
Let us see an example to understand how to use view data to pass data from a controller action method to a view.

In our example, we want to pass three pieces of information to the view from the controller. One is the Title of the page, second is the Header of the Page and the third one is the Student data that we want to show on the page.

So, modify the Details action method of the Home Controller as shown below.
using FirstCoreMVCApplication.Models;
using Microsoft.AspNetCore.Mvc;
namespace FirstCoreMVCApplication.Controllers
{
    public class HomeController : Controller
    {
        public ViewResult Details()
        {
            //String string Data
            ViewData["Title"] = "Student Details Page";
            ViewData["Header"] = "Student Details";
            Student student = new Student()
            {
                StudentId = 101,
                Name = "James",
                Branch = "CSE",
                Section = "A",
                Gender = "Male"
            };
            //storing Student Data
            ViewData["Student"] = student;
            
            return View();
        }
    }
}
Accessing the ViewData from a View in ASP.NET Core MVC.
In order to access the ViewData, modify the Details.cshtml view file as shown below.
<html xmlns="http://www.w3.org/1999/xhtml">
<head>
    <title>@ViewData["Title"]</title>
</head>
<body>
    <h1>@ViewData["Header"]</h1>
    @{
        var student = ViewData["Student"]
            as FirstCoreMVCApplication.Models.Student;
    }
    <div>
        StudentId : @student.StudentId
    </div>
    <div>
        Name : @student.Name
    </div>
    <div>
        Branch : @student.Branch
    </div>
    <div>
        Section : @student.Section
    </div>
    <div>
        Gender : @student.Gender
    </div>
</body>
</html>
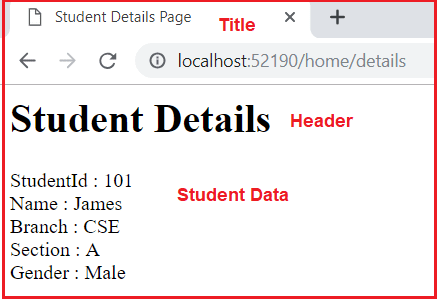
Now run the application and navigate to the “/Home/Details” URL and you will see the data as expected as shown below.
ViewData in ASP.NET Core MVC

The ViewData is dynamically resolved at runtime, as a result, it does not provide compiles time error checking as well as we do not get any IntelliSense. For example, if we miss-spell the key names then we wouldn’t get any compile-time error. We get to know about the error only at runtime

The ViewData only transfers the data from the controller action method to a view, but not vice-versa. That means it is valid only during the current request.

In the next article, I will discuss ViewBag in ASP.NET Core MVC with an example. In this article, I try to explain ViewData in ASP.NET Core MVC application. I hope this article will help you to understand the ViewData in ASP.NET Core MVC Application.

Summary:
I hope this post will be helpful to understand the concept of ViewData in ASP.NET Core MVC
Please share this post with your friends and colleagues.
For any queries please post a comment below.
Happy Coding 😉
Read More
  • Share This:  
  •  Facebook
  •  Twitter
  •  Google+
  •  Stumble
  •  Digg
Newer Posts Older Posts

Join us on Telegram

Loved Our Blog Posts? Subscribe To Get Updates Directly To Your Inbox

Like us on Facebook

Popular Posts

  • What is Dependency Injection(DI)
    Hi friends! Today we are going to learn about Dependency Injection and in our last session we have come across Static classes and where it s...
  • ASP.NET State Management
    State management is a technique or way to maintain / store the state of an Asp.Net controls, web page information, object/data, and user in ...
  • HTTP Client Message Handler in Web API
    In this article, I am going to discuss HTTP Client Message Handler in Web API with real-time examples. As we already discussed in HTTP Mes...
  • ASP.NET Web API Basic Authentication
    In this article, I am going to discuss how to implement the ASP.NET Web API Basic Authentication step by step with an example. Please read...
  • What is Abstract Class and When we should use Abstract Class
    Hi friends! In our previous sessions we have seen  Difference Between Class and Struct . And in our last session  we learnt Usability of Sec...
  • Anonymous Types in C#
    Hi friends! Today we are going to learn about Anonymous Types in C#. Let's start with the Introduction Anonymous is a type that does...
  • Development Approach with Entity Framework
    In this article, I will discuss Development Approach with Entity Framework . The entity framework provides three different approaches when ...

Blog Archive

Contact Form

Name

Email *

Message *

Tags

.Net .Net Core .Net Core MVC Algorithm Angular Anonymous Types Asp.Net Asp.Net MVC Blazor C# Data Structure Database Design Patterns Entity Framework Entity Framework Core Filters Interview Question Management Studio Programming Programs SQL Server SSMS Web API

Copyright © C# Techtics | All Right Reserved.

Protected by Copyscape