• Home
  • About
  • Contact
  • ado.net
  • angular
  • c#.net
  • design patterns
  • linq
  • mvc
  • .net core
    • .Net Core MVC
    • Blazor Tutorials
  • sql
  • web api
  • dotnet
    • SOLID Principles
    • Entity Framework
    • C#.NET Programs and Algorithms
  • Others
    • C# Interview Questions
    • SQL Server Questions
    • ASP.NET Questions
    • MVC Questions
    • Web API Questions
    • .Net Core Questions
    • Data Structures and Algorithms

Tuesday, August 18, 2020

ASP.NET Core Main Method

 Admin     August 18, 2020     .Net, .Net Core, Asp.Net, C#     No comments   

In this article, I am going to discuss the ASP.NET Core Main Method in detail. Please read our previous article where we discussed the ASP.NET Core Project File in detail. As part of this article, we are going to discuss the following two important concepts in detail.
  1. The significance of the ASP.NET Core Main Method.
  2. Why do we have a Main() method in ASP.NET Core?
  3. What happens behind the scenes when you run a .NET core application?
In order to understand the Main method of ASP.NET Core application, let’s first create an Empty ASP.NET Core Web application.

Creating ASP.NET Core Web Application
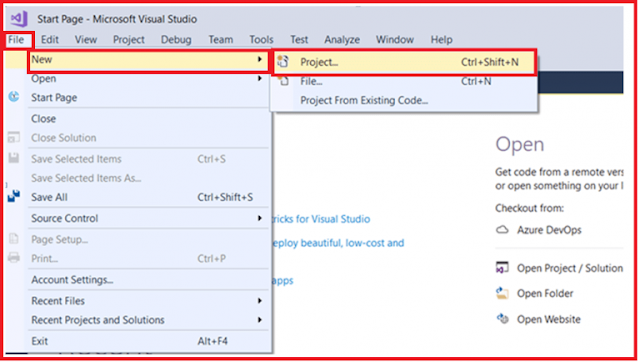
Open Visual Studio 2017. Then select File => New => Project from the file menu as shown below.
ASP.NET Core Main Method First ASP.NET Core Project

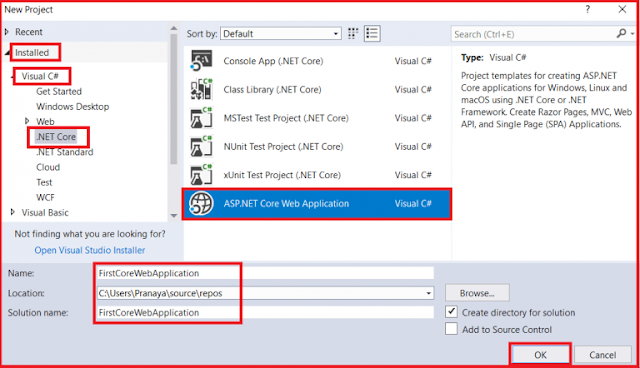
From the “New Project” window, from the left pane expand the “Installed” template section. Then expand the “Visual C#” section and then select .NET Core. From the middle pane, you need to choose ASP.NET Core Web Application. Provide a meaningful name for your application such as “FirstCoreWebApplication”. Then provide the location where you want to create the Project. Finally, click on the OK button as shown in the image below.
FirstCore Web Application

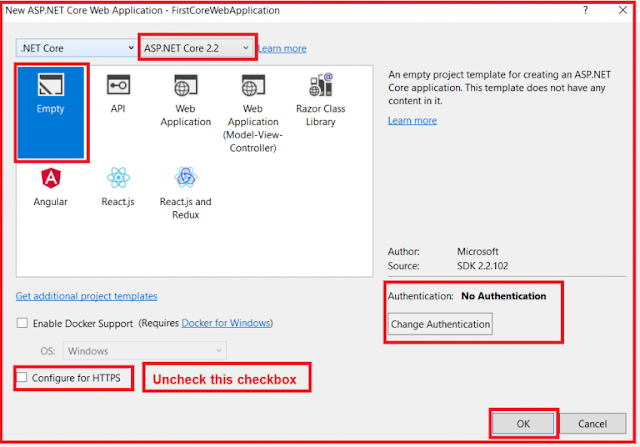
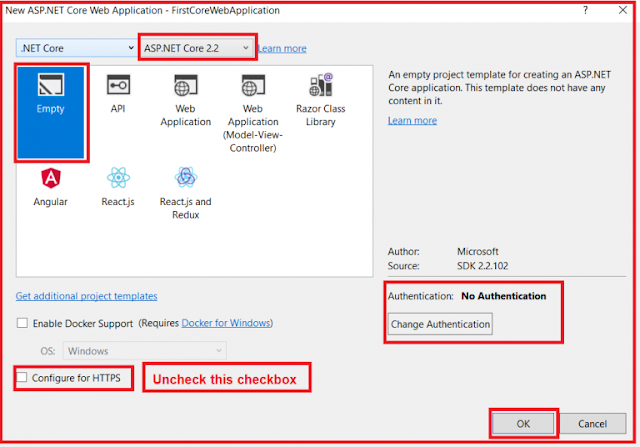
Once you click on the OK button, it will open the following window. From the below window, select ASP.NET Core 2.2 (currently it is the latest version). Then uncheck the Configure for HTTPS checkbox. Then click on the OK button as shown below.
ASP.NET Core Main Method

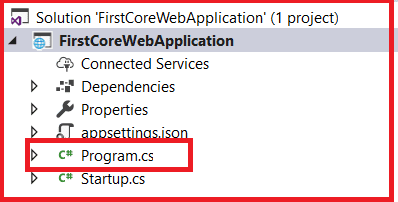
Once you click on the OK button, it will create the ASP.NET Core Web Application with the following structure.
ASP.NET Core Empty Web Application Project Structure

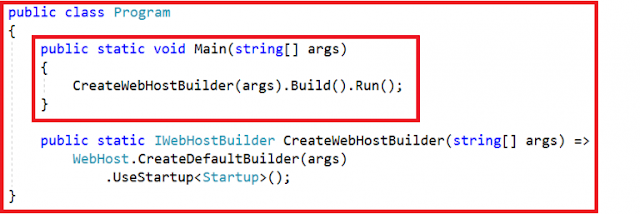
As you can see from the above image, we have a file with the name Program.cs. The Program.cs file of our ASP.NET Core Web Application contains the following code.
ASP.NET Core Program Class

From the above image, you can see that the Program class contains a public static void Main() method. As we already know, when we create a console application in .net then by default the .NET Framework creates a class (i.e. Program class) with the Main Method. We also know that the Main() method is the entry point for that console application execution.

Now the question is, here we are not creating a console application, here we create an ASP.NET Core Web Application. Then why do we have a Main() method in the ASP.NET Core Web Application?

Why do we have a Main() method in ASP.NET Core?
The most important point that you need to keep in mind is, the ASP.NET Core Application initially starts as a Console Application and the Main() method is the entry point to the application.

So, when we execute the ASP.NET Core application, first it looks for the Main() method and this is the method from where the execution starts. The Main() method then configures the ASP.NET Core and starts it. At this point, the application becomes an ASP.NET Core web application.

If you look at the body of the Main() method, then you will find that it makes a call to the CreateWebHostBuilder() method by passing the command line arguments as shown in the below image.
Main Method Of ASP.NET Core Application.

As shown in the below image, the CreateWebHostBuilder() method returns an object that implements the IWebHostBuilder interface.
Create a Web Host Builder method

Within the Main() method, on this IWebHostBuilder object, the Build() method is called which actually builds a web host. Then it hosts our asp.net core web application within that Web Host.

Finally, on the web host, we called the Run() method, which actually runs the web application and it starts listening to the incoming HTTP requests.

CreateWebHostBuilder() method calls the static CreateDefaultBuilder() method of the WebHost class. The CreateDefaultBuilder() method creates a web host with the default configurations.

Behind the scene, to create a web host, the CreateDefaultBuilder() method does several things. In the next article, we will discuss the CreateDefaultBuilder() method in detail.

For now, just understand that the CreateDefaultBuilder() method sets up a web host with default configurations.

Startup Class
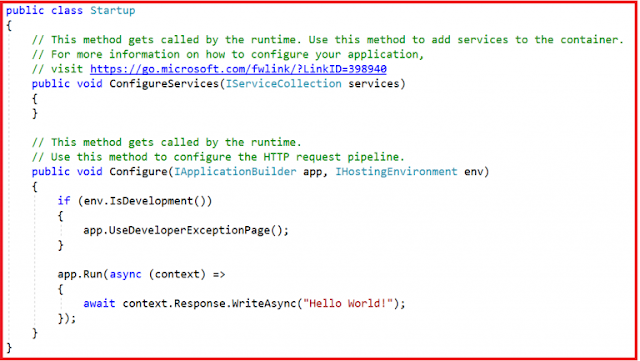
While setting up the web host, the Startup class is also configured using the UseStartup() extension method of the IWebHostBuilder class. The Startup class has two methods as shown below.
ASP.NET Core Startup Class

The ConfigureServices() method of the Startup class configures the services which are required by the application. The Configure() method of the Startup class sets up the pipeline of the application’s request processing. In a later article, we will discuss these two methods in detail.

In the next article, I will discuss the ASP.NET Core InProcess Hosting in detail. Here, in this article, I try to explain the ASP.NET Core Main Method in detail. I hope you understood the need and use of the Main Method in ASP.NET Core Web Application.

Summary:
I hope this post will be helpful to understand the concept of ASP.NET Core Main Method
Please share this post with your friends and colleagues.
For any queries please post a comment below.
Happy Coding 😉
Read More
  • Share This:  
  •  Facebook
  •  Twitter
  •  Google+
  •  Stumble
  •  Digg

ASP.NET Core Project File

 Admin     August 18, 2020     .Net, .Net Core, Asp.Net, C#     No comments   

In this article, I am going to discuss the ASP.NET Core Project File in detail. Please read our previous article before proceeding to this article, where we discussed how to create ASP.NET Core Web Application as well as we also discussed the different project templates that are available as part of ASP.NET Core Web Application.

If you worked with the previous versions of ASP.NET Framework, then you may know, if you are using C# as the programming language then the framework will create the project file with ”.csproj” as the extension. Similarly, if you are using VB as the programming language, then it will create the project file with “.vbproj” as the file extension. But with ASP.NET Core, the format and content of the project file have been changed significantly.

Changes in the Project file in ASP.NET Core Application:
The ASP.NET Core Project File does not contain any references for folder or file. In previous versions of ASP.NET Framework, when we add a folder or a file to the project using Solution Explorer, then a reference to that folder or file is added in the project file. But with ASP.NET Core, the Project File does not include any reference for the Files or Folders added the project using Solution Explorer.

Another significant change in ASP.NET Core is, the File System determines what folders and files belong to the project. Generally, the files and folders which are present at the project root folder are part of the project. Those files and folders which are present at the project root folder are only going to display in the Solution Explorer.

So, if you add a file or a folder using the File Explorer, then that file or folder is part of the project. As soon as you add a file or folder using the file explorer, it immediately displayed in the solution explorer. In the same way, if you delete a file or folder from the Project Folder or any of its subfolders, then that deleted file or folder is no longer part of the project and that is reflected immediately in the Solution Explorer.

How we can Edit the Project File in Previous Versions of ASP.NET:
In our previous versions of ASP.NET Framework, in order to edit the project file, we need to follow the following steps
  1. First, we need to unload the project
  2. Then we need to edit the project file
  3. Once we edit the file then we need to save the project file
  4. Then reload the project.
But with ASP.NET Core we can edit the project file without unloading the project.

How we can Edit the ASP.NET Core Project File:
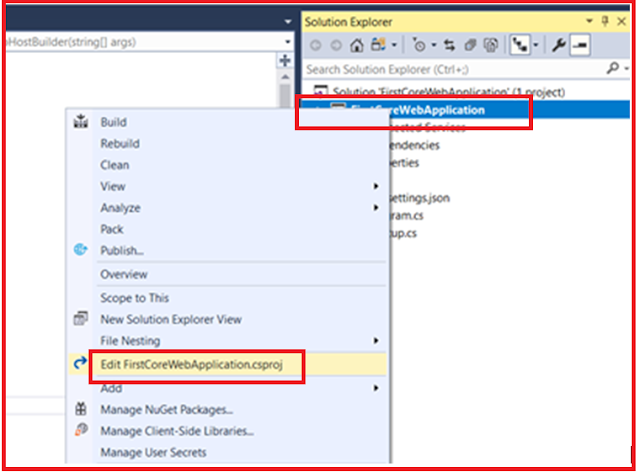
To edit the ASP.NET Core project file, right-click on the project name in the Solution Explorer, and then select “Edit FirstCoreWebApplication.csproj” as shown in the below image.
How to Edit the ASP.NET Core Project File

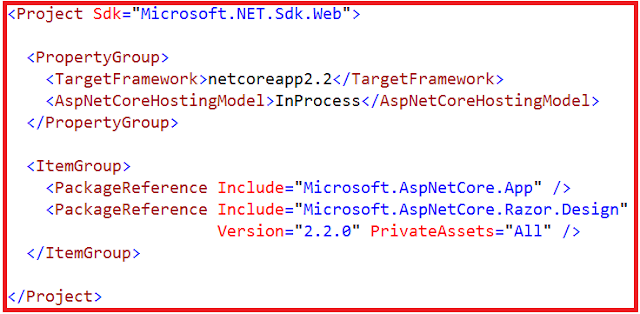
Once you click on the “Edit FirstCoreWebApplication.csproj” then the file will open in the editor as shown below.
ASP.NET Core Project File Content

Understanding the ASP.NET Core Project File:
Let us understand the ASP.NET Core Project File elements.

TargetFramework:
The TargetFramework element in the project file is used to specify the target framework for your application. To specify the target framework in the project file we are using something called Target Framework Moniker (TFM).

In our example, the application targets the framework netcoreapp2.2. The netcoreapp2.2 is the Moniker for .NET Core 2.2. If you remember, while we are creating this project, we select .NET Core 2.2 as the target framework.

AspNetCoreHostingModel:
The AspNetCoreHostingModel element of the project file is used to specify how we are going to host the asp.net core application. Values for this AspNetCoreHostingModel element are either InProcess or OutOfProcess.

The value InProcess specifies that we are going to use the in-process hosting model for our application. It means we are going to host the ASP.NET Core Application inside of the IIS Worker Process which is nothing but w3wp.exe.

The value OutOfProcess specifies that we are going to use the out-of-process hosting model. In a later article, we will discuss the In Process and Out Of Process hosting model in detail.

PackageReference:
The Package Reference element of the project file is used to add the references to all the NuGet packages which are installed for your application. At the moment, the project file adds references for the following 2 NuGet packages.
  1. Microsoft.AspNetCore.App
  2. Microsoft.AspNetCore.Razor.Design
Let us discuss these two packages in detail.

Microsoft.AspNetCore.App:
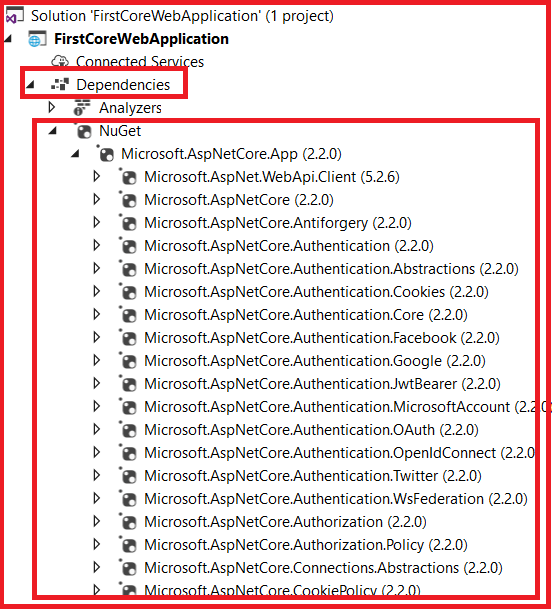
Microsoft.AspNetCore.App NuGet package is generally called the Meta Package. The Meta Package has not any content of its own but it contains a list of dependencies i.e. it contains other packages.

You can find this Meta Package, in the Solution Explorer, under NuGet which is present inside the Dependencies. When you expand the Meta Package, then you will find all the dependencies as shown in the below image.
Microsoft.AspNetCore.App Meta Package

As you can see in the project file, there is no version number for the Meta Package. When the version for a package is not specified, then an implicit version is specified by the SDK. In our upcoming articles, we will discuss more regarding Meta Package and implicit version.

Microsoft.AspNetCore.Razor.Design:
Microsoft.AspNetCore.Razor.Design package contains MSBuild support for Razor. This is also referenced by Microsoft.AspNetCore.App Meta Package.

In the next article, I am going to discuss the Main method in the ASP.NET Core application. Here, in this article, I try to explain the ASP.NET Core Project File in detail. I hope you enjoy this article and I would like to have your feedback. Please post your feedback, question, or comments about this article.

Summary:
I hope this post will be helpful to understand the ASP.NET Core Project File
Please share this post with your friends and colleagues.
For any queries please post a comment below.
Happy Coding 😉
Read More
  • Share This:  
  •  Facebook
  •  Twitter
  •  Google+
  •  Stumble
  •  Digg

Monday, August 17, 2020

Creating ASP.NET Core Web Application

 Admin     August 17, 2020     .Net, .Net Core, Asp.Net, C#     No comments   

In this article, I am going to discuss how to create ASP.NET Core Web Application step by step from scratch. Please, read our previous article before proceeding to this article where we discussed what is the software required to develop and run the ASP.NET Core application based on your operating system. As part of this article, we are going to discuss the following two things.
  1. Creating a new ASP.NET Core Web Application step by step using Visual Studio 2017.
  2. Different project templates that are available as part of .NET Core and what they are going to do.
Creating First ASP.NET Core Web Application using Visual Studio
To create a new ASP.NET Core Project, Open Visual Studio 2017. Then select File => New => Project as shown in the below image.
Creating ASP.NET Core Web Application using Visual Studio

In the “New Project” window, from the left pane expand the “Installed” template section. Then expand the “Visual C#” section and select .NET Core. From the middle pane select ASP.NET Core Web Application. Provide the name as “FirstCoreWebApplication” and select the location where you want to create the Project. Finally, click on the OK button as shown below.
ASP.NET Core Web Application

Once you click on the OK button, it will open the following window where you need to select the ASP.NET Core version and template types.
ASP.NET Core version and template types

From the above window, select ASP.NET Core 2.2 which is the latest version as of this writing. Then uncheck the Configure for HTTPS checkbox.

Project templates in ASP.NET Core Application
As you can see in the above image, we have different project templates for creating ASP.NET Core Web applications. So let us discuss a little about all these project templates. In our upcoming articles, we will use and build the ASP.NET Core Web application using all these project templates.

Empty Project Template:
As the name says, the Empty Project Template does not have any content. If you want to do everything manually from the scratch then you need to select the Empty Template. Here in this demo, we are going to use this template, so that you will understand how the different components fit together to develop an ASP.NET Core application. The following image shows the structure of an Empty template.
Empty Template

Web Application (Model-View-Controller) Template:
The Web Application (Model-View-Controller) template contains everything that is required to create an ASP.NET Core MVC Web Application.

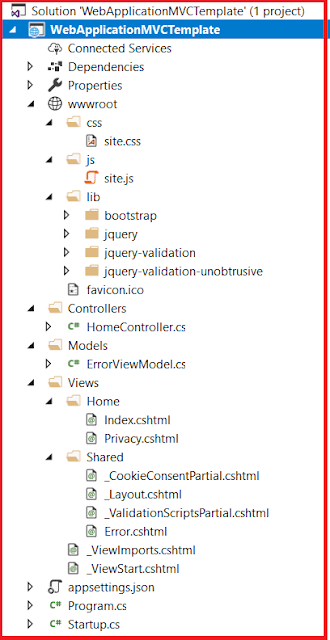
The Web Application (Model-View-Controller) template creates Models, Views, and Controllers folders. It also adds web-specific things such as JavaScript, CSS files, Layout files, etc. which are necessary and required in order to develop a web application. In a later article, we will discuss using this template. The following image shows the structure of a Web Application (Model-View-Controller) template.
Web Application (Model-View-Controller) Template

API Template:
The API template contains everything that is required and necessary to create an ASP.NET Core RESTful HTTP service. The following image shows the structure of an API template.
API Template

As you can see from the above image, it contains only the Controllers folder. The website-specific things such as CSS files, JavaScript files, view files, layout files, etc. are not present. This is because an API does not have any user interface hence it does not includes such website-specific files. This API template also does not have the Models and Views folder as they are not required for an API.

Web Application Template:
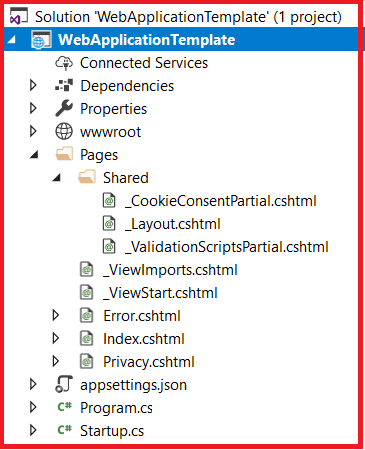
The Web Application Template uses the new Razor Pages framework for building web applications. With new Razor Pages, the coding page-focused scenarios are much easier and also more productive. We need to use this template when we want to develop a web application but do not want the full complexity of ASP.NET MVC. In our upcoming articles, we will discuss the new Razor Pages. The following image shows the structure of a Web Application template.
Web Application Template

Razor Class Library (RCL):
This Razor Class Library (RCL) Template is used to create a reusable Razor Class Library project. Typically, a Razor Class Library project contains the reusable user interface contents such as data models, page models, pages, controllers, View components, and Razor view.

Once you create the Razor Class Library (RCL) project, then this project can be consumed by many applications. The application which uses the Razor Class Library (RCL) project has the flexibility to override the views and pages it contains. In our upcoming articles, we will discuss the Razor Class Library project in detail.

Angular, React.js, React.js, and Redux:
You can also create an asp.net core web application in combination with Angular, React or React and Redux.

For this demo, select ASP.NET Core 2.2. Then uncheck the Configure for HTTPS checkbox. Then click on the Ok button. That’s it. Run the application and you will see the output “Hello World!” in the browser window.

The output “Hello World!” comes from the Configure method of Startup class which is present inside the Startup.cs file Open Startup.cs file and then change “Hello World!” string to something else and rerun the application and it will change the output accordingly.

In the next article, I am going to discuss the ASP.NET Core Project File. Here, in this article, I try to explain how to create ASP.NET Core Web Application step by step using the different types of templates from scratch. I would like to have your feedback. Please post your feedback, question, or comments about this article.

Summary:
I hope this post will be helpful to understand Creating the ASP.NET Core Web Application
Please share this post with your friends and colleagues.
For any queries please post a comment below.
Happy Coding 😉
Read More
  • Share This:  
  •  Facebook
  •  Twitter
  •  Google+
  •  Stumble
  •  Digg

ASP.NET Core Environment Setup

 Admin     August 17, 2020     .Net, .Net Core, Asp.Net, C#     No comments   

In this article, I am going to discuss the ASP.NET Core Environment Setup required for developing ASP.NET Core application. Please read our previous article before proceeding to this article where we gave a brief overview of the ASP.NET Core Framework. In order to develop the ASP.NET Core application, the following two software is required to install in your machine.
  1. Integrated Development Environment (IDE)
  2. .NET Core SDK (Software Development Kit)
The ASP.NET Core is a part of .NET Core SDK, so you don’t require to install it separately.

Download and Install an editor (IDE) for .NET Core Development
In my machine, I have windows operating system. So, I am going to use Visual Studio as my editor or you can say Integrated Development Environment for developing the ASP.NET Core application. But this is not mandatory. You can use any editor as per your choice. Some of the Editors are as follows
  1. Visual Studio
  2. Sublime
  3. Visual Studio Code
  4. Vim
  5. Atom, Etc.
Download and install Visual Studio
The Visual Studio Community Edition is free. As of this article, the latest version of Visual Studio is Visual Studio 2017 and it can be downloaded from the following site

https://visualstudio.microsoft.com/

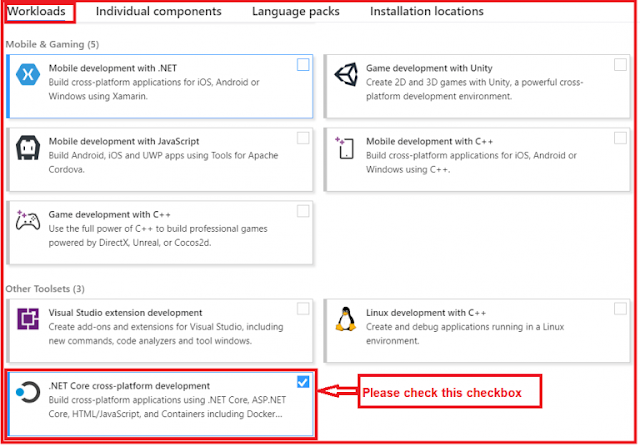
To develop .NET Core applications in Visual Studio 2017 we need .NET Core cross-platform development. So while you are installing the Visual Studio please select .NET Core cross-platform development workload as shown in the below image.
ASP.NET Core Environment Setup - .Net Core cross-platform development

If you already installed the Visual Studio 2017, then make sure the above .NET Core cross-platform development is installed. If not installed then you just install this by using Visual Studio Installer.

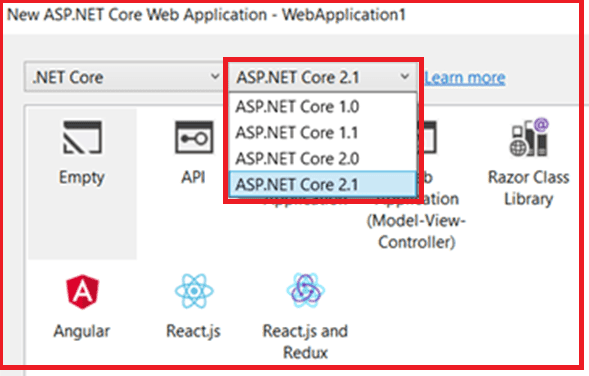
By default with this .NET Core cross-platform development, the .NET Core SDK 2.1 is installed. You can also verify this by creating a new ASP.NET Core application.

Creating ASP.NET Core Application:
Open Visual Studio. Then select File => New => Project as shown in the below image.
ASP.NET Core Environment Setup - Creating Project

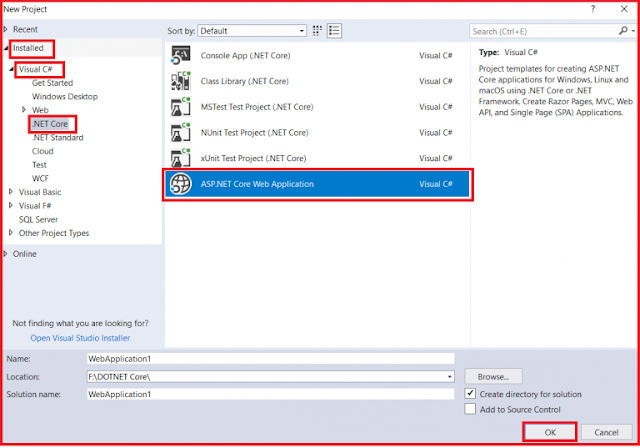
In the “New Project” window, from the left pane select “.NET Core” which is under the “Visual C#” which is under the “Installed” template section. From the middle pane select ASP.NET Core Web Application. Finally, click on the “OK” button as shown in the image below.
ASP.NET Core Environment Setup - Creating ASP.NET Core Application

Once you click on the OK button, then it will open the select template section. Here you can observe that the ASP.NET Core 2.1 is installed by default as shown in the below image.
ASP.NET Core Environment Setup - Checking ASP.NET Core Version

As of this writing, the latest stable version of .NET Core is 2.2 and you can verify this by visiting the following site.

https://github.com/dotnet/core/blob/master/release-notes/download-archive.md

Download and install .NET Core SDK
In order to download the .NET Core SDK latest version, please visits the following side. Then depending on your operating system installed on your machine download the appropriate .NET Core SDK and install it.

https://dotnet.microsoft.com/download

Here you will find two things as shown in the below image
ASP.NET Core Environment Setup - Downloading .NET Core SDK and Run Time

If you want to develop and run the .NET Core application, then you need to download the .NET Core SDK. The .NET Core Runtime is required only to run .NET Core applications.

The .NET Core SDK contains the .NET Core Runtime. So, if you installed the .NET Core SDK, then there is no need to install .NET Core Runtime separately. The .NET Core Runtime just contains the resources or libraries which are required to run existing .NET Core applications.

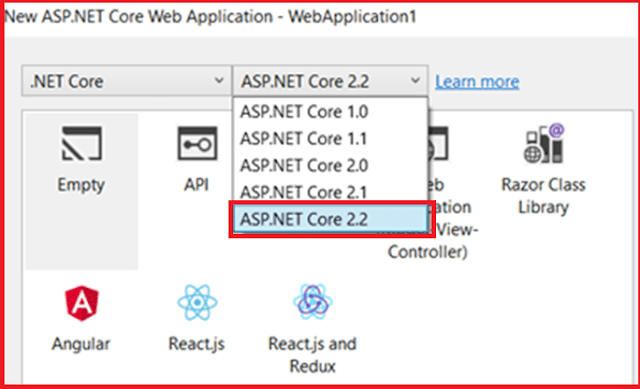
Once you installed the .NET Core SDK 2.2, create a new .NET Core Application. Now you can see that the ASP.NET Core 2.2 along with other versions in the .NET Core dropdown list as shown in the below image.
ASP.NET Core Environment Setup - ASP.NET Core 2.2

In the next article, I will discuss Creating First ASP.NET Core Web Application using Visual Studio step by step. Here, in this article, I discussed the ASP.NET Core Environment Setup required for developing ASP.NET Core application. I hope you enjoy this article.

Summary:
I hope this post will be helpful to understand the concept of ASP.NET Core Environment Setup
Please share this post with your friends and colleagues.
For any queries please post a comment below.
Happy Coding 😉
Read More
  • Share This:  
  •  Facebook
  •  Twitter
  •  Google+
  •  Stumble
  •  Digg

Introduction to ASP.NET Core Framework

 Admin     August 17, 2020     .Net, .Net Core, Asp.Net, C#     No comments   

In this article, I am going to give you a brief introduction to ASP.NET Core Framework. Nowadays, when it comes to software development, everyone is talking about open source and cross-platform development. As we all know Microsoft is well known for its Windows-based products. Now we are in the new age of software development. For this, a new revolutionary product came into the market by Microsoft and it is ASP.NET Core. As part of this article, I am going to discuss the following pointers in detail.
ASP.NET Core Framework

History of ASP.NET
As we know, ASP.NET is the framework that has been used to develop data-driven web applications for many years. Since then, the ASP.NET Framework went through a steady evolutionary change, and finally, the most decent evolution is ASP.NET Core.
  1. The ASP.NET Core is not a continuous part of ASP.NET 4.6. Instead, it is completely a new framework.
  2. This Framework is an actual re-write of the current ASP.NET 4.6 Framework, but with much smaller and a lot more modular.
  3. Some people think that many things remain the same, but that is not completely true. The ASP.NET Core is actually a big fundamental change to the ASP.NET Framework.
What is ASP.NET Core?
The ASP.NET Core is a brand new cross-platform, high-performance, light-weight, open-source Framework which is used for developing modern, Internet-connected, cloud-based Web Applications, IoT, and Web APIs which can be developed and run on Windows, Linux, or Mac operating systems.

ASP.NET Core Framework is completely rewritten of existing ASP.NET 4.x, with architectural changes which make it more modular, scalable, open-source, high-performance, light-weight, and a cross-platform web framework.

ASP.NET Core benefits and features:
Nowadays, the ASP.NET Core framework becomes more and more popular among the developers for several reasons. Let us discuss the benefits and features provided by this framework in detail.

Open Source:
The ASP.NET Core framework is Open Source. The Source Code of this Framework is available at https://github.com/aspnet and you are free to download the source code and even if you want then modify and compile your own version of it.

Cross-Platform:
The ASP.NET Core Framework is designed from scratch to keep in mind to be Cross-Platform for both development and deployment. Let us discuss what Cross-Platform is from ASP.NET Core point of view by comparing it with the earlier versions of the ASP.NET Framework.

The earlier versions of ASP.NET Framework applications can only run on windows platforms whereas the ASP.NET Core applications can develop and run on different platforms such as Windows, Mac, or Linux operating systems. We can host the earlier ASP.NET Framework 4.x applications only on IIS whereas we can host the ASP.NET Core applications on IIS, Nginx, Docker, Apache, or even self-host deployment.

To develop ASP.NET Core applications, you have multiple options like you can use either Visual Studio or Visual Studio Code. If you want then you can also use any third-party editors as per your choice.

Full Control over HTML and HTTP Requests:
In ASP.NET Core MVC Framework, you will get full control over HTML. That means you will be able to create simple to complex type HTML pages styled with CSS and display them on the browser.

Similarly, you will also get full control over HTTP requests passed between the browser and the server. It is very easy to create an AJAX request.

In ASP.NET Core MVC, You can easily plugin and use the client-side libraries like jQuery, Bootstrap, React, and Angular.

Unified MVC and Web API Framework:
The ASP.NET Core provides a unified programming model for developing both Web apps and Web APIs. That means a single controller class can be used to handle both. The Controller we create in ASP.NET Core (either Web APPs or Web APIs) application is going to inherit from the Controller base class and returns the IActionResult interface. The IActionResult interface provides several implementations. The built-in result types such as the JsonResult and the ViewResult and (like this there are so many result types available that we will discuss later) implement the IActionResult interface.

In the ASP.NET Core Web API application, the controller action method is going to return JsonResult. At the same time if it is ASP.NET Core Web application, then the return type of the controller action method is going to be ViewResult.

Extensible Framework:
The ASP.NET Core MVC Framework is designed to be highly extensible. That means you can create an application today, that can be extended to any levels in the future. Some of the key features provided by this framework that give it the extensible power are as follows.
  1. View Components
  2. Tag Helpers
  3. Routing
In our upcoming articles, we will discuss each of these features in detail.

Dependency Injection:
One of the most important used design patterns in the real-time application is Dependency Injection Design Pattern. And more importantly, the ASP.NET Core framework provides the inbuilt support for dependency injection design pattern. In our upcoming articles, we will discuss the Dependency Injection Design Pattern in detail.

Testing made Maintainability:
You can easily test and maintain the applications developed using the ASP.NET Core MVC framework. This is possible because it allows you to separate different parts of your application into independent pieces and it also allows you to test them independently. The Testing frameworks such as xUnit and MOQ can be easily integrated into ASP.NET Core MVC application for simulating any scenario.

Handling Request and Response Pipeline:
We can handle the request and response in the ASP.NET Core application by using the new Middleware Components. In earlier ASP.NET 4.x we generally use Handlers and Modules to handle the Request and Response pipeline. The ASP.NET Core Framework provides a lot of built-in Middleware Components and we can use those Middleware Components to handle the request and response pipeline. If you want then also you can create your own middleware components and use it in the request-response pipeline. In a later article, we will discuss the Middleware Components in detail. We will also discuss how to create custom Middleware Components and how to use them in ASP.NET Core applications.

What the ASP.NET Core doesn’t have?
If you are coming from ASP.NET 4.x, then you will not find the following things in ASP.NET Core
  1. The Global.asax file
  2. Web.Config file
  3. HTTP Handlers and HTTP Modules
  4. ASP.NET Page Life-Cycle model
In the next article, I am going to discuss the ASP.NET Core Environment Setup required for developing ASP.NET Core application using Visual Studio. Here, in this article, I try to give a brief overview of the ASP.NET Core Framework. I hope this Overview of ASP.NET Core Framework article will help you with your need.

Summary:
I hope this post will be helpful to understand the Introduction to ASP.NET Core Framework
Please share this post with your friends and colleagues.
For any queries please post a comment below.
Happy Coding 😉
Read More
  • Share This:  
  •  Facebook
  •  Twitter
  •  Google+
  •  Stumble
  •  Digg

Sunday, August 16, 2020

Merge Sort in C#

 Admin     August 16, 2020     C#, Interview Question, Programming, Programs     No comments   

In this article, I am going to discuss the Merge Sort in C# with Example. Please read our previous article before proceeding to this article where we discussed the Bubble Sort Algorithm in C# with example. The Merge Sort Algorithm in C# is a sorting algorithm and used by the many programmers in real-time applications.

The Merge Sort Algorithm:
The Merge Sort Algorithm is a comparison-based sorting algorithm that is based on the divide and conquers approach.

What is the Divide and Conquer Approach?
The divide and conquer approach means it will divide the input the array into sub-arrays and then further it divide the sub-arrays into sub-arrays until each sub-array contains a single element. Then each sub-arrays merge together in such a way that it will form a single sorted array.

How does the Merge Sort Algorithm work?
The Merge Sort Algorithm works as follows:
  1. Divide the unsorted array into n sub-arrays, each array containing a single element.
  2. Repeatedly merge the sub-arrays to produce a new sorted array until there is only 1 array remaining.
Note: The idea behind the merge sort is that it is going to merge two sorted arrays.

Let us understand this with an example. We have an input integer array having the elements as 38, 27, 43, 3, 9, 82, and 10. Let’s have a look at the following diagram which shows how the merge sort is work.
Merge Sort Algorithm in C#

Let us understand the step by step procedure to understand the merge with the example shown in the above image.

Step1: Dividing
In step1, we need to divide the array into two sub-arrays. Here the first sub-array will contain four elements (such as 38, 27, 43, and 3) and the other sub-array will contain 3 elements such as (9, 82, and 10).

The first subarray which contains 38, 27, 43, and 3 is further divided into two subarrays (38, 27) and (43, 3). The subarray which contains (38, 27) is further divided into (28) and (27). Similarly, the subarray which contains (43, 3) will be divided into subarrays (43) and (3). At this point, the division will stop as each sub-array contains a single element.

The second subarray which contains 9, 82, and 10 is further divided into two subarrays. One sub-array with two elements i.e. 9 and 82 and the other sub-array with a single element i.e. 10. Further, the subarray which contains (9, 82) is divided into (9) and (82). At this point as each sub-array contains a single element so the division will stop here.

Step2: Merge
At the end of step1, we have seven subarrays, and each one containing a single element in it. In step2, we need to merge the sub-arrays. The Subarrays (38) and (27) will merge together to form a sorted subarray i.e. (27, 38). Similarly, the other subarrays (43) and (3) will merge together to form sorted subarray (3, 43) and the subarrays (9) and (82) will merge together to form sorted subarray (9, 82). In this step, we will keep 10 as it is.

Now the sub-arrays (27, 38) and (43, 3) will merge together to form a sorted subarray i.e. (3, 27, 38, and 43). Similarly, the other two subarrays (9, 82) and 10 merge together to form a sorted subarray (i.e. 9, 10, and 82).

Now, we have two sub-arrays i.e. (3, 27, 38, and 43), and (9, 10, and 82) will merge together to finally produce the sorted array such as (3, 9, 10, 27, 38, 43, and 82).

Program to Implement Merge Sort in C#:
using System;
namespace LogicalPrograms
{
    class Program
    {
        static public void MergeMethod(int[] numbers, int left, int mid, int right)
        {
            int[] temp = new int[25];
            int i, left_end, num_elements, tmp_pos;
            left_end = (mid - 1);
            tmp_pos = left;
            num_elements = (right - left + 1);
            while ((left <= left_end) && (mid <= right))
            {
                if (numbers[left] <= numbers[mid])
                    temp[tmp_pos++] = numbers[left++];
                else
                    temp[tmp_pos++] = numbers[mid++];
            }
            while (left <= left_end)
                temp[tmp_pos++] = numbers[left++];
            while (mid <= right)
                temp[tmp_pos++] = numbers[mid++];
            for (i = 0; i < num_elements; i++)
            {
                numbers[right] = temp[right];
                right--;
            }
        }
        static public void SortMethod(int[] numbers, int left, int right)
        {
            int mid;
            if (right > left)
            {
                mid = (right + left) / 2;
                SortMethod(numbers, left, mid);
                SortMethod(numbers, (mid + 1), right);
                MergeMethod(numbers, left, (mid + 1), right);
            }
        }
        static void Main(string[] args)
        {
            int[] numbers = { 38, 27, 43, 3, 9, 82, 10 };
            int len = numbers.Length;
            Console.WriteLine("Before Merge Sort:");
            foreach(int item in numbers)
            {
                Console.Write(item + " ");
            }
            Console.WriteLine();
            Console.WriteLine("After Merge Sort");
            SortMethod(numbers, 0, len - 1);
            foreach (int item in numbers)
            {
                Console.Write(item + " ");
            }
            Console.Read();
        }
    }
}
Output:
Merge Sort Program in C#

Time Complexity of Merge Sort in C#:
The Merge Sort Algorithm is a recursive algorithm. The array of size N is divided into the maximum of logN parts, and the merging of all the subarrays into a single array takes O(N) time. Hence in all the three cases (worst, average, best), the time complexity of Merge sort is O(NLogN).

Algorithm for C# Merge Sort:
To sort the array A[1 .. n], make the initial call to the procedure MERGE-SORT (A, 1, n).

MERGE-SORT (A, p, r)
  1. IF p < r // Check for base case
  2. THEN q = FLOOR[(p + r)/2] // Divide step
  3. MERGE (A, p, q) // Conquer step.
  4. MERGE (A, q + 1, r) // Conquer step.
  5. MERGE (A, p, q, r) // Conquer step.
In the next article, I am going to discuss the Quick Sort in C# with examples. Here, in this article, I try to explain the Merge Sort in C# with example. I hope now you understood how Merge Sort Algorithm Works in C# to sort an unsorted array.

Summary:
I hope this post will be helpful to understand the concept of Merge Sort in C#
Please share this post with your friends and colleagues.
For any queries please post a comment below.
Happy Coding 😉
Read More
  • Share This:  
  •  Facebook
  •  Twitter
  •  Google+
  •  Stumble
  •  Digg

Bubble Sort in C#

 Admin     August 16, 2020     C#, Interview Question, Programming, Programs     No comments   

In this article, I am going to discuss the Bubble Sort in C# with Examples. The Bubble sort is a sorting algorithm and used by the many developers in real-time applications. You can use this algorithm with any type of collection such as an array, string, numbers, or characters.

The Bubble Sort Algorithm:
The Bubble Sort Algorithm works on the concept of iterating through the array from the first index to the last index and comparing it with the adjacent elements and then swapping the elements if they appear in the wrong order i.e. if the next element is smaller than the current element, they are swapped.

Pictorial Representation of Bubble Sort:
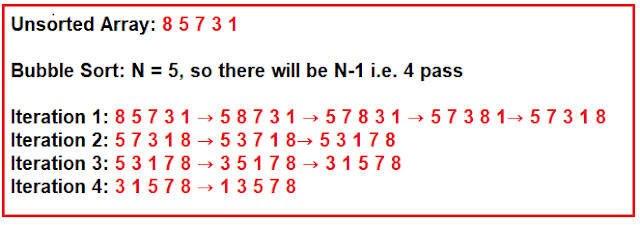
In order to sort an array, there will be n-1 passes where n is the number of elements in the array. For better understanding please have a look at the following diagram. Let us take an input array such as 8 5 7 3 1.
Bubble Sort in C#

As you can see in the above image we have an integer array with 5 elements such as 8 5 7 3 1.

Iteration1:
The bubble sort starts with the first two elements i.e. 8 and 5. As 5 is smaller than 8, so swap both of them. Now the list is 5 8 7 3 1. Again 7 is less than 8, so swap them which results as 5 7 8 3 1. Now, 3 is less than 8, so swap them which results in the sequence like 5 7 3 8 1. Finally 1 is less than 8, so swap them which concludes the iteration1 as 5 7 3 1 and 8.

Iteration2:
For iteration2 the sequence is 5 7 3 1 and 8. Here, the first 2 elements are 5 and 7. 7 is greater than 5, so no need to swap them. The 7 is compared with 3 and 3 is less than 7, so swap them which results in the sequences as 5 3 7 1 8. Then 1 is less than 7 so swap them which results in the sequence like 5 3 1 7 8.

Iteration3: For the iteration3, the sequence will be 5 3 1 7 8. Here, the first two elements are 5 and 3. 3 is less than 5, so swap them which results in the sequences as 3 5 1 7 and 8. Again 1 is less than 5, so swap them which concludes the iteration3 with the sequences as 3 1 5 7 and 8.

Iteration4:
This is the last iteration. This iteration starts with the sequence as 3 1 5 7 and 8. Here the first two elements are 3 and 1. 1 is less than 3, so swap them which results in the elements in the sorted order as 1 3 5 7 and 8.

Program to implement bubble sort in C#:
using System;
namespace LogicalPrograms
{
    class Program
    {
        static void Main(string[] args)
        {
            int count = 0;
            int[] intArray = new int[5];
            Console.WriteLine("Enter the Array Elements : ");
            for (int i = 0; i < intArray.Length; i++)
            {
                intArray[i] = int.Parse(Console.ReadLine());
            }
            //Sorting the array
            for (int j = 0; j <= intArray.Length - 2; j++)
            {
                //intArray.Length - 2
                for (int i = 0; i <= intArray.Length - 2; i++)
                {
                    count = count + 1;
                    if (intArray[i] > intArray[i + 1])
                    {
                        int temp = intArray[i + 1];
                        intArray[i + 1] = intArray[i];
                        intArray[i] = temp;
                    }
                }
            }
            Console.WriteLine("After Sorting Array :");
            foreach (int item in intArray)
            {
                Console.Write(item + " ");
            }
            Console.WriteLine();
            Console.WriteLine("The Loop iterates :" + count);
            Console.ReadKey();
        }
    }
}
Output:
Bubble Sort in C# with Example

As you can see the number of iterates is 16. You can improve the performance of the bubble sort by using a bool flag.

Performance Improvement in Bubble sort:
In the following example, we are using a flag variable.
using System;
namespace LogicalPrograms
{
    class Program
    {
        static void Main(string[] args)
        {
            int count = 0;
            int[] intArray = new int[5];
            Console.WriteLine("Enter the Array Elements : ");
            for (int i = 0; i < intArray.Length; i++)
            {
                intArray[i] = int.Parse(Console.ReadLine());
            }
            bool flag = true;
            for (int i = 1; (i <= (intArray.Length - 1)) && flag; i++)
            {
                flag = false;
                for (int j = 0; j < (intArray.Length - 1); j++)
                {
                    count = count + 1;
                    if (intArray[j + 1] > intArray[j])
                    {
                        int temp = intArray[j];
                        intArray[j] = intArray[j + 1];
                        intArray[j + 1] = temp;
                        flag = true;
                    }
                }
            }
            Console.WriteLine("After Sorting Array :");
            foreach (int item in intArray)
            {
                Console.Write(item + " ");
            }
            Console.WriteLine();
            Console.WriteLine("The Loop iterates :" + count);
            Console.ReadKey();
        }
    }
}
Output:
Performance Improvement in C# Bubble sort

Time Complexity of Bubble Sort:
In bubble sort, as we are iterating through the entire array for each element, the average and the worst-case complexity of bubble sort is O(n²).

Algorithm for Bubble Sort:

Procedure BubbleSort(DATA: list of sortable items)
N= DATA.Length
1. Set Flag: = True
2. Repeat Steps from 3 to 5 for I = 1 to N-1 while Flag == true
3. Set Flag:= False
4. Set J:=0. [Initialize pass pointer J]
5. Repeat while JDATA[J], then:
       Swap DATA[J] and DATA[J+1]
       Set Flag:= True
       [End of If structure]

       (b) Set J:=J+1
       [End of inner loop]
       [End of step 1 outer loop]

6. Exit
In the next article, I am going to discuss the Merge Sort Algorithm In C# with examples. Here, in this article, I try to explain the Bubble Sort in C# with example. I hope now you understood how bubble sort works in C# and I also hope you enjoy this article.

Summary:
I hope this post will be helpful to understand the concept of Bubble Sort in C#
Please share this post with your friends and colleagues.
For any queries please post a comment below.
Happy Coding 😉
Read More
  • Share This:  
  •  Facebook
  •  Twitter
  •  Google+
  •  Stumble
  •  Digg
Newer Posts Older Posts

Join us on Telegram

Loved Our Blog Posts? Subscribe To Get Updates Directly To Your Inbox

Like us on Facebook

Popular Posts

  • What is Dependency Injection(DI)
    Hi friends! Today we are going to learn about Dependency Injection and in our last session we have come across Static classes and where it s...
  • ASP.NET State Management
    State management is a technique or way to maintain / store the state of an Asp.Net controls, web page information, object/data, and user in ...
  • What is Abstract Class and When we should use Abstract Class
    Hi friends! In our previous sessions we have seen  Difference Between Class and Struct . And in our last session  we learnt Usability of Sec...
  • HTTP Client Message Handler in Web API
    In this article, I am going to discuss HTTP Client Message Handler in Web API with real-time examples. As we already discussed in HTTP Mes...
  • ASP.NET Web API Basic Authentication
    In this article, I am going to discuss how to implement the ASP.NET Web API Basic Authentication step by step with an example. Please read...
  • Views in ASP.NET Core MVC
    In this article, I am going to discuss Views in the ASP.NET Core MVC application. Please read our previous article before proceeding to th...
  • How to find the angle between hour and minute hands of a clock at any given time in C#
    In this article, I am going to discuss how to find the angle between the hour and minute hands of a clock at any given time in C# with an ...

Blog Archive

Contact Form

Name

Email *

Message *

Tags

.Net .Net Core .Net Core MVC Algorithm Angular Anonymous Types Asp.Net Asp.Net MVC Blazor C# Data Structure Database Design Patterns Entity Framework Entity Framework Core Filters Interview Question Management Studio Programming Programs SQL Server SSMS Web API

Copyright © C# Techtics | All Right Reserved.

Protected by Copyscape